My Experience!
Have you ever heard of Steam-dying yarn? I’ve always been intrigued by the Indie yarn dyers and the absolutely gorgeous yarn that they create. So, when I was at my Knitting Guild meeting last month, just imagine how thrilled I was to see that the presentation for that month was on how to dye yarn using things that you have in your kitchen. Our presenter did a great job and I was enthralled with what I was learning. Then, it was time for the door prize…and, I WON! She gifted me 200g of bare worsted weight 100% wool, Easter egg dye tablets and instructions so that I could dye my own hank. (Insert happy dance here!).

Today I decided to give Steam-dying yarn a try. I had tried with Kool-Aid before and enjoyed the process, as well as liking the results. But, Easter egg tablets?? The directions said to microwave the yarn as it dyes. However, my microwave is one of those crazy industrial strength ones that can cook something that’s supposed to take 10 minutes in 3 minutes. So, I was told that I could try steaming the yarn instead. I followed the directions (except for the microwave part) and took pictures along the way so that I could share the results with you. So….here we go! (By the way, if you want to see the Kool-Aid dying experience, I filmed it and you can see it by clicking HERE
Step 1
I gathered 1 quart of water and added 2 tablespoons of white vinegar to the water. Then soaked the yarn in a bag with the water & vinegar solution for 20 minutes. This allows the yarn to open up and say, “Hello dye! Welcome to my wool!”

Step 2:
While the wool was soaking in the bag, I crushed up the little Easter egg dye tablets. I was told that the best way to do that is to remove the tablets from the little, plastic casing. Then to insert one tablet it there and to smash it. I did a gentle smash with a hammer (I love anything that involves hammers!) and then emptied the contents on a piece of aluminum foil. Then, repeated the process again until all tabs had been smashed.
BIG TIP: Wear gloves!

Step 3:
After the wool finished soaking and the tablets were all smashed up to a powder, I lined a baking sheet with plastic wrap, unrolled the hank and placed the yarn on the baking sheet.

Step 4:
I sprinkled the powder on the yarn. I didn’t do a specific order, except for keeping the yellowish / orange close to the reds and blues (that way it makes more of an orange or green blend). Then, I gently flipped the yarn over so that I could get both sides with the dye.
Step 5:
Now we’re off to the steam bath…
I used my steaming basket and kept the heat on low once the water was steaming. Then I rolled the yarn up in the plastic wrap, put the yarn in the steam basket and covered the pot for 2 minutes. After the 2 minutes was up, I flipped the yarn, covered the pot and gave it another 2 minutes of steam.

Step 6
Let it rest for 5 minutes.
(Sorry, there really wasn’t any way to get a photo that looks flattering of this!)
Then put the wrapped wool back in the steam bath and repeated the process of 2 minutes with the steam, then flip and gave it another 2 minutes.

Step 7:
The hardest step of all….wait…for 10-20 minutes as it rests and cools. (This is when I’d cue up the Tom Petty song “The waiting is the hardest part!”)
After the wool has cooled, then you can carefully open the plastic wrap. Just be sure that you’re still wearing gloves, as this step can be a little messy.
I had a wire rack on top of my baking sheet to help with the potential messiness and it worked wonderfully.

Step 8:
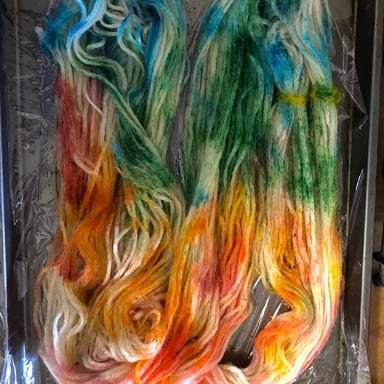
Admire the colors. Do all of your oooh’s and ahhhh’s as you amaze yourself with what you created. I especially love the blues and greens of this!
Step 9:
Rinse your wool very gently with cool water and a couple drops of dish soap. Unfortunately, I think I did something wrong. When I washed it, the majority of the color went with the water down the drain (insert the not-so-happy dance here). However, I’m kind of liking the pastel tones that I’m getting from this. This will be hung to dry and re-rolled back into a hank.
Step 10:
Admire the final, dried hank and dream up what you’d like to make with it. I’m thinking I may add it to some other yarn to make a hat or complement another color for a scarf or a cowl. What do you think? What would you make with it?

All in all, this was a great experience and I’ll definitely be dyeing more yarn in the future. I’ve heard that the acid dyes do a wonderful job. Since I used to make soap, that process doesn’t seem too intimidating. When I do it, I’ll let you know!
Stacy J
Subscribe on YouTube • Join me on Facebook • Follow on Instagram