Featured Friend – Meet Helen with Sunflower Cottage Crochet!

Hello and Happy Friday!! Are you ready to meet an amazing designer? I’m thrilled to be introducing you to Helen Wilkinson with Sunflower Cottage Crochet!

About Helen

Helen’s “mum tried to teach me how to knit when I was young, but it never stuck. In fact, knitting frustrated me. I think it was maybe because she was trying to teach me all the things at once – how to cast on, the stitches and reading patterns, which looked like gibberish to me without actually explaining how to read it. At 14, she showed me how to double crochet and away I went!

I actually started crocheting as a means to revise for my exams when I was around 14 years old. I loved history and factual lessons. Crocheting while revising historical facts and dates worked well for me. Watching what my hands were doing. I wasn’t tempted to review my notes to check if I was saying things correctly. I used to get annoyed with myself when I had to stop crocheting and check my dates and facts! That year I made A LOT of dc granny squares. I think there are about 6 blankets in my family that I made while revising!”

Helen’s journey as a designer

I asked Helen to tell me about her journey as a designer, “I have only been designing for just shy of 2 years. Sunflower Cottage Crochet is actually a partnership. Sara and I met whilst testing for another designer and we became firm friends. We actually have a lot in common! Sara wanted to dabble with the idea of becoming a designer and was encouraged to do a short pattern writing challenge. I tested that pattern for her – it was the Paige hat.

A couple more patterns followed and Sara asked me to join her as I had helped her work out some kinks and made some suggestions for her patterns. At the time, I had just designed my very first pattern – the Mixed Toffee Cowl (if you haven’t seen it, I urge you to check it out – it is still one of my favorites!). It wasn’t made to be a published pattern but was designed to help out another designer who was struggling with her group. As it happens, the Mixed Toffee Cowl was never used for that purpose, but still it took us a while to publish it as Sunflower because we were both so new to designing and nervous! Since then, we have never looked back.

What kind of patterns do you design?

We design patterns for you, your family and your home. In 2021 we are starting to look at more garments, which I am excited about. We also started the Preemie Crochet Challenge in 2020 and are busy organizing this year’s event now.

In 2 years, we have over 100 patterns published and a thriving Facebook community with our following growing at an awesome rate!”

“I kind of fell into designing when Sara asked me! Recently I had taken a career break from my government job and things were settling down at home. I was getting used to being at home and was starting to think about what I could do. So, Sara asked me at the right time and I figured why not? If you don’t try something, you will never know whether you can do it! For me, it is the ultimate work from home career! I’m located in the north east on England, UK. In fact, I am about 90 miles south of Edinburgh. I live right on the coast and absolutely love where I live. Sara, on the other hand, lives in Kansas, US! Fun fact, we work together but have never actually met in person! Perhaps once the travel restrictions are lifted, we can rectify that!”

How long have you been designing?

Helen has been designing for almost 2 years, “It’s amazing how many patterns have been released in that time and what we have achieved! But don’t be fooled if you are thinking about becoming a designer – only about 20% of it is designing, especially if you have a blog, YouTube channel and facebook groups too! It can also be quite a lonely profession if you let it. I am super lucky that I have always had Sara to talk to, bounce ideas off, and work with. I have also made some amazing designer friends as I have become more confident and become involved in more events. Most designers are so friendly and supportive. As a community, this is definitely one of the best if you are willing to go out there and meet people (even if it is usually online!)”

What inspires you to continue designing?

“At the moment I have so many ideas for patterns I would like to make. I like to try new things – whether that is stitches or techniques, and then challenge myself to create something with them. I am also going to challenge myself in 2021 with designing more garments, such as tees and sweaters. We have a cocoon cardigan which I designed and a couple of ponchos, but I am ready for the next step! The grading of garments and the maths for these has always put me off, but Susanna from Fosbas Designs and my Co-work crew have been so helpful and supportive I am excited to start!

I enjoy trying new stitch combo’s, playing with different types of yarn and love the feeling when a pattern is finally finished. I do get a little rush when I put out a testing call in our testers group and lots of people volunteer to test it! Most of all, I think one of my favorite parts is that I get to reach out to people all over the world and, for maybe a few minutes, be part of their world; whether I am helping them with a stitch, commenting on a picture of something they made using one of our designs or getting to know them more in our community group!”

What’s on the hook?

Currently Helen has “a couple of patterns in test at the minute and I am writing the pattern for another cocoon cardigan. I also have ideas drafted on paper or graph for a few other projects I want to do. Mainly, I’m finishing off the design ideas I had while I ponder the garment designs I want to make. I am waiting for some yarn from a couple of yarn companies who want me to design something with it for them, so that is exciting!”

Tips for a new crafter?

Helen’s biggest tip to share with a new crafter? “Do not compare yourself to other crafters! Everyone has a different crafting journey – maybe like my daughter; they learned Tunisian crochet before they could double crochet, or they only learn via video tutorials and cannot read written patterns and charts. Likewise, do not judge your beginning by someone else’s middle. Falling into the rabbit hole of comparing yourself to others is not a good place to be and should be avoided at all costs. I feel so passionately about this that I actually wrote a blog post titled ‘The Comparison Pitfall’. Be proud of what you craft whether you just started learning today or have been at it for a lifetime!”

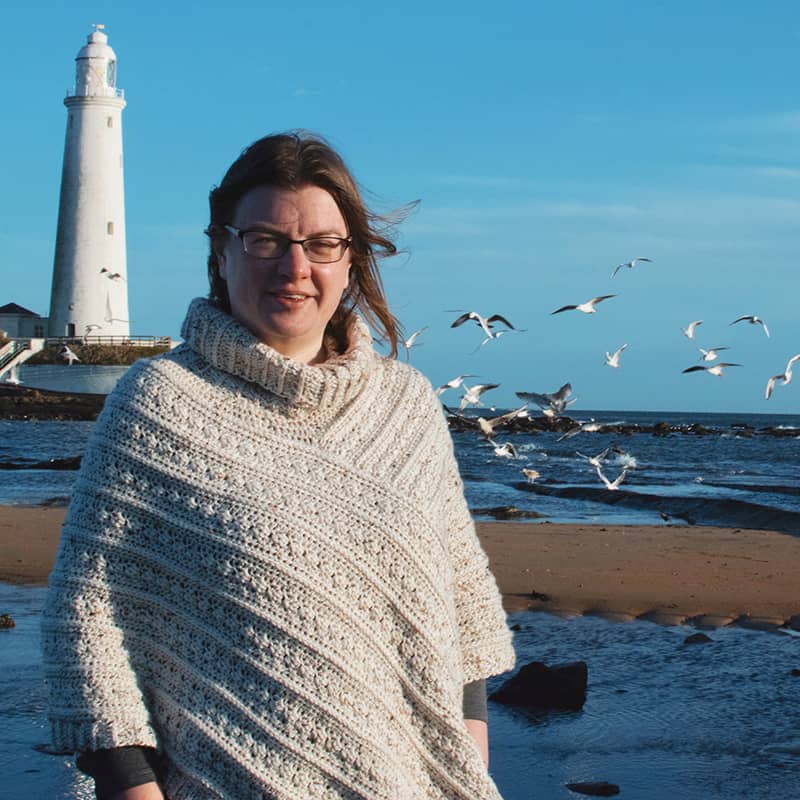
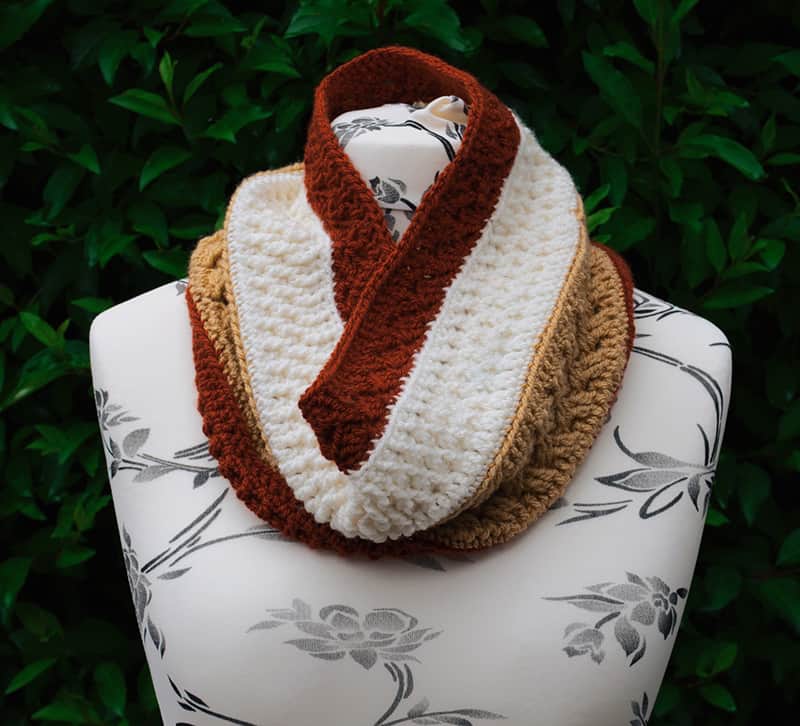
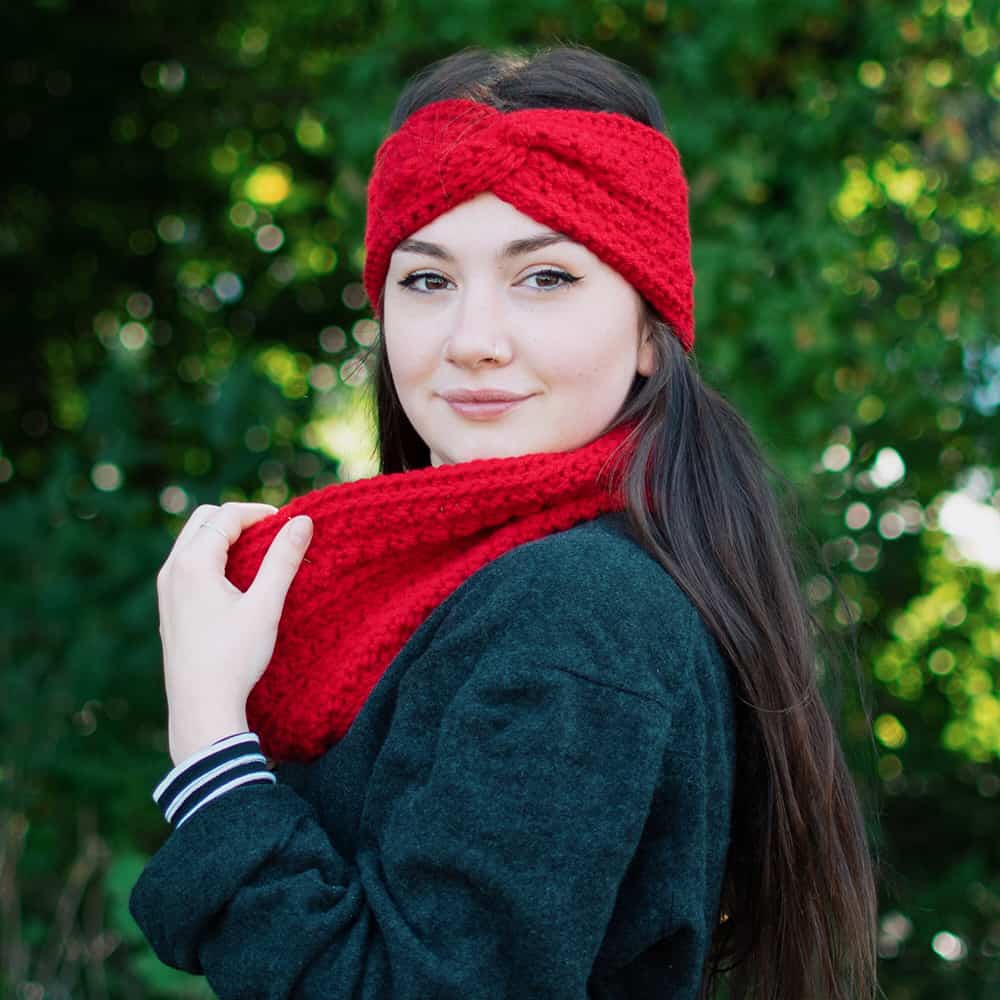
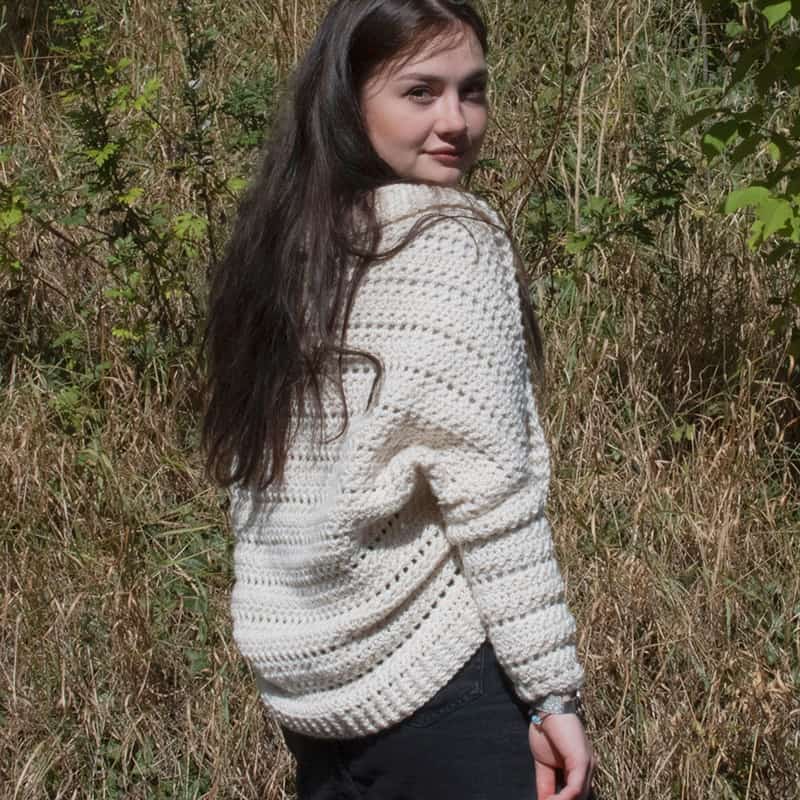
Helen has hand-picked a few crochet projects for you and is offering a very generous discount of 40% off Sunflower Cottage Crochet’s patterns on Ravelry, Etsy and their blog shop. Use the code STACYJ – but, do so soon, as the code expires on April 5th, 2021! Just click on any (or all!) of the images below to be directed to the pattern).

Some personal bits

Helen is married to “Richard, who is a workaholic, but I am immensely proud of what he has achieved. I do wish he would slow down a bit. We have had conversations about wanting to spend a good few years in retirement driving each other crazy! I worry that he works too hard sometimes; but he reminds me that in the last year I have put in more hours with Sunflower than he has at work. We have been married 7 years this year, but together for 22 (eek … it’s never been that long already!!). I have a daughter, Jorja, who is 9 and spent lockdown learning to crochet. She’s doing awesome at it and I am so proud of her.

My fur babies are most definitely my babies! We have a dalmatian called Holly who unfortunately is getting near her time. She’s an old girl at 12 ½ years old now and has DCM which is progressing. Hugo is our 2 year old great dane and just the gentlest, cheekiest chappie you could ever wish for! In January we also had a young Horsfield tortoise join our family – I have always wanted a tortoise. You can’t tell the gender of a tortoise until they are about 4 years old, so for another 3 years he (I really think he is a he) is called Joey until we know whether it should be Harry or Hermione!”

Helen’s other hobbies

In addition to crochet, Helen has some other hobbies, as well. “Before Sunflower I had so many hobbies – now I don’t have much time for them, although I am trying to carve time out for them again. I love to read. Phillippa Gregory, John Grisham, Karin Slaughter are some of my favourite authors. I recently read the Tattooist of Auschwitz, which was a book that had been on my shelf for over a year while I mentally prepared to read it. It was soo good that I have bought the follow up book about Cilka to read!

I also love to quilt and sew. When Jorja was younger she used to beg me to make her dresses but they had to be ‘spinney dresses’ which meant that my 3, 4, 5, and 6 year old had 2 width of fabric piece in each skirt part of her dresses! That made ironing so much more of a chore lol. Then my friends started asking me to teach them to sew and make dresses for their girls.”

Check out more Sunflower Cottage Crochet designs

To see more of Helen and Sara’s designs, please visit them at the links below and show them some love:

1. Website (Be sure to sign up for the newsletter – It’s lovely!) www.sunflowercottagecrochet.com

2. Facebook: https://www.facebook.com/SunflowerCottageCrochet

3. Community Facebook group is: https://www.facebook.com/groups/851570451884519

4. Instagram: www.instagram.com/sunflower.cottage.crochet.too

5. YouTube: https://www.youtube.com/channel/UC99X9Pzmt4M6qx67aU5lrPg

6. Ravelry: https://www.ravelry.com/designers/sunflower-cottage-crochet

7. Pinterest: https://www.pinterest.co.uk/sunflowercottagecrochet/_created/

8. Etsy: https://www.etsy.com/shop/SunflowerCottageCo

Thank you so much for stopping by to learn about Helen and Sunflower Cottage Crochet. I do hope you’ll take her up on her offer of 40% off and visit her socials and website. Hoping that you have a fabulous weekend with lots and lots of yarn.

Stacy J

Subscribe on YouTubeJoin me on FacebookFollow on Instagram

Patterns on RavelryInspiration on Pinterest

Lacy Fan and V Stitch

The Lacy Fan and V Stitch Pattern is a super beautiful lace crochet stitch that is actually quite simple. This stitch is very similar to the Fan and V stitch, except it’s lacy! It’s light, airy and would absolutely gorgeous as a lightweight cardigan, a shawl or even a light throw.

Below you will find the written instructions for the Lacy Fan and V Stitch, as well as a pin to save to your boards. Enjoy!


Difficulty Level:

Easy-ish

Stitches & Abbreviations Used:

Stitch pattern is written in US terminology

Ch: Chain

Sc: Single Crochet

Dc: Double Crochet

Sk: Skip

Tch: Turning Chain

Rep: Repeat

Pin of crocheted Lacy Fan and V stitch from Handmade by Stacy J
Here’s a pin for your Pinterest board 🙂

Directions for the Lacy Fan and V Stitch

Stitch is worked in multiples of 8+6 (+3 for the base chain)

For the YouTube video, I chained 25 and for the green lace sample in the pictures that uses fingering weight yarn, I chained 41.

1: In 6th ch from hook, work *7 dc in same ch, sk 2 ch, 1 sc in next ch, ch 3, sk 1 ch, sc in next ch, sk 2 ch; rep * until 6 ch remain, work 7 dc in next ch, sk 2 ch, 1 dc in last ch; turn.

2: Ch 5, in 4th dc of 7-dc cluster from row 1 work 1 sc, *ch 3, in ch-2 space work (1 dc, ch 2, 1 dc), ch 3, in 4th dc of 7-dc cluster from row 1 work 1 sc; rep * across ending with ch 2, 1 dc in tch; then turn.

3: Ch 2, 2 dc in first st, r sc in ch-sp below, *ch 3, 1 sc in ch-3 sp, 7 dc in in ch-2 sp, 1 sc in ch-3 sp; rep * across ending with ch 3, 1 sc in ch-3 sp, 3 dc in first ch of tch; then turn

4: Ch 4, in ch-3 sp work (1 dc, ch 2, 1 dc), *ch 3, 1 sc in 4th dc of 7-dc cluster, ch 3, in ch-3 sp work (1 dc, ch 2, 1 dc); rep * across ending with ch 2, 1 dc in tch; then turn

5: Ch 2, *7 dc in ch-2 sp, 1 sc in ch-3 sp, ch 3, 1 sc in ch-3 sp; rep * ending with 7 dc in ch-2 sp, 1 dc in tch; then turn

Rep rows 2-5 until you reach the desired length.


Here’s the link to the video for you: https://youtu.be/GtOW36Sra5c

I hope you’ve enjoyed this stitch for the week and I’d love to see what you make! Please tag me @handmadebystacyj and #handmadebystacyj and thank you for joining me on our yarny adventures. Happy crocheting!

Stacy J

YouTubeFacebookInstagramRavelryPinterest


Zigzag Eyelet Lace Stitch

The Zigzag Eyelet Lace Stitch written directions can be used with the video tutorial on the “Handmade by Stacy J” YouTube channel. This is a stitch that requires a little concentration, however the chart that accompanies the written directions will make it easier for you. The Zigzag Eyelet Lace stitch pattern in worked in multiples of 11 over 12 rows with a background of Stockinette Stitch.

Disclosure: If you choose to purchase from any of the links that I have on this tutorial, you are allowing me to continue providing free tutorials by letting the companies that I am affiliated with pay me a small commission. Thank you for your support!

Difficulty level:

Easy

Stitches used:

Knit (k)

Purl (p)

Knit 2 Together (k2tog)

Slip a stitch knitwise, knit 1, pass the slipped stitch over (Sl1, k1, psso)

Yarn over (yo)

Materials Needed:

Paintbox Yarns – Simply DK (100% Acrylic; 100g / 3.5oz; Light #3 weight); Color #136 Dolphin Blue

KnitPicks Straight Knitting needles, size 6 (4.00 mm)

Works in multiples of 11 sts over 12 rows with background of Stockinette Stitch – For the sample in the YouTube video, I cast on 21


Pin of Zigzag lace panel from Handmade by Stacy J
Here’s a pin for you Pinterest board 🙂

Directions for Zigzag Lace Panel

For lace panel section only

  • 1 (RS): K6, yo, sl1, k1, psso, k3. (11 sts)
  • 2 and all WS rows: Purl.
  • 3: K7, yo, sl1, k1, psso, k2.
  • 5: K3, k2tog, yo, k3, yo, sl1, k1, psso, k1.
  • 7: K2, k2tog, yo, k5, yo, sl1, k1, psso.
  • 9: K1, k2tog, yo, k8.
  • 11: K2tog, yo, k9.
  • 12: Purl

Rep rows 1-12 until desired length is reached.


Chart of Zigzag Lace Panel from Handmade by Stacy J

Here is the link to the video tutorial for you: https://youtu.be/bs2pyyZUxEo

If you prefer a printable pdf, here is one to download:

 Zigzag-Eyelet-Lace-Tutorial

I do hope that enjoy this stitch and it finds a way into your knitting repertoire. Thank you so much for joining me on our yarny adventures. Happy Knitting and I’ll see you soon!

Stacy J

Subscribe on YouTubeJoin me on FacebookFollow on Instagram

Patterns on Ravelry Inspiration on Pinterest

Diamond Shells Lace

The Diamond Shells Lace Stitch is such a beautiful crochet lace that is light and airy, plus it works up very quickly! The Diamond Shells Lace stitch uses only a few stitches and a four row repeat. Below is the written directions, as well as the link to the video tutorial. And, if you enjoy this stitch tutorial, please consider subscribing to my newsletter and my YouTube channel.

Also, my friend Kris with Krissy’s Over the Mountain Crochet has a lovely pattern that she designed using this stitch. To check her pattern out, click here!

Disclosure: This post contains affiliate links. By purchasing through my link, you are allowing the company to pay me a small commission at no additional cost to you. This allows me to continue making free content. Thank you for your support!

Difficulty Level:

Easy

Materials Used in Tutorial:

Stitches and Abbreviations Used:

Directions are written using US terminology

Ch: Chain

Dc: Double Crochet

Hdc: Half Double Crochet

Rep: Repeat

Sc: Single Crochet

Sk: Skip

Pin of Diamond Shells Lace crochet stitch from Handmade by Stacy J
Here’s a pin for your Pinterest board 🙂

Special Stitches Used

Sh: Shell – [2 dc, ch 3, 2 dc] in same stitch or space indicated

HdcV: Half Double V – [1 hdc, ch 1, 1 hdc] in same stitch or space indicated


Directions for Diamond Shells Lace:

Stitch works in multiples of 10 + 12

1 (RS): Sc in second ch from hook and next ch, *sk 3 ch, work Sh in next ch, sk 3 ch, sc in next ch, ch 1, sk 1 ch, sc in next ch, rep from * to last 9 ch, sk 3 ch, Sh in next ch, sk 3 ch, sc in last 2 ch, then turn.

Step 1 of Diamond Shells Lace crochet stitch
Row 1

2: Ch 2, hdc in first sc, *ch 3, sc in ch-3 sp of Sh, ch 3, HdcV in ch-1 sp between 2 sc, rep from * to last Sh, ch 3, sc in ch-3 sp of Sh, ch 3, 2 hdc in last sc, then turn.

Step 2 of Diamond Shells Lace crochet stitch
Row 2

3: Ch 4, 2 dc in first hdc, *sc in ch-3 sp, ch 1, sc in next ch-3 sp, Sh in ch-1 sp between HdcV, rep from * to last 2 ch-3 sps, sc in ch-3 sp, ch 1, sc in next ch-3 sp, [2 dc, ch 1, dc] in beg ch-2, then turn.

Step 3 of Diamond Shells Lace crochet stitch
Row 3

4: Ch 1, sc in first dc, *ch 3, HdcV in ch-1 sp between 2 sc, ch 3, sc in ch-3 sp of Sh, rep from * to last ch-1 sp between 2 sc, ch 3, HdcV in ch-1 sp, ch 3, sc in beg ch-4 sp, then turn.

Step 4 of Diamond Shells Lace crochet stitch
Row 4

5: Ch 1, sc in first sc and in ch-3 sp, *Sh in ch-1 sp between 2 hdc, sc in next ch-3 sp, ch 1, sc in next ch-3 sp, rep from * to last ch-1 sp between HdcV, Sh in last ch-1 sp, sc in ch-3 sp, sc in last sc, then turn.

Step 5 of Diamond Shells Lace crochet stitch
Row 5

Rep rows 2-5 to reach desired length


Here is the link to the video tutorial for you: https://youtu.be/yqJlAKM-xww

I hope you have a lovely day and Happy Crocheting!

Stacy J

YouTubeFacebookInstagramRavelryPinterest

Checkerboard Lace

The Checkerboard Lace Stitch Pattern is a stitch pattern that requires a little concentration. However, the chart that accompanies the written directions will make it easier for you. The Checkerboard Lace stitch pattern in worked in multiples of 10 + 4 over 20 rows. Written directions are below, as well as a chart and a link to the video tutorial.

Disclosure: If you choose to purchase from any of the links that I have on this tutorial, you are allowing me to continue providing free tutorials by letting the companies that I am affiliated with pay me a small commission. Thank you for your support!

Difficulty level:

Intermediate

Stitches used:

Knit (k)

Purl (p)

Knit 2 Together (k2tog)

Slip slip knit (ssk)

Yarn over (yo)

Pin of Checkerboard Lace Stitch Pattern from Handmade by Stacy J
Here’s a pin for your Pinterest board 🙂

Materials Needed:

Paintbox Yarns – Simply DK (100% Acrylic; 100g / 3.5oz; Light #3 weight); Color #136 Dolphin Blue

KnitPicks Straight Knitting needles, size 6 (4.00 mm)


Directions for Checkerboard Lace Stitch Pattern

Works in multiples of 10 sts + 4

For the sample in the YouTube video, I cast on 24

1 (WS) and all WS rows: Purl across

2 (RS): K4, *Yo, ssk, k1, [k2tog, yo] × 2, k3; rep * to end.

4: K3, *[Yo, ssk] × 2, k1, k2tog, yo, k3; rep from * to last st, k1.

6: K2, *[Yo, ssk] × 3, k4; rep * to last 2 sts, yo, ssk.

8: K1, *[Yo, ssk] × 4, k2; rep * to last 3 sts, yo, ssk, k1.

10: Repeat row 6.

12: Repeat row 4.

14: Repeat row 2.

16: K2tog, yo, *k4, [k2tog, yo] × 3; rep * to last 2 sts, k2.

18: K1, k2tog, yo, *k2, [k2tog, yo] × 4; rep * to last st, k1

20: Repeat row 16.

Rep rows 1-20 until desired length is reached, binding off as pattern.

Chart showing how to knit the Checkerboard Lace Stitch Pattern from Handmade by Stacy J

Here’s the link to the video tutorial for you: https://youtu.be/peCBZIKZxl0

I do hope you found this tutorial helpful. If you have any stitches are that giving you fits, please feel free to email me with your suggestions – I absolutely love making tutorials from requests. Also, please remember to tag me @handmadebystacyj with your makes!

Stacy J

Subscribe on YouTubeJoin me on FacebookFollow on Instagram

Patterns on RavelryInspiration on Pinterest

Fan and V Stitch

The Fan and V Stitch is a fairly simple crochet pattern that works over a 4 row repeat. The Fan and V Stitch would look great as a shawl, wrap or even a blanket. I’m so happy to be able to show you step by step how to create this beautiful stitch pattern.

Don’t forget to subscribe to my YouTube channel, as I upload new videos regularly: https://m.youtube.com/channel/UCS79P_gCKa7kOKbfGtsx4tA

Disclosure: This post contains affiliate links. As an affiliate, when you purchase through my links, you allow the company to pay me a small commission without costing you a penny more, which allows me to continue making free content. Thank you for your support!

The crochet hook used is my absolute favorite hook. It’s the Furls Odyssey in Turquoise; however, they now have a bunch of colors that I love! The yarn is also lovely! It’s a super soft, inexpensive and absolutely lovely yarn that I just love, as well (Oh, and it rarely splits!). So much so that I became an affiliate with the Furls company and LoveCrafts. What that means for you is that when you purchase using my link, you allow the company to pay me a small commission without costing you a penny more. This helps me to continue making free tutorials and patterns. Below are the links if you’d like to check them out for yourself:

Image of Furls crochet hooks

Furls Crochet Hook

Yarn: Paintbox Simply DK – https://www.lovecrafts.com?utm_medium=affiliate&a_aid=eccf469a

Difficulty level:

Intermediate


Stitches and Abbreviations used:

Directions are written using US terminology

Ch: Chain

Dc: Double Crochet

Rep: Repeat

Sc: Single Crochet

Sl st: Slip Stitch

Pin of Fan and V stitch from Handmade by Stacy J
Here’s a pin for your Pinterest board 🙂

Special Stitch Used:

V Stitch: Work [1 dc, ch 1, 1 dc] in same st


Notes:

Stitch is worked in increments of 8 + 1 (+1 for the base chain)

Ch-3 at the beginning of row counts as a dc


Directions for the Fan and V Stitch:

1 (RS): 1 sc in second ch from hook, *sk 3 chs, work 9 dc in next ch, sk 3 chs, work 1 sc in next ch; rep * across, ending with 1 sc in last ch, turn

2 (RS): Ch 3, 1 dc in same st, *ch 5, sk 9 dc cluster, work V stitch in next sc,; rep from * ending with ch 5, sk 9 dc cluster, work 2 dc in last sc, turn.

3: Ch 3, 4 dc in same st, *working over ch-5, work 1 sc in 5th dc in 9dc cluster from row below, 9 dc in ch-sp at center of V stitch; rep across ending with 5 dc in top of turning ch, turn.

4: Ch 3, sk 5 dc, V stitch in next sc, *ch 5, sk 9dc cluster, V stitch into next sc; rep from * across ending with ch 2, sl st to top of turning ch, turn

5: Ch 1, 1 sc in same st, 9 dc into ch-sp in center of V stitch from row below, work 1 sc in 5th dc from row below working over the ch-5; rep from * ending with 1 sc in first ch of turning ch, turn

Repeat rows 2 & 5 until you reach desired length.

If you would like the scalloped edge, you can end when you finish a RS row.

For straighter edge, end with a WS row, working ch 3, 1 dc in same st, *ch 2, sl st to 5th dc in 9dc cluster from row below, ch 2, work V st in sc from row below; rep * across ending with ch 2, 2 dc in last sc from previous row.


Here is the link to the video for you: https://youtu.be/jJqklSEzs8Y

I hope you enjoy this stitch – I know I do!

Happy crocheting and thank you for joining me!

Stacy

YouTubeFacebookInstagramRavelryPinterest

Chinese Lace Stitch

Chinese Lace is a beautiful lace stitch that is worked over 12 stitches and 24 rows. I have been intrigued by this pattern for as long as I’ve been knitting and decided to jump in and learn it. Then, a tutorial was born because I just HAD to share it with you!

This pattern does require concentration, but once you get the hang of it, it isn’t very difficult. Please join me as I show you how to create this beautiful lace pattern with step by step instructions.

For your reference, written directions and chart are below. There is also a video tutorial link for you to view for this stitch that is available at the box below and at the bottom of this post.

Disclosure: This post contains affiliate links. As an affiliate, when you purchase through my links, you allow the company to pay me a small commission without costing you a penny more, which allows me to continue making free content. Thank you for your support!

Difficulty level:

Intermediate / Advanced

Stitches used:

K: Knit

K2tog: Knit 2 stitches together

P: Purl

P2tog: Purl 2 stitches together

Yo: Yarn Over

Ssk: Slip slip knit

Ssp: Slip slip purl


Pin of knitted Chinese Lace from Handmade by Stacy J
Here’s a pin for your Pinterest board 🙂

Materials Needed:

Paintbox Yarns – Simply DK (100% Acrylic; 100g / 3.5oz; Light #3 weight); Color #143 Raspberry Pink

KnitPicks Straight Knitting needles, size 6 (4.00 mm)


Directions for Chinese Lace

For the sample in the video, I cast on 39 stitches.

Note: This is stitch pattern is worked flat.

1 (RS): P1, k1, p1, *ssk, k7, yo, p1, k1, p1; rep from * to end

2 (WS): K1, p1, k1, *p1, yo, p6, ssp, k1, p1, k1; rep from * to end.

3: P1, k1, p1, *ssk, k5, yo, k2, p1, k1, p1; rep from * to end.

4: K1, p1, k1, *p3, yo, p4, ssp, k1, p1, k1; rep from * to end.

5: P1, k1, p1, *k3, k2tog, k4, yo, p1, k1, p1; rep from * to end.

6: K1, p1, k1, *p1, yo, p4, p2tog, p2, k1, p1, k1; rep from * to end.

7: P1, k1, p1, *k1, k2tog, k4, yo, k2, p1, k1, p1; rep from * to end.

8: K1, p1, k1, *p3, yo, p4, p2tog, k1, p1, k1; rep from * to end.

9:P1, k1, p1, *yo, k3, k2tog, k4, p1, k1, p1; rep from * to end.

10: K1, p1, k1, *p4, p2tog, p2, yo, [p1, k1] twice; rep from * to end.

11: P1, k1, p1, *k2, yo, k1, k2tog, k4, p1, k1, p1; rep from * to end.

12: K1, p1, k1, *p4, p2tog, yo, p3, k1, p1, k1; rep from * to end.

13: P1, k1, p1, *yo, k7, k2tog, p1, k1, p1; rep from * to end.

14: K1, p1, k1, *p2tog, p6, yo, [p1, k1] twice; rep from * to end.

15: P1, k1, p1, *k2, yo, k5, k2tog, p1, k1, p1; rep from * to end.

16: K1, p1, k1, *p2tog, p4, yo, p3, k1, p1, k1; rep from * to end.

17: P1, k1, p1, *yo, k4, ssk, k3, p1, k1, p1; rep from * to end.

18: K1, p1, k1, *p2, ssp, p4, yo, [p1, k1] twice; rep from * to end.

19: P1, k1, p1, *k2, yo, k4, ssk, [k1, p1] twice; rep from * to end.

20: K1, p1, k1, *ssp, p4, yo, p3, k1, p1, k1; rep from * to end.

21: P1, k1, p1, *k4, ssk, k3, yo, p1, k1, p1; rep from * to end.

22: K1, p1, k1, *p1, yo, p2, ssp, p4, k1, p1, k1; rep from * to end.

23: P1, k1, p1, *k4, ssk, k1, yo, k2, p1, k1, p1; rep from * to end.

24: K1, p1, k1, *p3, yo, ssp, p4, k1, p1, k1; rep from * to end.

Rep rows 1-24 until desired length is reached then end by binding off as pattern.


In case you missed it at the top, here’s the video tutorial for you: https://youtu.be/gxBNsaYs-vs

I hope you’ve enjoyed learning this stitch as much as I did! And, as always, thank you so much for supporting me on my yarny journeys! Please remember to tag me @handmadebystacyj so that I can see your makes – I love seeing them!

Stacy J

Subscribe on YouTubeJoin me on FacebookFollow on Instagram

Patterns on RavelryInspiration on Pinterest

Twist and Cross Stitch Pattern

The Twist and Cross Stitch Pattern is a very simple crochet pattern that works over a 2 row repeat. The double crochet segments are framed on the sides with a really fun, little twisty column. Join me as I show you step by step how to create this beautiful stitch pattern.

The crochet hook used is my absolute favorite hook. It’s the Furls Odyssey in Turquoise; however, they now have a bunch of colors that I love! The yarn is also lovely! It’s a super soft, inexpensive and absolutely lovely yarn that I just love, as well (Oh, and it rarely splits!). So much so that I became an affiliate with the Furls company and LoveCrafts. What that means for you is that when you purchase using my link, you allow the company to pay me a small commission without costing you a penny more. This helps me to continue making free tutorials and patterns. Here is the link if you’d like to check them out for yourself:

Furls Crochet Hook:

Yarn: Paintbox Simply DK – https://www.lovecrafts.com?utm_medium=affiliate&a_aid=eccf469a

———

Difficulty level:

Easy

Terms and Abbreviations used:

Directions are written using US terminology

Ch: Chain

Dc: Double Crochet

FpDc: Front Post Double Crochet

Rep: Repeat

Sk: Skip

St (s): Stitch (es)


Pin of Twist and Cross Stitch Pattern from Handmade by Stacy J
Here’s a pin for your Pinterest board 🙂

Notes:

Instead of working a ch-3 at the beginning of row, instead try using the Chainless Starting Double Crochet.

Directions for the Twist and Cross Stitch Pattern

Ch a multiple of 9 + 3 chains

1 (WS): Dc in 4th ch from hook (the 3 skipped sts count as a dc) and in next ch, ch 1, *sk next ch, dc in each of the next 2 ch, ch 1, sk next ch, dc in ea of next 5 chs, ch 1, sk next ch, dc in ea of next 2 chs, ch 1; rep * to last 4 chs, sk next ch, dc in ea of the last 3 chs, turn.

2 (RS): Ch 3 (or work a Chainless Starting Double Crochet), dc in ea of next 2 sts, ch 1, sk next ch and dc, work FpDc around post of next dc, working in front of FpDc just made, work Fpdc around skipped dc, ch 1, *1 dc in ea of the next 5 sts, ch 1, sk next ch and dc, work FpDc around post of next dc, working in front of FpDc just made, work Fpdc around skipped dc, ch 1; rep * to last 3 sts, dc in last 2 sts and top of turning ch, turn.

3: Ch 3 (or working Chainless Starting Double Crochet), 1 dc in ea of next 2 sts, ch 1, dc in ea of the FpDc, ch 1, *1 dc in ea of next 5 sts, ch 1, dc in ea of the FpDc, ch 1; rep * to last 3 dc, 1 dc in ea of last 3 sts.

Repeat rows 2 & 3 until you reach desired length.


Here is the video tutorial for you: https://youtu.be/8r9XalISbdc

To access the pdf of this stitch, simply click on the button below.

 Twist-Cross-Crochet-Stitch

As always, I sincerely thank you for your support in our yarny adventures and hope that you’ll join me soon for another tutorial.

Thanks!!

Stacy J

YouTubeFacebookInstagramRavelryPinterest

Double Seed Stitch

Also known as the Moss Stitch

The Double Seed Stitch is a very simple, beginner friendly stitch that is worked over 2 stitches and 4 rows using only knits and purls. This stitch is also knows as the Moss stitch. Join me as I show you step by step how to create the Double Seed Stitch, a super easy and beautiful stitch.

Below you will find the written directions with a chart, as well as the video tutorial. If you’d like to save this idea for later, there’s a pin for you, as well 🙂

Disclosure: This post contains links for companies that I am an affiliate for. By purchasing through those links you continue to allow me to provide free tutorials by allowing the company to pay me a small commission. Thank you for your support!

Difficulty level:

Easy / Beginner

Stitches used:

K: Knit

P: Purl


Double Seed Stitch Pin from Handmade by Stacy J
Here’s a pin for your Pinterest board 🙂

Materials Needed:

Paintbox Yarns – Simply DK (100% Acrylic; 100g / 3.5oz; Light #3 weight); Color #142 Tea Rose

KnitPicks Straight Knitting needles, size 6 (4.00 mm)

Directions for Double Seed Stitch

For the sample in the YouTube video, I cast on 15

1 (RS): K1, *p1, k1; rep from * to end

2 (WS): P1, *k1, p1; rep from * to end

3: Rep row 2

4: Rep row 1

Rep rows 1-4 until desired length is reached, binding off as pattern.

Chart of the Double Seed Stitch from Handmade by Stacy J

Here’s the video tutorial for you: https://youtu.be/9nsbwhi5YhA

If you would like a pdf, you can download that below.

Thanks again for visiting! I’m so grateful to have you joining on our yarny adventures.

Stacy J

Subscribe on YouTubeJoin me on FacebookFollow on Instagram

Patterns on RavelryInspiration on Pinterest

Cable Crochet Stitch

The Cable Crochet Stitch is such a beautiful, lacy and fairly simple stitch once you get the hang of it. It involves yarn overs, single crochet and a 2 row repeat. The Cable Crochet Stitch pattern is worked over multiples of 6+2

Disclosure: The yarn and hook used are some of my absolute favorites. So much so that I became an affiliate with the companies. What that means for you is that when you purchase using my link, you allow the company to pay me a small commission without costing you a penny more. This helps me to continue making free tutorials and patterns. The links are below with the Materials Needed if you’d like to check them out.

Difficulty level:

Intermediate

Terms and Abbreviations used:

Directions are written using US terminology

Ch: Chain

Rep: Repeat

Sc: Single Crochet

Sk: Skip

St (s): Stitch (es)

Tch: Turning chain

X: Times (example: 2x means 2 times)

Yo: Yarn Over 


Pin of the Cable crochet stitch from Handmade by Stacy J
Here’s a pin for your Pinterest board 🙂

Materials Needed:

Paintbox Yarns – Simply DK (100% Acrylic; 100g / 3.5oz; Light #3 weight); Color #142 Tea Rose

Crochet Hook Size G (4 mm) If you love Furls, here’s a link 🙂

Notes: Ch-1 at beginning of sc row does not count as a st.

Directions for the Cable Crochet Stitch:

(For YouTube sample, I chained 26)

1: Ch 1 (does not count as st), sc across.

2: Ch 7, sk 3 sts, *yo 5x, insert hook in next st, (yo, draw through 2 loops) 6x; rep *2x. Yo 5x and insert in first skipped st (there are 3 sts between tch and first st made in row 2). Work *in ea of the 3 skipped stitches. Continue working in this pattern across the row. In last st, yo 4 times, insert hook in top of last st and (yo, draw through 2 loops) 5x. Turn.

3: Ch 1, work 1 sc in same st and in ea st across. Turn.

Repeat rows 2 & 3 until desired length.


I did my best to create a chart to help along with this stitch and the video tutorial is below:

Cable crochet stitch chart from Handmade by Stacy J

Here’s the video tutorial for you: https://youtu.be/EN729A-Cyqg

If you’d like a pdf of this stitch, you can download the file below:

 
    Cable-Crochet-Tutorial
 

I’d love to see what you make with this stitch, as it’s absolutely gorgeous. Please tag me on social media @handmadebystacyj

As always, thank you so much for visiting and supporting me on our yarny adventures.

Stacy J

YouTubeFacebookInstagramRavelryPinterest