The Crossed Front Post Double Crochet Columns stitch pattern is a lovely (and easy) stitch to learn. The chain space between the columns offer a touch of lace, while the double crochet panels between the columns offer stability and a denser fabric. This stitch is worked in stitch multiples of 9 + 3 chains over a 2 row repeat.
Disclosure: This post contains affiliate links. That means that I may receive compensation when you purchase through my links at no additional cost to you. I am a King Cole Brand Ambassador and this post is part of our ongoing collaboration. Thank you for your support!
The Three-and-two stitch is a very simple crochet stitch to learn; so easy that a beginner could master it! It’s slightly lacy and airy, yet has enough density to offer warmth. The Three-and-two stitch works over a two-row repeat and only uses double crochet and chains, making it a very easy pattern to memorize. This would be a beautiful stitch to use for a scarf or as an accent for a pull over or wrap.
Disclosure: This post contains affiliate links. That means that I may receive compensation when you purchase through my links at no additional cost to you. Thank you for your support!
The Wrapped Columns crochet stitch is a very simple and fun crochet stitch to learn. The columns in the stitch are wrapped with yarn overs around the post of the double crochet, creating an interesting look.
This stitch is a combination of double crochet, chains and yarn overs. It creates a wonderful fabric and, as a result, works up very quickly, too!
The Wrapped Columns crochet stitch is a beginner friendly stitch that be wonderful for a fun accent to a garment, a shawl or a scarf!
Disclosure: This post contains affiliate links; I am an affiliate with these companies and highly recommend them. As an affiliate, when you purchase from those links, you allow the companies to pay me a small commission. This doesn’t cost you any more, and allows me to making free content. Thank you for your support!
To see a video tutorial of the Wrapped Columns crochet stitch, click on the video above or you can also clickHERE.
For the tutorial, I used King Cole “Baby Superball DK” yarn in the color “Silver”. To find your local store that stocks King Cole yarns, here is the stockist finder link.
If you’re looking for your next favorite hook, click HEREto check out Furls!
Stitches and abbreviations used:
Pattern is written in US terms
Ch: Chain
Dc: Double crochet
Ea: Each
Rem: Remaining
Rep: Repeat
RS: Right Side
Sk: Skip
Sp: Space
St(s): Stitch (es)
Tch: Turning Chain
WS: Wrong Side
Yo: Yarn over
Special stitch:
FP Puff St: Front Post Puff Stitch – [Yo once, insert hook from front to back around post of indicated stitch, Yo and pull up a loop] three times, Yo and draw through all 7 loops on hook.
Here’s a pin to add to your Pinterest board 🙂
Notes:
Ch-3 at beg of row counts as first dc
Ch-4 at beg of row counts as first dc and ch 1
Directions for the Wrapped Columns crochet stitch
Stitch works in multiples of 4 + 1 (+ 2 for the base chain)
1 (RS): Work 1 dc in fourth ch from hook (skipped chs count as first dc) and then 1 dc in ea ch across
2 (WS): Ch 4, turn. Sk 1, 1 dc I next st, work FP Puff St around post of dc just made, *[ch 1, sk 1, 1 dc] 2 times, FP Puff St around post of dc just made; rep * until 2 sts rem ending with ch 1, sk 1, 1 dc in top of tch.
3: Ch 3, turn. *1 dc in ch-1 sp, sk FP Puff St, 1 dc in top of dc that FP Puff St is made around, 1 dc in ch-1 sp, 1 dc in top of next dc; rep * ending with dc in top of tch.
Repeat rows 2-3 to desired length.
I hope you enjoyed learning this stitch as much as I did. When you make something with it, could you please tag me @handmadebystacyj or #handmadebystacyj? I’d love to see what you create!
The Little Boxes stitch is a very simple and fun crochet stitch to learn. It has a textured front and the back is flat. And, although it looks very similar to the crocheted Waffle stitch, it is worked just a little bit differently.
This stitch is a combination of front and back post double crochet. It creates a wonderful fabric and, as a result, works up very quickly, too!
The Little Boxes stitch is a beginner friendly stitch that be wonderful for a warm blanket, scarf or a hat!
Disclosure: This post contains affiliate links; I am an affiliate with these companies and highly recommend them. As an affiliate, when you purchase from those links, you allow the companies to pay me a small commission. This doesn’t cost you any more, and allows me to making free content. Thank you for your support!
To see a video tutorial of the Little Boxes stitch, click on the video above. You can also clickHERE. At the bottom of the post there is also a chart for your reference.
If you’re looking for your next favorite hook, click HEREto check out Furls!
Stitches and abbreviations used:
Pattern is written in US terms
Ch: Chain
Dc: Double crochet
Ea: Each
Hdc: Half double crochet
Rep: Repeat
RS: Right Side
St(s): Stitch (es)
Tch: Turning Chain
WS: Wrong Side
Yo: Yarn over
Special stitches:
BPDC: Back Post Double Crochet – Yo once, insert hook back to front around indicated stitch, draw up a loop (3 loops on hook), [yo, draw through 2] two times
FPDC: Front Post Double Crochet – Yo once, insert hook front to back around indicated stitch, draw up a loop (3 loops on hook), [yo, draw through 2] two times
Here’s a pin for your Pinterest board 🙂
Notes:
Ch-2 at beg of row counts as first hdc
Ch-3 at beg of row counts as first dc
Directions for the Little Boxes stitch
Chain in multiples of 4 + 5 for base chain
1 (RS): Work 1 dc in fourth ch from hook (skipped chs count as first dc) and then in ea ch across
2: Ch 2, turn; (WS): 1 FPDC around ea of the next 2 sts, 1 BPDC around next st, *1 FPDC around ea of the next 3 sts, 1 BPDC around next st; rep * to last 3 sts, work 1 FPDC around ea of next 2 sts, 1 hdc in top of tch
3: Ch 3, turn; (WS): Dc in ea of the next 2 sts, 1 FPDC around next st, *1 dc in ea of the next 3 sts, 1 FPDC around next st; rep * to last 3 sts, 1 dc in ea of the last 3 sts
Repeat rows 2-3 to desired length.
I hope you enjoyed learning this stitch as much as I did. When you make something with it, could you please tag me @handmadebystacyj or #handmadebystacyj? I’d love to see what you create!
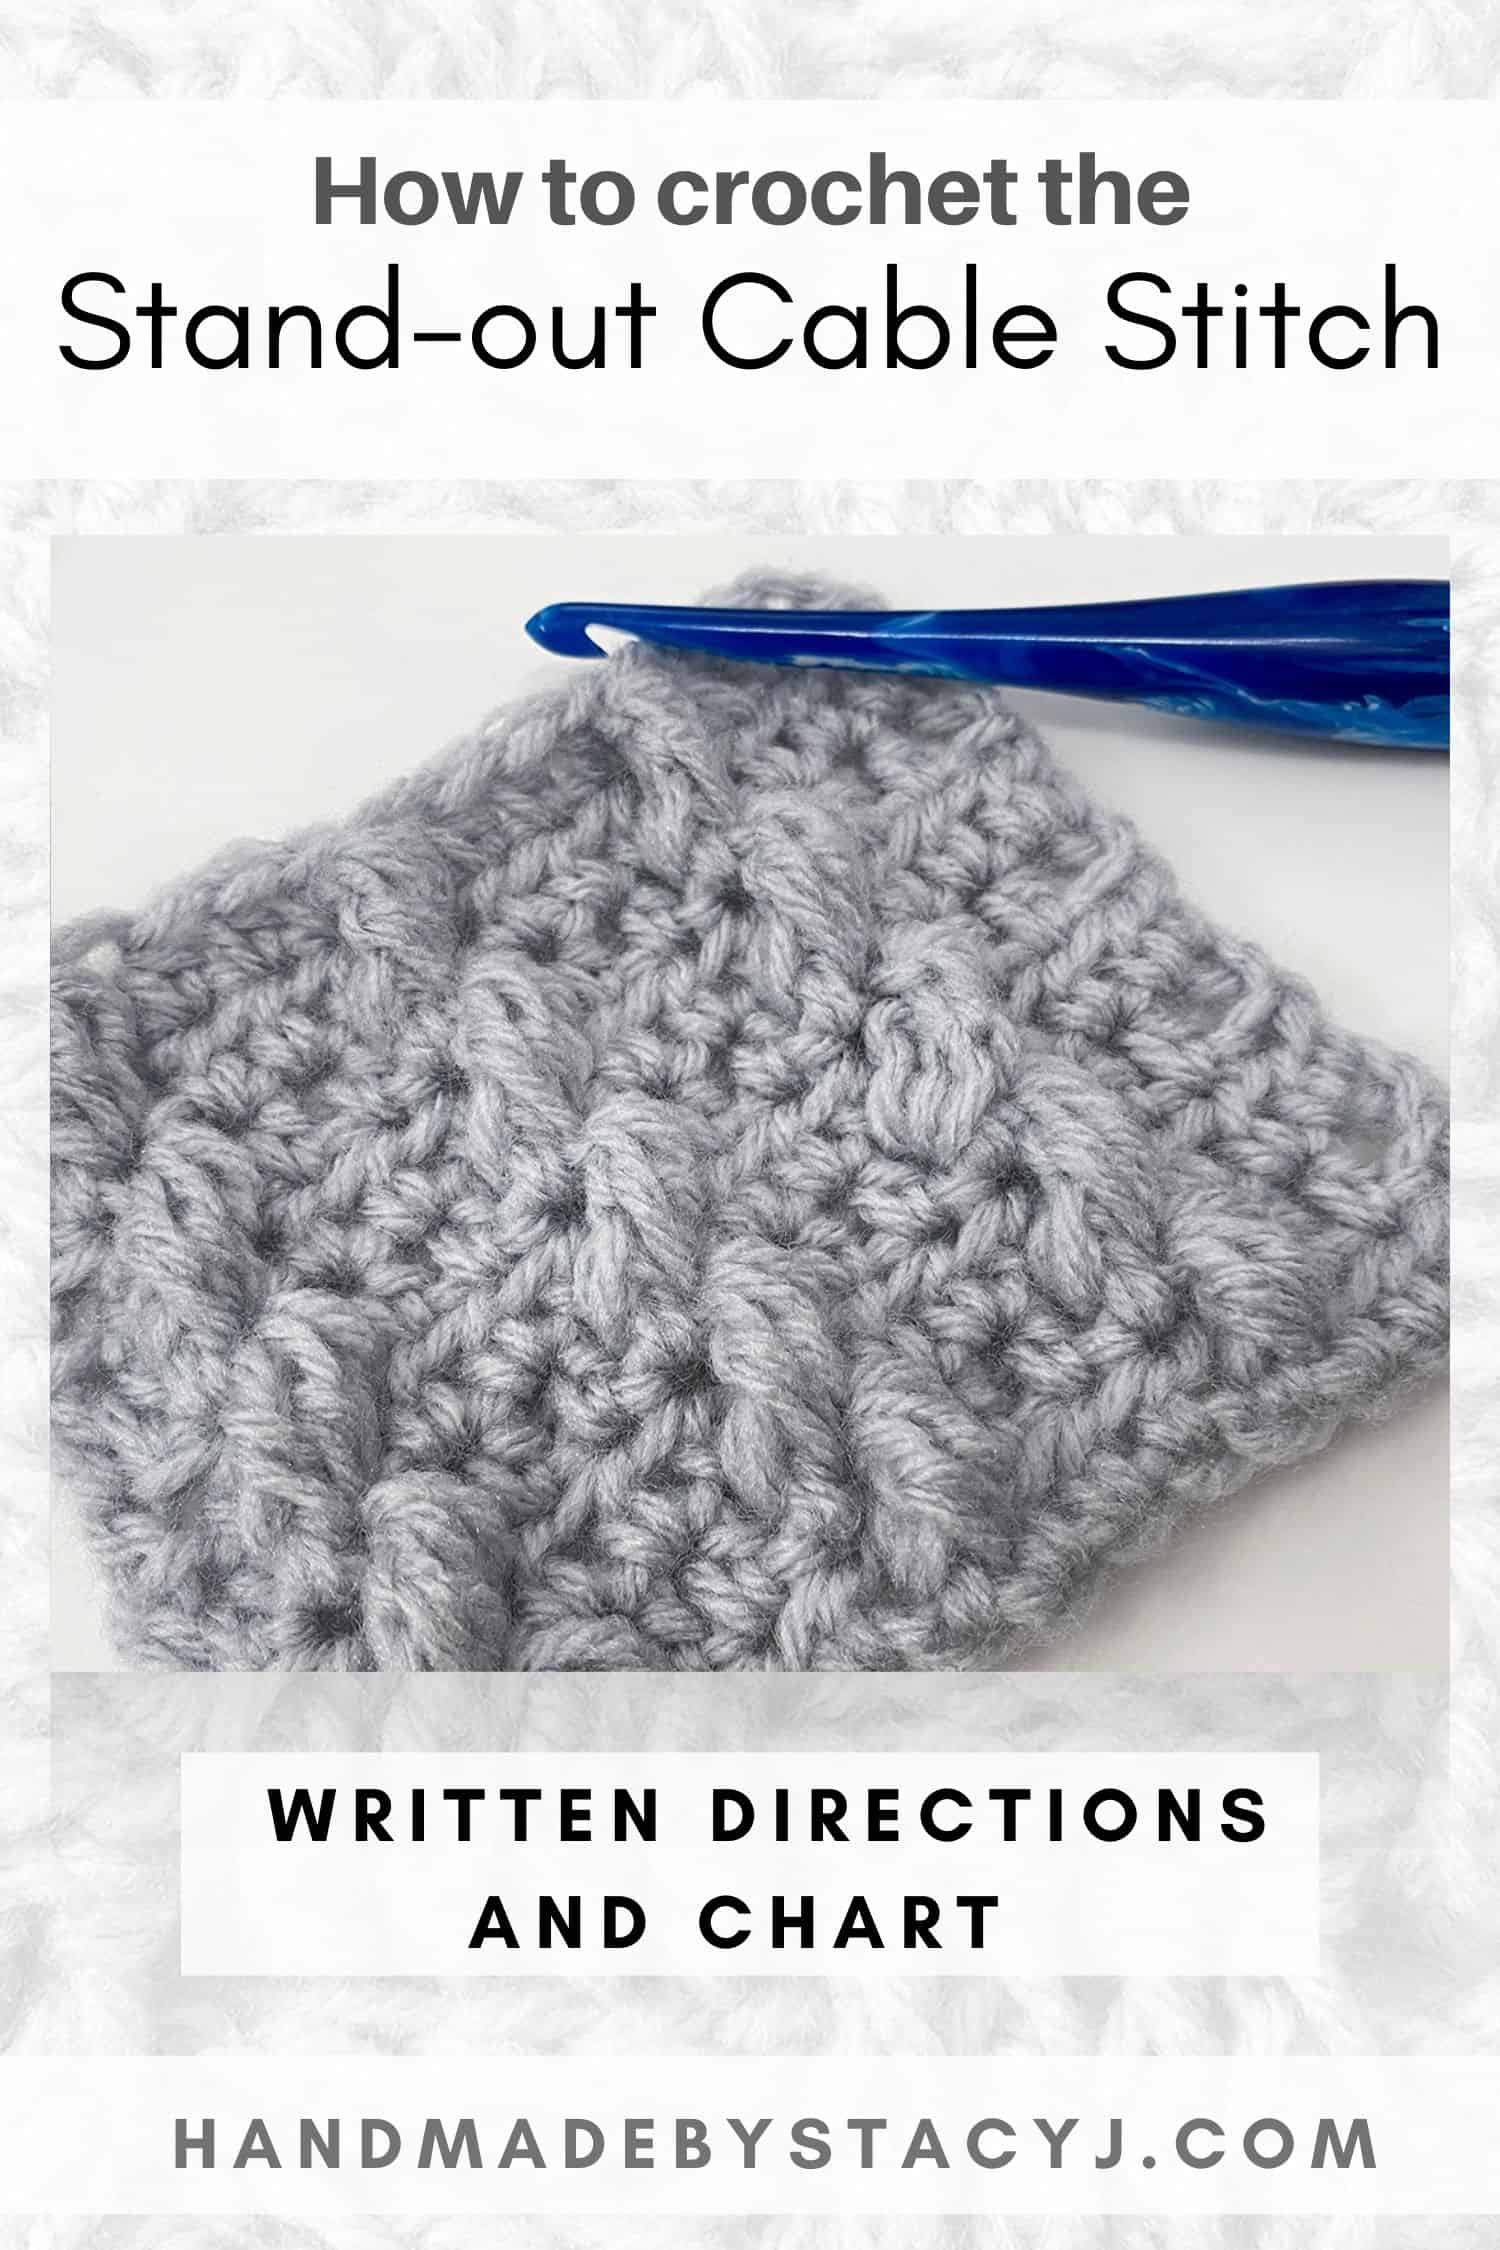
The Stand-Out Cable stitch is a combination of half double crochet and front post double crochet clusters. The combination of stitches create a cable look with a flat back. As a result of using those stitches, this works up very quickly and also works over a 2 row repeat.
It’s a fun stitch to add to your stitching knowledge and would be wonderful for a blanket, scarf or a hat!
Disclosure: This post contains affiliate links. As an affiliate, when you purchase through my links, you allow the company to pay me a small commission without costing you a penny more, which allows me to continue making free content. Thank you for your support!
Here’s a pin for your Pinterest board 🙂
If you’d like to see a video tutorial of this stitch, please scroll to the top of this post or you can clickHERE. Also, at the bottom of the post there is a chart for your reference.
If you’re looking for your next favorite hook, click HERE to check out Furls!
Stitches and abbreviations used:
Pattern is written in US terms
Ch(s): Chain(s)
Ea: Each
Hdc: Half double crochet
Rep: Repeat
RS: Right Side
Sk: Skip
St(s): Stitch (es)
WS: Wrong Side
Yo: Yarn over
Special stitches:
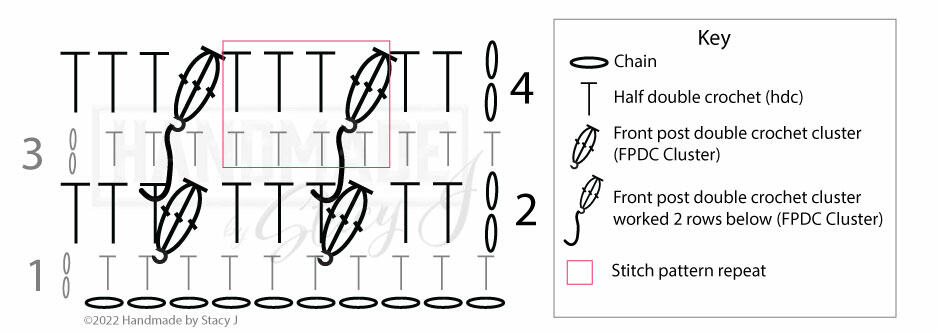
FPDC Cluster: Front Post Double Crochet Cluster – *YO once, insert hook front to back around post of indicated stitch, YO and draw up a loop (3 loops on hook), [yo, draw through 2]; rep * twice more, YO and draw through all 4 loops on hook.
Directions
Note: Ch-2 at beg of row counts as first hdc
Chain in multiples of 4
1 (WS): Work 1 hdc in third ch from hook (2 skipped chs count as first hdc) and in ea ch across
2: Ch 2, turn; (RS): work 1 hdc in ea of next 2 sts, *sk next hdc, work FPDC Cluster around next hdc, 1 hdc in top of hdc just worked, 1 hdc in ea of the next 2 sts; rep * across
3: Ch 2, turn; (WS): 1 hdc in next st and in ea st across
4: Ch 2, turn; (WS): Work 1 hdc in ea of the next 2 sts, *sk next st, working in front of previous row, work FPDC Cluster around hdc one row below next hdc, 1 hdc in ea of the next 3 sts; rep * across
Repeat rows 3-4 to desired length.
Here’s a tip to even out the symmetry of the edge stitches
Try working the pattern by adding 2 more hdc to your beginning ch / row and then work them at the end of RS rows and beg of WS rows.
I hope you enjoyed learning this stitch as much as I did. When you make something with it, could you please tag me @handmadebystacyj or #handmadebystacyj – I’d love to see what you create!
The Basketweave stitch is one of the first stitches that I ever learned how to crochet when I was young and my mom was teaching me. It was so amazing to me how creating a combination of stitches would create such a wonderful fabric; plus, it was fun AND easy!
It’s a combination of front and back post double crochet and it creates a wonderful weave with a reversible fabric that looks like a basketweave! As a result of using double crochet stitches, it works up very quickly, too! This stitch is very beginner friendly and would be wonderful for a blanket, scarf or a hat!
Disclosure: This post contains affiliate links; I am an affiliate with these companies and highly recommend them. As an affiliate, when you purchase from those links, you allow the companies to pay me a small commission. This doesn’t cost you a penny more and allows me to continue making free content. Thank you for your support!
Stitches and abbreviations used:
Pattern is written in US terms
Ch: Chain
Dc: Double crochet
Ea: Each
Hdc: Half double crochet
Rep: Repeat
RS: Right Side
St (s): Stitch (es)
Tch: Turning Chain
WS: Wrong Side
Yo: Yarn over
Special stitches:
BPDC: Back Post Double Crochet – Yo once, insert hook back to front around indicated stitch, draw up a loop (3 loops on hook), [yo, draw through 2] two times
FPDC: Front Post Double Crochet – Yo once, insert hook front to back around indicated stitch, draw up a loop (3 loops on hook), [yo, draw through 2] two times
Here’s a pin for you Pinterest board 🙂
Directions for how to crochet the Basketweave Stitch
Note: Ch-2 at beg of row counts as first hdc
Chain in multiples of 8 + 4 for base chain
1 (RS): Work 1 dc in fourth ch from hook (skipped chs count as first dc) and in ea ch across
2: Ch 2, turn; (WS): *1 fpdc around ea of the next 4 sts, 1 bpdc around ea of the next 4 sts; rep * ending with hdc in top of tch
3: Ch 2, turn; (WS): *1 fpdc around ea of the next 4 sts, 1 bpdc around ea of the next 4 sts; rep * ending with hdc in top of tch
4: Ch 2, turn; (WS): *1 bpdc around ea of the next 4 sts, 1 fpdc around ea of the next 4 sts; rep * ending with hdc in top of tch
5: Ch 2, turn; (WS): *1 bpdc around ea of the next 4 sts, 1 fpdc around ea of the next 4 sts; rep * ending with hdc in top of tch
Repeat rows 2-5 to desired length.
I hope you enjoyed learning the Basketweave stitch as much as I did. When you choose to make something with it, could you please tag me @handmadebystacyj and #handmadebystacyj – I’d love to see what you create with this stitch!
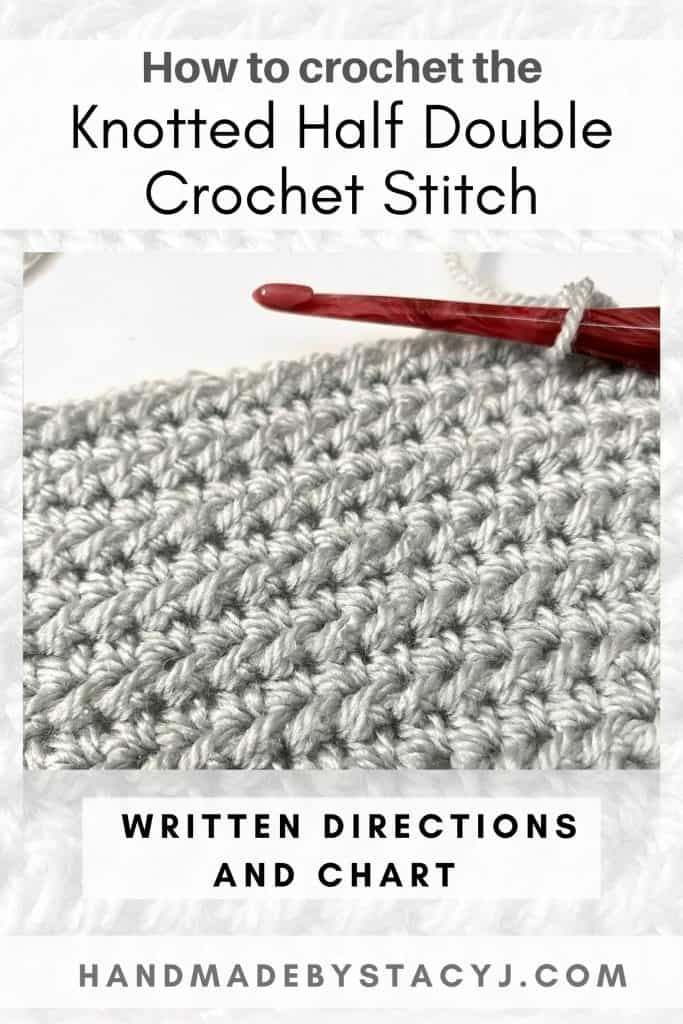
The Knotted Half Double Crochet Stitch is a fun and amazingly simple stitch to master. It’s a combination of single crochet and a half double crochet with a twist and works up over a 2 row repeat. This is a fun stitch to add to your stitching knowledge and would be wonderful for a blanket, scarf or a hat!
Disclosure: This post contains affiliate links. As an affiliate, when you purchase through my links, you allow the company to pay me a small commission without costing you a penny more, which allows me to continue making free content. Thank you for your support!
Here’s a pin for your Pinterest board 🙂
If you’re looking for your next favorite hook, click HEREto check out Furls!
To see a video tutorial of the Knotted Half Double Crochet stitch, scroll to the top of this post or clickHERE. At the bottom of the post there is also a chart for your reference.
Stitches and abbreviations used:
Pattern is written in US terms
Ch(s): Chain(s)
Ea: Each
RS: Right Side
Sc: Single crochet
St(s): Stitch (es)
WS: Wrong Side
Yo: Yarn over
Special stitches:
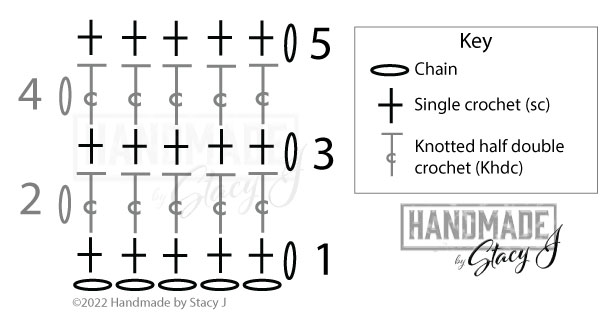
KHdc: Knotted Half double crochet – YO once, insert hook in indicated stitch, YO and draw up a loop pulling the yarn through all loops on the hook (At the bottom of this post is a video demonstrating this stitch)
Directions for the Knotted Half Double Crochet stitch
Note: Ch-1 at beg of row does not count as a stitch
Chain in any multiple of chs + 1 ch
1 (RS): Work 1 sc in second ch from hook and in ea ch across
2: Ch 1, turn; (WS): work 1 KHdc in first st and in ea st across
3: Ch 1, turn; 1 sc in first st and in ea st across
Repeat rows 2-3 to desired length.
If you’d like to even out the pull of the side stitches, try adding a border to your final piece and block your work.
I hope you enjoyed learning this stitch as much as I did. When you make something with it, could you please tag me @handmadebystacyj or #handmadebystacyj – I’d love to see what you create!
The Leafy Lace Crochet Stitch is inspired by a knit stitch that I did a tutorial for recently. While working on a collaboration with Kris from Krissy’s Over the Mountain Crochet, she had asked her viewers to pick a stitch from my YouTube channel and she would design a rectangular wrap using the viewers’ choice. (To see Kris’s video, click HEREand go to about the 5 minute mark)
Many people showed interest in the Leafy Lace Knit Stitch and Kris is a crocheter. So, I listened to the viewers and decided to adapt a crochet stitch from the knit stitch.
After about a week of trial and error, frogging and stitching…here it is – The Leafy Lace Crochet Stitch!
Disclosure: Many of my posts contain affiliate links. When you purchase from those links, you allow the companies to pay me a small commission without costing you any more. Those purchases allow me to continue making free content. Thank you for your support!
Stitch information
This stitch works in 17 + 2 (plus 2 for a base chain) over a 6 row repeat. It uses a combination of chain, double crochet and front / back post treble crochet. I’ve adapted the beginning and ending post trebles so that a gap isn’t formed in the back of the stitch. Even though it looks complicated, once you get the hang of it, it isn’t too bad at all. So, let’s give it a try!
I’m currently working on a design that uses this stitch. I’ll keep you updated when it goes live. Please be sure to sign up for my email list so that you know right away.
To see a video tutorial of this stitch, click on the link towards the top of this post or clickHERE. At the bottom of the post there is also a chart for your reference.
Stitches and abbreviations used:
Ch: Chain
Dc: Double crochet
Ea: Each
Rep: Repeat
RS: Right Side
Sk: Skip
Sp: Space
St(s): Stitch (es)
Tch: Turning Chain
WS: Wrong Side
Yo: Yarn over
Here’s a pin for your Pinterest board 🙂
Special stitches:
BPTR:
Back Post Treble Crochet – Yo 2 times, insert hook back to front around indicated stitch, draw up a loop (4 loops on hook), [yo, draw through 2] three times
BPTR3tog:
Back Post Treble 3 Together – Yo 2 times, insert hook back to front around first stitch, draw up a loop, [yo, draw through 2] two times (2 loops on hook), yo 2 times, insert hook back to front around next stitch, draw up a loop, [yo, draw through 2] two times (3 loops on hook), yo 2 times, insert hook back to front around next stitch, draw up a loop [yo, draw through 2] two times (4 loops on hook), yo, the draw through remaining 4 loops
FPTR3tog:
Front Post Treble 3 Together – Yo 2 times, insert hook front to back around first stitch, draw up a loop, [yo, draw through 2] two times (2 loops on hook), yo 2 times, insert hook front to back around next stitch, draw up a loop, [yo, draw through 2] two times (3 loops on hook), yo 2 times, insert hook front to back around next stitch, draw up a loop [yo, draw through 2] two times (4 loops on hook), yo, then draw through remaining 4 loops
FPTR:
Front Post Treble Crochet – Yo 2 times, insert hook front to back around indicated stitch, draw up a loop (4 loops on hook), [yo, draw through 2] three times
modBPTR:
Modified Back Post Treble Crochet – Yo 2 times, insert hook back to front around indicated stitch, draw up a loop (4 loops on hook), [yo, draw through 2] twice (2 loops on hook), yo, insert hook in stitch behind post just worked, draw up a loop (4 loops on hook), yo, draw through 2, yo, then draw through remaining 3 loops
modFPTR:
Modified Front Post Treble Crochet – Yo 2 times, insert hook front to back around indicated stitch, draw up a loop (4 loops on hook), [yo, draw through 2] twice, (2 loops on hook) yo, insert hook in stitch behind post just worked, draw up a loop (4 loops on hook), yo, draw through 2, yo, then draw through remaining 3 loops
Directions for Leafy Lace Crochet Stitch
Note: Ch-3 at beg of row counts as first dc
Work Foundation dc and skip to step 2 (only work step one is if the beginning ch method is your preferred method)
1: Chain in multiples of 17 + 2 (add 2 for base chain). Work 1 dc in fourth ch from hook (skipped chs count as first dc) and in ea ch across
2: Ch 3, turn; (RS): *1 dc in next st, 1 modFPTR in next st, 1 dc in ea of the next 3 sts, ch 2, sk 3, 3 dc in next st, ch 2, sk 3, 1 dc in ea of next 3 sts, 1 modFPTR in next st, 1 dc in next st; rep * ending with dc in top of tch
3: Ch 3, turn; (WS): *1 dc in next st, 1 modBPTR in next st, 1 dc in ea of next 2 sts, ch 2, sk 1 dc and ch-2 sp, 1 BPTR around first post of 3-dc cluster, [1 BPTR, 1 dc, 1 BPTR] in second st, 1 BPTR around third post of 3-dc cluster, ch 2, sk ch-2 sp and dc, 1 dc in ea of next 2 sts, 1 modBPTR in next st, 1 dc in next st; rep * ending with 1 dc in top of tch
4: Ch 3, turn; *1 dc in next st, 1 modFPTR in next st, 1 dc in next st, ch 2, sk 1 dc and ch-2 sp, 1 FPTR around ea of the next 2 posts, [1 FPTR, 1 dc, 1 FPTR] in next st, 1 FPTR around post of ea of the next 2 sts, ch 2, sk ch-2 sp and 1 dc, 1 dc in next st, 1 modFPTR in next st, 1 dc in next st; rep * ending with 1 dc in top of tch
5: Ch 3, turn; *1 dc in next st, 1 modBPTR in next st, 1 dc in next st and 1 dc in ch-2 sp, ch 2, 1 BPTR around ea of the next 2 posts, 1 BPTR3tog around next 3 posts, 1 BPTR around ea of next 2 posts, ch 2, 1 dc in ch-2 sp and 1 dc in next st, 1 modBPTR in next st, 1 dc in next st; rep * ending with dc in top of tch
6: Ch 3, turn; *1 dc in next st, 1 modFPTR in next st, 1 dc in ea of next 2 sts and ch-2 sp, ch 2, 1 FPTR in next st, 1 FPTR3tog around next 3 posts, 1 FPTR in next st, ch 2, 1 dc in ch-2 sp and in ea of next 2 dcs, 1 modFPTR in next st, 1 dc in next st; rep * across ending with 1 dc in top of tch
7: Ch 3, turn; *1 dc in next st, 1 modBPTR in next st, 1 dc in next 3 sts and 1 dc in ch-2 sp, ch 2, BPTR3tog around next 3 posts, ch 2, 1 dc in ch-2 sp and in ea of the next 3 sts, 1 modBPTR in next st, 1 dc in next st; rep * across ending with 1 dc in top of tch
Repeat rows 2 – 7 to desired length.
I hope you enjoyed learning this stitch as much as I did. When you make something with it, could you please tag me @handmadebystacyj or #handmadebystacy – I’d love to see what you create!
The Fantasia stitch was my very first YouTube crochet tutorial that I put out to the world a few years ago. However, I just looked at it again and realized that the written directions, as well as the video needed an overhaul…desperately! (If you’d like to check out the original Fantasia stitch video, here’s the link)
This week I’ve reworked the stitch. I made some small changes to the stitch pattern. Then re-filmed the video and updated the verbiage on the pattern (it’s so much easier to read now!). There’s even better step-by-step photos.
Disclosure: This post contains affiliate links. As an affiliate, when you purchase through my links, you allow the company to pay me a small commission. This doesn’t cost you any more, and allows me to continue making free content. Thank you for your support!
About the Fantasia stitch
This stitch works in chain multiples of 12 + 5 over a 4 row repeat. It uses a combination of chain, single crochet and treble crochet. Even though it looks complicated, once you get the hang of it, it isn’t too bad at all. So, let’s give it a try!
To see a video tutorial of this stitch, scroll to the top of this post or clickHERE.
Need a new hook? Want a super beautiful hook? Check out Furls!
Stitches and abbreviations used:
Ch: Chain
Lp (s): Loop (s)
Rep: Repeat
RS: Right side
Sc: Single crochet
Sk: Skip
St (s): Stitch (es)
WS: Wrong side
Yo: Yarn over
Here’s a pin for your Pinterest board
Special stitches:
FPTR3tog – Front post treble crochet 3 together: *Yarn over two times and insert hook from front to back around post from previous row, draw up a lp, [yo, draw through 2 lps] 2 times; rep * 2 more times around the next 2 posts, 4 loops should be on your hook, yo and draw through all 4 lps
FPTR6tog – Front post treble crochet 6 together: *Yarn over two times and insert hook from front to back around post from previous row, draw up a lp, [yo, draw through 2 lps] 2 times; rep * 5 more times around the next 5 posts, 7 loops should be on your hook, yo and draw through all 7 lps
Directions for the Fantasia Stitch
Chain in multiples of 12 + 5 (for this example I chained 41)
1: In 5th ch from hook (counts as first tr), work 3 tr, ch 1; sk 5 ch, 1 sc in next ch, ch 1, *sk 5 ch, in next ch work [3 tr, ch 3, 3 tr], sk 5 ch, 1 sc in next ch, ch 1; Rep * across ending with 4 tr in last ch
2: (Note: When working around the tr posts, be careful not to confuse the ch-5 from the previous row for a tr post) Ch 1, turn; Sc in first st, ch 5, *work FPTR6tog, ch 5, sc in ch-3 sp from previous row, ch 5; rep * across ending with sc in top of 4th ch of previous row’s turning ch
3: Ch 1, turn; Sc in first st, ch 1, *work [3 tr, ch 3, 3 tr] in st that joins FPTR6tog from previous row, ch 1, 1 sc in sc from previous row, ch 1; rep * across ending with sc in last sc
4: Ch 4, turn; work FPTR3tog around posts below, ch 5, *sc in ch-3 sp, ch 5, FPTR6tog, ch 5; rep * across ending with 1 sc in last ch-3 sp, ch 5, FPTR3tog on last 3 tr from previous row, ch 4, sc in last sc
5: Ch 4, turn; 3 tr in first sc, ch 1, sk (ch-4, FPTR3tog & ch-5 sp), *sc in sc from previous row, ch 1, work [3 tr, ch 3, 3 tr] in st that joins FPTR6tog; rep * across ending with 4 tr in third ch of turning ch
Repeat rows 2 – 5 to desired length ending on a row 2 or row 4 repeat.
I hope you enjoyed learning this stitch as much as I did. When you make something with it, could you please tag me @handmadebystacyj or #handmadebystacyj – I’d love to see what you create!
The Flame stitch is a decorative lace crochet stitch that uses a variety of basic stitches. It works in multiples of 10 sts + 2 over a 4 row repeat. The Flame stitch would be great for a scarf or a lightweight blanket. It also looks great with fingering / sock weight yarn.
Disclosure: Most of my posts contain affiliate links. That means that if you choose to purchase from that link, you allow the company to pay me a small commission without costing you a penny more, which allows me to continue creating free content. Thank you so much for your support!
To see a video tutorial of this stitch, click on the box above or click HERE. There is also a chart below for your reference.
Stitches and abbreviations used:
Ch: Chain
Dc: Double crochet
Rep: Repeat
Sc: Single crochet
Sk: Skip
Sp: Space
St (s): Stitch (es)
Tr: Treble
Here’s a pin for your Pinterest board 🙂
Special Stitch / Abbreviation:
Dc2tog: Double crochet 2 together – Yarn over and insert hook into designated chain space, draw up a loop, yarn over and draw through 2 loops (2 loops remain on hook), yarn over, insert hook into same chain space and draw up a loop, yarn over and draw through 2 loops (3 loops remain on hook), yarn over and then draw through all 3 remaining loops on hook.
Directions for the Flame Stitch
Written using US terms
Chain in multiples of 10 + 2
(WS): Work 1 sc in second chain from hook, *ch 3, sk 3 ch, 1 sc in next ch, ch 3, sk 1 ch, 1 sc in next ch, ch 3, sk 3 ch, 1 sc in next ch; rep from * to end, then turn
(RS): Ch 1, 1 sc in first sc, *ch 1, sk next ch-3 sp, in next ch-3 sp work (dc2tog, ch 3) four times, then work one more dc2tog in same ch-3 sp, ch 1, sk next ch-3 sp, 1 sc in next sc; rep from * to end, turn
Ch 7 (counts as 1 tr and ch 3), sk next ch-3 sp, 1 sc in next ch-3 sp, ch 3, 1 sc in next ch-3 sp, ch 3, sk next ch-3 sp, work 1 tr in next sc, *ch 3, sk next ch-3 sp, 1 sc in next ch-3 sp, ch 3, 1 sc in next ch-3 sp, ch 3, sk next ch-3 sp, work 1 tr in next sc; rep from * to end, turn
Ch 1, 1 sc in first sc, *ch 1, sk next ch-3 sp, in next ch-3 sp work (dc2tog, ch 3) four times, then work one more dc2tog in same ch-3 sp, ch 1, sk next ch-3 sp, 1 sc in next sc; rep from * ending with last sc in the 4th ch of ch-7 at beginning of previous row, turn
Repeat rows 3-4 to desired length
I hope you enjoyed learning this stitch as much as I did. When you make something with it, could you please tag me @handmadebystacyj or #handmadebystacyj – I’d love to see what you create!