The Textured C2C Square & Dishcloth was inspired by my Birthday Sorbet Baby Blanket design. It’s such a fun and easy pattern to work with that I thought a smaller version would be perfect for the Unraveled Mitten 2023 Blanket CAL. It offers a lot of texture and works up quickly. If you’d like to make the dishcloth, simply follow the pattern, but use the smaller hook and lighter, cotton yarn. My testers rated this pattern as “Easy”, making it the perfect project to make as you watch your favorite program or listen to your favorite podcast. On a side note, I want to extend a big “Thank You!” to all of my testers that helped with this design!
The 2023 Stash-busting Afghan Mystery Crochet Along with Unraveled Mitten is a year-long crochet along that involves 20 different squares. Each square is 12″ x 12″ and is designed by a different participating designer. The squares are released every other week throughout 2023, with the last square being released in October (giving you plenty of time to finish your blanket to gift it!). To see the other blocks that have been released (there are some amazing blocks – you will want to check them out!), please visit: https://theunraveledmitten.com/2023/01/05/2023-stash-busting-crochet-along/
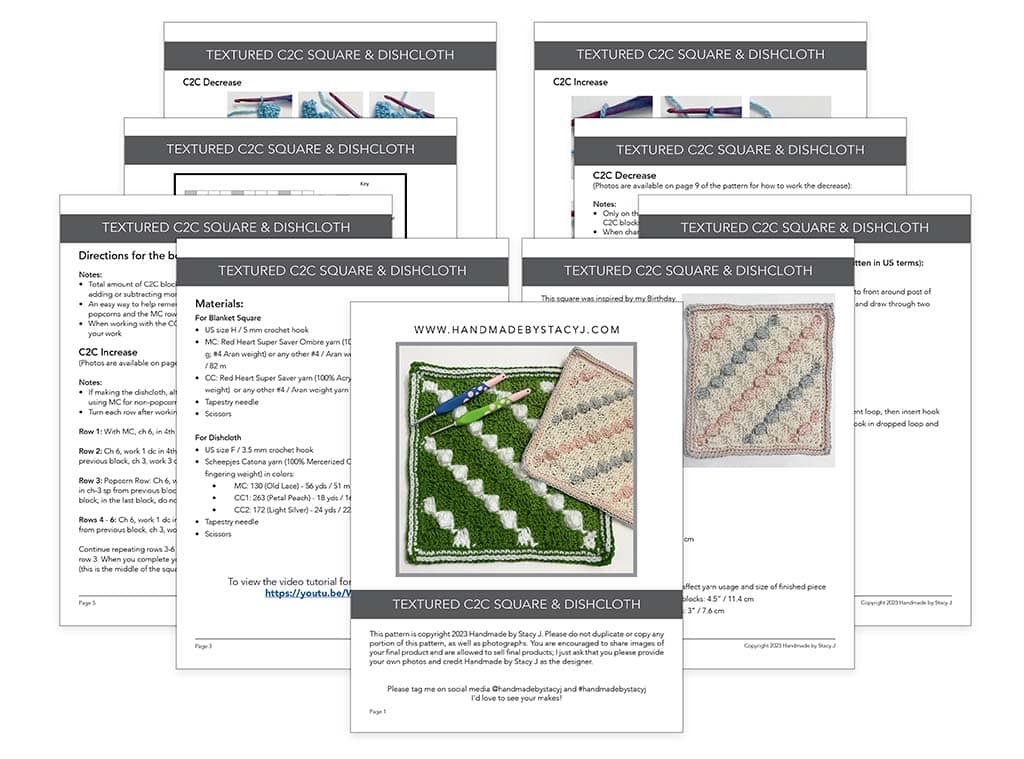
If you prefer a printable pdf that includes printable gift tags for gifting you can purchase directly through the Ravelry button below.
Please note that due to this being a digital download, all sales are final and no refunds will be given. Thank you for your support!
The Little Boxes stitch is a very simple and fun crochet stitch to learn. It has a textured front and the back is flat. And, although it looks very similar to the crocheted Waffle stitch, it is worked just a little bit differently.
This stitch is a combination of front and back post double crochet. It creates a wonderful fabric and, as a result, works up very quickly, too!
The Little Boxes stitch is a beginner friendly stitch that be wonderful for a warm blanket, scarf or a hat!
Disclosure: This post contains affiliate links; I am an affiliate with these companies and highly recommend them. As an affiliate, when you purchase from those links, you allow the companies to pay me a small commission. This doesn’t cost you any more, and allows me to making free content. Thank you for your support!
To see a video tutorial of the Little Boxes stitch, click on the video above. You can also clickHERE. At the bottom of the post there is also a chart for your reference.
If you’re looking for your next favorite hook, click HEREto check out Furls!
Stitches and abbreviations used:
Pattern is written in US terms
Ch: Chain
Dc: Double crochet
Ea: Each
Hdc: Half double crochet
Rep: Repeat
RS: Right Side
St(s): Stitch (es)
Tch: Turning Chain
WS: Wrong Side
Yo: Yarn over
Special stitches:
BPDC: Back Post Double Crochet – Yo once, insert hook back to front around indicated stitch, draw up a loop (3 loops on hook), [yo, draw through 2] two times
FPDC: Front Post Double Crochet – Yo once, insert hook front to back around indicated stitch, draw up a loop (3 loops on hook), [yo, draw through 2] two times
Here’s a pin for your Pinterest board 🙂
Notes:
Ch-2 at beg of row counts as first hdc
Ch-3 at beg of row counts as first dc
Directions for the Little Boxes stitch
Chain in multiples of 4 + 5 for base chain
1 (RS): Work 1 dc in fourth ch from hook (skipped chs count as first dc) and then in ea ch across
2: Ch 2, turn; (WS): 1 FPDC around ea of the next 2 sts, 1 BPDC around next st, *1 FPDC around ea of the next 3 sts, 1 BPDC around next st; rep * to last 3 sts, work 1 FPDC around ea of next 2 sts, 1 hdc in top of tch
3: Ch 3, turn; (WS): Dc in ea of the next 2 sts, 1 FPDC around next st, *1 dc in ea of the next 3 sts, 1 FPDC around next st; rep * to last 3 sts, 1 dc in ea of the last 3 sts
Repeat rows 2-3 to desired length.
I hope you enjoyed learning this stitch as much as I did. When you make something with it, could you please tag me @handmadebystacyj or #handmadebystacyj? I’d love to see what you create!
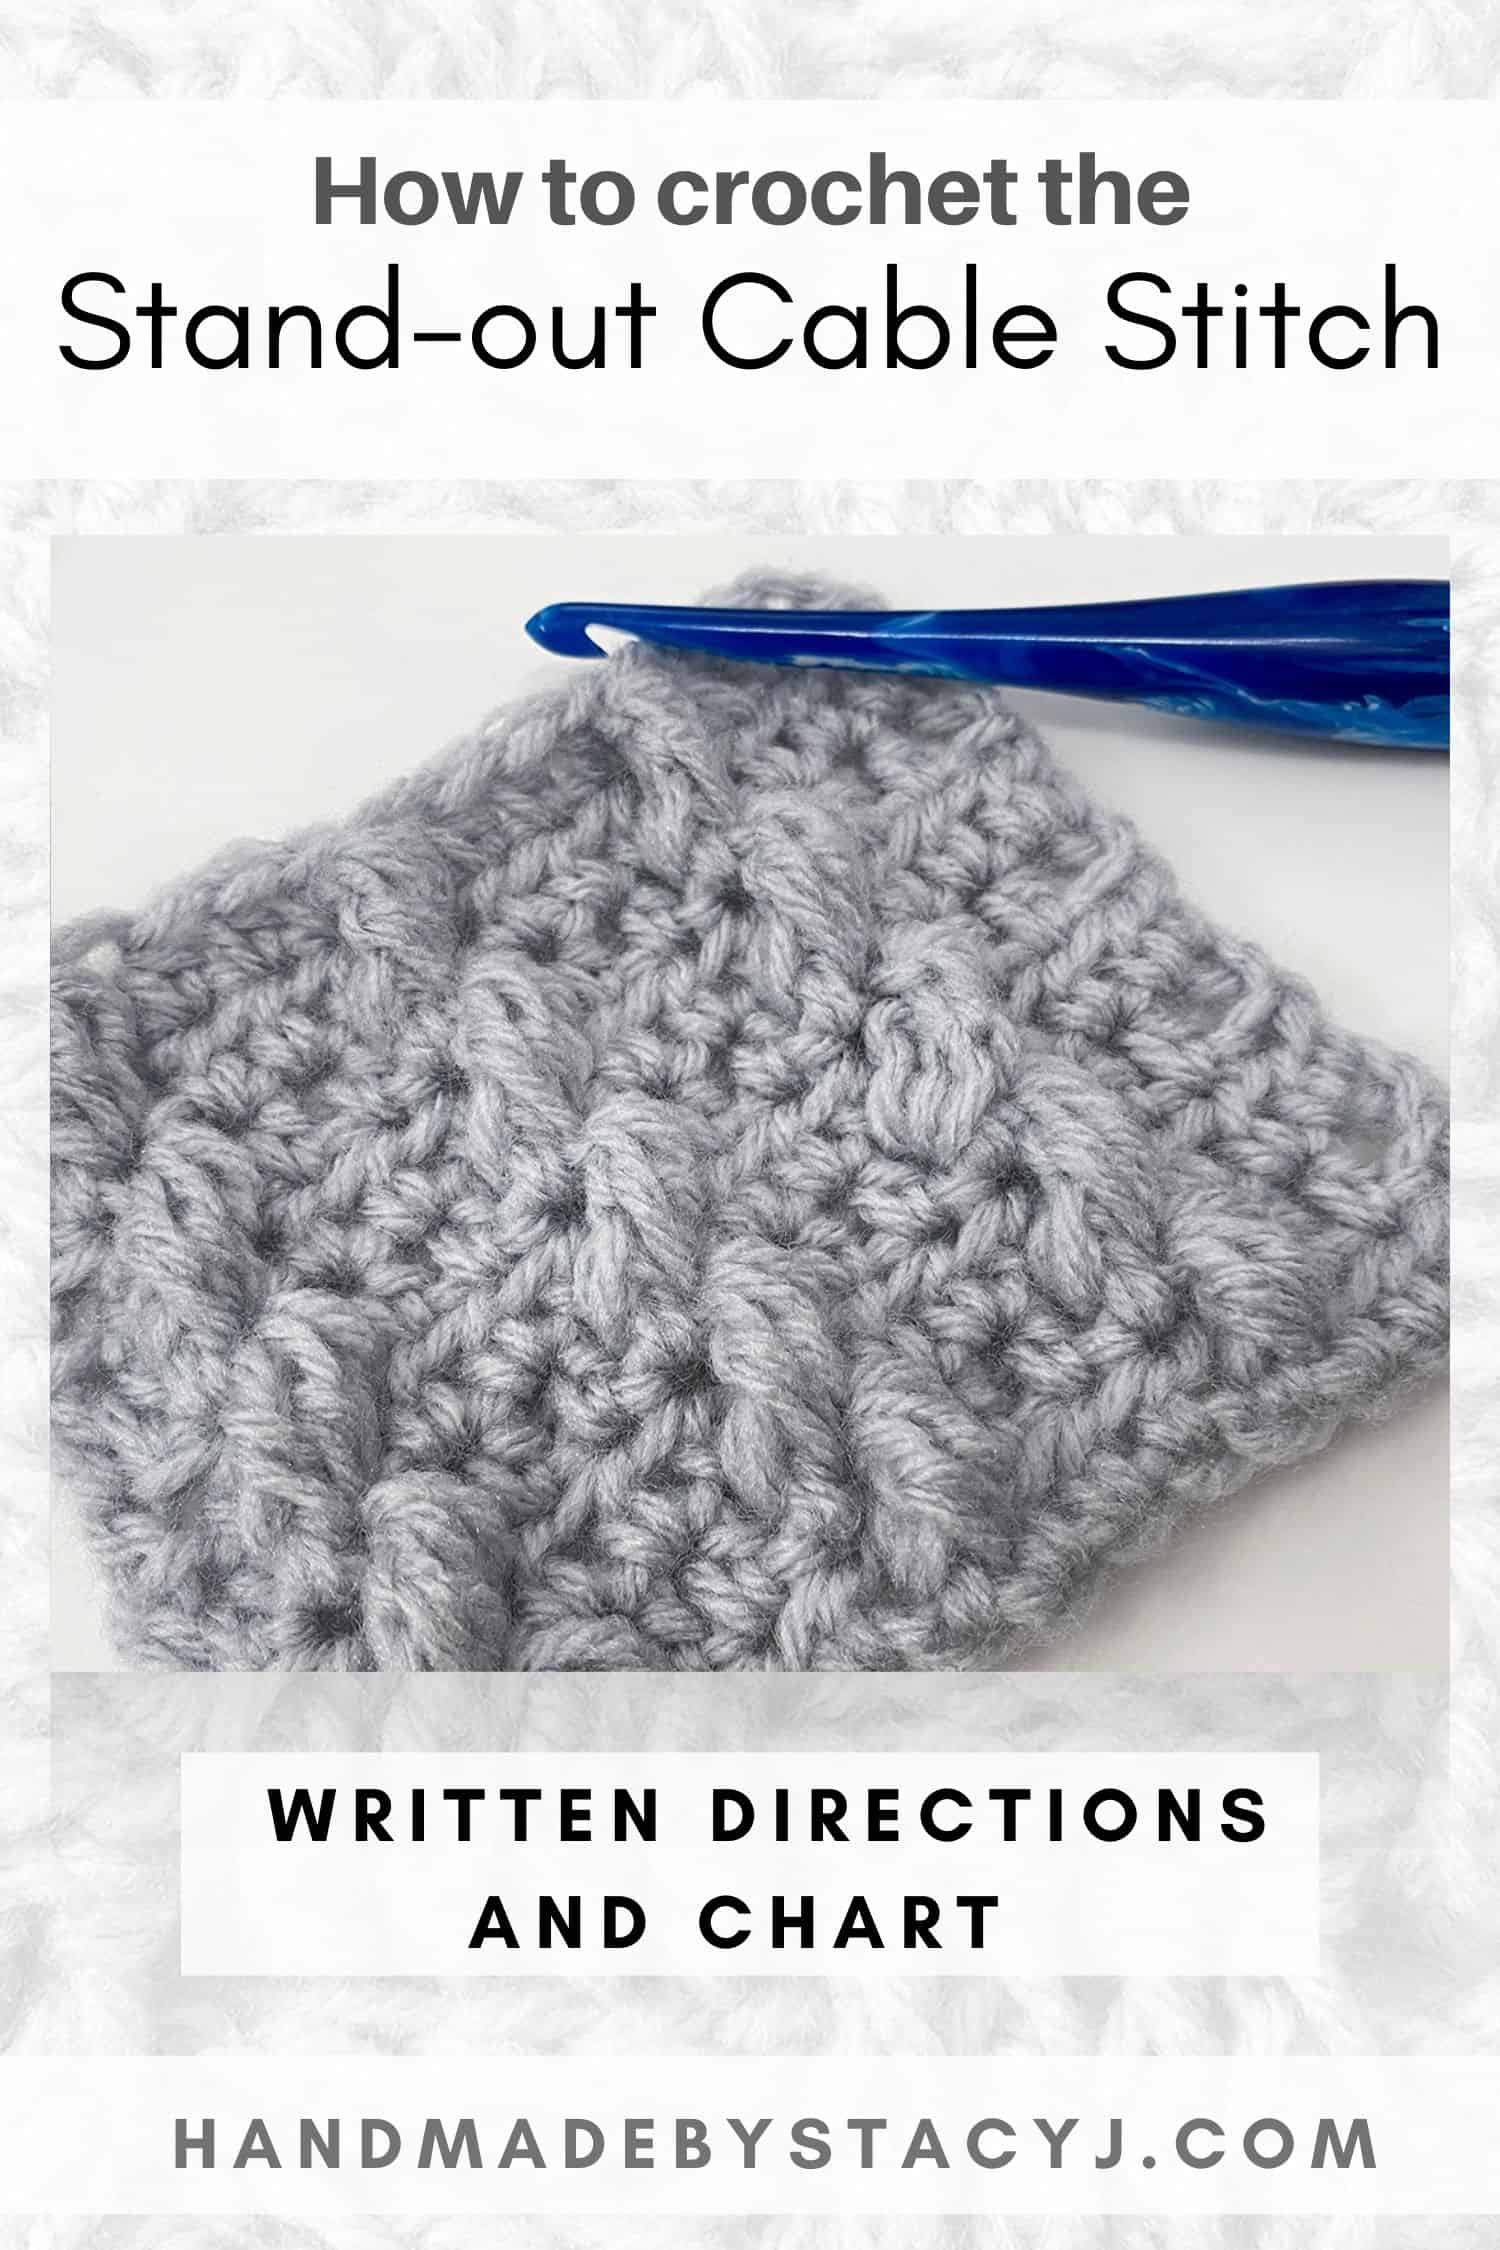
The Stand-Out Cable stitch is a combination of half double crochet and front post double crochet clusters. The combination of stitches create a cable look with a flat back. As a result of using those stitches, this works up very quickly and also works over a 2 row repeat.
It’s a fun stitch to add to your stitching knowledge and would be wonderful for a blanket, scarf or a hat!
Disclosure: This post contains affiliate links. As an affiliate, when you purchase through my links, you allow the company to pay me a small commission without costing you a penny more, which allows me to continue making free content. Thank you for your support!
Here’s a pin for your Pinterest board 🙂
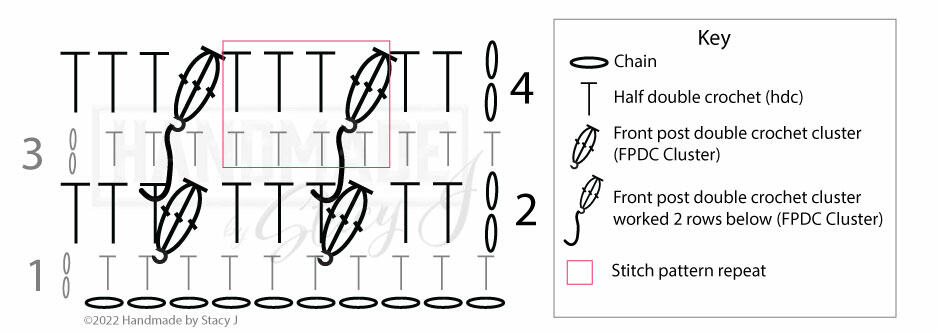
If you’d like to see a video tutorial of this stitch, please scroll to the top of this post or you can clickHERE. Also, at the bottom of the post there is a chart for your reference.
If you’re looking for your next favorite hook, click HERE to check out Furls!
Stitches and abbreviations used:
Pattern is written in US terms
Ch(s): Chain(s)
Ea: Each
Hdc: Half double crochet
Rep: Repeat
RS: Right Side
Sk: Skip
St(s): Stitch (es)
WS: Wrong Side
Yo: Yarn over
Special stitches:
FPDC Cluster: Front Post Double Crochet Cluster – *YO once, insert hook front to back around post of indicated stitch, YO and draw up a loop (3 loops on hook), [yo, draw through 2]; rep * twice more, YO and draw through all 4 loops on hook.
Directions
Note: Ch-2 at beg of row counts as first hdc
Chain in multiples of 4
1 (WS): Work 1 hdc in third ch from hook (2 skipped chs count as first hdc) and in ea ch across
2: Ch 2, turn; (RS): work 1 hdc in ea of next 2 sts, *sk next hdc, work FPDC Cluster around next hdc, 1 hdc in top of hdc just worked, 1 hdc in ea of the next 2 sts; rep * across
3: Ch 2, turn; (WS): 1 hdc in next st and in ea st across
4: Ch 2, turn; (WS): Work 1 hdc in ea of the next 2 sts, *sk next st, working in front of previous row, work FPDC Cluster around hdc one row below next hdc, 1 hdc in ea of the next 3 sts; rep * across
Repeat rows 3-4 to desired length.
Here’s a tip to even out the symmetry of the edge stitches
Try working the pattern by adding 2 more hdc to your beginning ch / row and then work them at the end of RS rows and beg of WS rows.
I hope you enjoyed learning this stitch as much as I did. When you make something with it, could you please tag me @handmadebystacyj or #handmadebystacyj – I’d love to see what you create!
The Basketweave stitch is one of the first stitches that I ever learned how to crochet when I was young and my mom was teaching me. It was so amazing to me how creating a combination of stitches would create such a wonderful fabric; plus, it was fun AND easy!
It’s a combination of front and back post double crochet and it creates a wonderful weave with a reversible fabric that looks like a basketweave! As a result of using double crochet stitches, it works up very quickly, too! This stitch is very beginner friendly and would be wonderful for a blanket, scarf or a hat!
Disclosure: This post contains affiliate links; I am an affiliate with these companies and highly recommend them. As an affiliate, when you purchase from those links, you allow the companies to pay me a small commission. This doesn’t cost you a penny more and allows me to continue making free content. Thank you for your support!
Stitches and abbreviations used:
Pattern is written in US terms
Ch: Chain
Dc: Double crochet
Ea: Each
Hdc: Half double crochet
Rep: Repeat
RS: Right Side
St (s): Stitch (es)
Tch: Turning Chain
WS: Wrong Side
Yo: Yarn over
Special stitches:
BPDC: Back Post Double Crochet – Yo once, insert hook back to front around indicated stitch, draw up a loop (3 loops on hook), [yo, draw through 2] two times
FPDC: Front Post Double Crochet – Yo once, insert hook front to back around indicated stitch, draw up a loop (3 loops on hook), [yo, draw through 2] two times
Here’s a pin for you Pinterest board 🙂
Directions for how to crochet the Basketweave Stitch
Note: Ch-2 at beg of row counts as first hdc
Chain in multiples of 8 + 4 for base chain
1 (RS): Work 1 dc in fourth ch from hook (skipped chs count as first dc) and in ea ch across
2: Ch 2, turn; (WS): *1 fpdc around ea of the next 4 sts, 1 bpdc around ea of the next 4 sts; rep * ending with hdc in top of tch
3: Ch 2, turn; (WS): *1 fpdc around ea of the next 4 sts, 1 bpdc around ea of the next 4 sts; rep * ending with hdc in top of tch
4: Ch 2, turn; (WS): *1 bpdc around ea of the next 4 sts, 1 fpdc around ea of the next 4 sts; rep * ending with hdc in top of tch
5: Ch 2, turn; (WS): *1 bpdc around ea of the next 4 sts, 1 fpdc around ea of the next 4 sts; rep * ending with hdc in top of tch
Repeat rows 2-5 to desired length.
I hope you enjoyed learning the Basketweave stitch as much as I did. When you choose to make something with it, could you please tag me @handmadebystacyj and #handmadebystacyj – I’d love to see what you create with this stitch!
I’m so excited to be sharing with you my latest design: The Squishtastic Cowl!! The name pretty much sums up the texture from this cuddly cowl. It’s crocheted using the Ladders stitch with Red Heart Yarn’s “Unforgettable” yarn and it’s oh-so-squishy!
The Squishtastic Cowl pattern was inspired while making the tutorial for the Ladders stitch and I just couldn’t help myself – it was calling out to be a cowl! This cowl is pretty generously sized, so it could be also be considered a smaller infinity scarf. The pattern is written for adding buttons, but you can choose to simply seam the two edges together if you prefer not to use the buttons.
Disclosure: There are affiliate links in this pattern post. By purchasing through those links, you allow the companies to pay me a small commission without costing you a penny more. Thank you for your support!
Red Heart’s “Unforgettable” yarn was just begging to be used for this project; The soft hues of the color palette were calling to me, as well as the softness of the yarn. Plus, it’s a worsted weight (#4) yarn, so the project works up quickly; especially with a size I crochet hook!
The buttons allow for multiple ways to wear the Squishtastic Cowl. You can wear it as it’s made, or you can twist it (once, twice or more) to fit.
The stitch pattern itself is pretty easy, but I’ve made a video tutorial for the stitch and you can access that by scrolling above or clicking HERE. I found the yarn at Michaels a little while back and it appears that they are still carrying it. However, if you prefer to use something else or order online, I’ll have my affiliate link on the materials section for Mary Maxim (they have a great selection of yarns!).
Most yarn labels have the gauge listed for single crochet, but I made a gauge swatch using double crochet.
The yarn label on the “Unforgettable” yarn lists a 4″ x 4″ / 10 cm x 10 cm swatch using single crochet and a J hook as 15 stitches x 18 rows. With the double crochet swatch that I created, I used the I / 5.5 mm hook and worked up 15 stitches x 8 rows to the 4″ x 4″ / 10 cm x 10 cm measurement.
Gauge isn’t super important with this piece. As long as you have enough yarn to finish the project and you’re happy with the drape, you’ll be good to go.
Cowl can be make wider or narrower by adding or subtracting in increments of 8
When working last 3 hdc, sk the last hdc and work final hdc in top of ch-2
If you check out the video tutorial, you’ll notice that I don’t work beginning and ending dc on the rows; instead I use hdc – I found that this gives a more even edge
Directions for Squishtastic Cowl:
Work 50 Fdc
RS: Ch 2, turn (does not count as hdc here and throughout); 1 hdc in first st and in ea of the next 2 sts, 1 FPDC around ea of the next 4 sts, * 1 BPDC around ea of the next 4 sts, 1 FPDC around ea of the next 4 sts; rep * across to last 3 sts, 1 hdc in ea of 3 remaining sts. (6 hdc, 24 FPDC, 20 BPDC)
WS: Ch 2, turn; 1 hdc in first st and in ea of the next 2 sts, work 1 BPDC around ea of the next 4 sts, * 1 FPDC around ea of the next 4 sts, 1 BPDC around ea of the next 4 sts; rep * to last 3 sts, 1 hdc in ea of 3 remaining sts. (6 hdc, 20 FPDC, 24 BPDC)
Rep rows 2-3 until piece measures 41″ or desired length.
If you prefer not to use buttons, feel free to fasten off after completing a row 3 repeat and seam the ends together.
Buttonhole
(If you prefer a tighter fit for the button, feel free to omit the ch-2 in the first row. Instead, ch 1 or omit the chain all together. You can also purchase larger buttons, as this is a little bit of a loose fit)
RS: Ch 2, turn; 1 hdc in first st and in ea of next 2 sts, *1 FPDC around next st, ch 2, sk 2, 1 FPDC around next st, 1 BPDC around ea of next 4 sts; rep * across to last 3 sts, omitting the last 4 BPDC, 1 hdc in ea of remaining 3 sts. (6 hdc, 20 BPDC, 12 FPDC, 6 ch-2 spaces)
WS: Ch 2, turn; 1 hdc in first st and in ea of next 2 sts, *1 BPDC around next st, 1 dc in ea of next 2 ch, 1 BPDC around next st, 1 FPDC around ea of next 4 sts; rep * across to last 3 sts, omitting the last FPDC section, 1 hdc in ea of remaining 3 sts. (6 hdc, 12 BPDC, 12 dc, 20 FPDC)
Ch 2, turn; 1 hdc in first st and in ea of the next 2 sts, 1 FPDC around ea of the next 4 sts, * 1 BPDC around ea of the next 4 sts, 1 FPDC around ea of the next 4 sts; rep * across to last 3 sts, 1 hdc in ea of 3 remaining sts. (6 hdc, 24 FPDC, 20 BPDC)
Ch 2, turn; 1 hdc in first st and in ea st across; Fasten off.
Styling
No Twist
One Twist
Two Twists
Above you’ll see three ways that I styled this lovely squishtastic cowl. The left side image has no twist, the middle image has one twist and the image on the right has two twists. Have fun with this and please tag me on social media @handmadebystacyj and #handmadebystacyj. I’d love to see how you wear yours!
This pattern is copyright 2022 Handmade by Stacy J. Please do not duplicate or copy any portion of this pattern, as well as photographs. You are encouraged to share images of your final product and are allowed to sell final products. I just ask that if you sell your final product, please purchase the ad-free pdf and please credit Handmade by Stacy J as the designer. Thank you for your support!
The Spring Ripples Baby Blanket is a super quick and easy blanket to crochet! It uses two strands of DK weight yarn held together and worked up for me in a weekend. It also has a pattern that is very easy to remember.
The yarn is extremely affordable through LoveCrafts and would be a great stash buster, as the contrasting colors only use about half a skein each. Just grab a main color and some fun contrasting colors and you can have a blanket in less time that it takes to decide on the colors!
This is an easy pattern that only uses a variation of double crochet, so a beginner could tackle this pretty easily. The hook size used makes this a dense and squishy blanket; if you would like yours a little more drapey, try using a larger hook; Some of my testers used worsted weight yarn with a K hook. Just keep in mind that your yarn usage will vary.
Difficulty level:
Easy
Stitches & Abbreviations Used:
Written in US Terms
Beg: Beginning
CC: Contrasting Color
Ch: Chain
Dc: Double Crochet
Dc3tog: Double Crochet 3 Together – Worked over 3 sts [Yarn over, insert hook in next stitch, yarn over and pull up loop, yarn over, draw through 2 loops] 3 times (4 loops on hook), yarn over, draw through all loops on hook —2 stitches decreased
MC: Main Color
Pc: Popcorn (When working Pc, do NOT ch 1 to close the st) Work 5 double crochet (dc) stitches in the same stitch, drop the loop from your hook, insert your hook from front to back under the top 2 loops of the first double crochet of the group, grab the dropped loop with your hook, as well as the dropped CC and pull it through the stitch, do NOT ch 1.
Rep: Repeat
Sk: Skip
Sl St: Slip Stitch
St (s): Stitch (es)
Tch: Turning Chain
Here’s a pin for your Pinterest board
Disclosure: If you choose to purchase your yarn through my affiliate links, please know that you will be allowing the companies to pay me a small commission without costing you a penny more. This allows me to continue creating free content. Thank you for your support!!
Working Dc with two strands of yarn held together, 12 sts x 7 rows = 4”
Gauge isn’t very important, however your yarn quantity will vary depending on your gauge.
Notes:
Two strands are held together at all times, with MC being one strand throughout, except for when making the Popcorn stitch.
Pattern may be made wider by adding stitches in multiples of 14 (+2 for base chain)
Stitch count of 98 sts will be the same on every row
To purchase an ad-free pdf that includes a chart, row checklist, gift tag and care instruction tag (if you used the recommended yarn) of this pattern, please visit my Ravelry or Etsy Shop.
1 (RS): Sk 2 ch (counts as dc), 2 dc in next ch, *1 dc in ea of next 3 ch, [over next 3 ch, work dc3tog] twice, 1 dc in each of next 3 ch, [3 dc in next ch] twice; rep * across ending with 3 dc in last ch, turn.
2 (WS): Ch 3 (counts as dc), 2 dc in same st, *1 dc in ea of next 3 sts, [over next 3 sts, work dc3tog] twice, 1 dc in each of next 3 sts, [3 dc in next st] twice; rep * across ending with 3 dc in tch; cut one strand of MC and join Color A; turn.
3 (RS): [On this row, you will use only the CC for the Popcorn stitch and then the 2 strands throughout the rest of the row] Ch 3 (counts as dc), 2 dc in same st, *1 dc in next st, using only CC work 1 pc in next st, using both strands work 1 dc in next st, [work dc3tog] twice, 1 dc in next st, using only CC work 1 pc in next st, using both strands work 1 dc in next st, [3 dc in next st] twice; rep * across ending with 3 dc in tch; turn.
4 (WS): Ch 3 (counts as dc), 2 dc in same st, *1 dc in ea of next 3 sts, [work dc3tog] twice, 1 dc in each of next 3 sts, [3 dc in next st] twice; rep * across ending with 3 dc in tch; turn.
Continue repeating rows 3 and 4 in the following sequence:
With MC and CC-A: Rep rows 3 and 4 twice more
With MC: Rep rows 3 and 4 once
With MC and CC-B: Rep rows 3 and 4 three times
With MC: Rep rows 3 and 4 once
With MC and CC-C: Rep rows 3 and 4 three times
With MC: Rep rows 3 and 4 once
With MC and CC-D: Rep rows 3 and 4 three times
With MC: Rep rows 3 and 4 once
With MC and CC-E: Rep rows 3 and 4 three times
Final two rows will be using MC strands held together & will not involve Popcorn sts
Repeat row 4 twice; do not fasten off, turn
Border (RS facing):
Working along the top edge, repeat row 4; do not turn, instead rotate the blanket so that you’re working down the long edge.
Work 1 more dc where the last 3 dc were just made, work dc in next st and evenly down the side; do not turn, rotate blanket so that you’re working along the lower edge.
(When working this section, it’s helpful to put a stitch marker where the first “point” of the blanket is, that way if you’re off count at all, you can adjust by adding or decreasing a dc as needed) Over the next 3 sts, work dc3tog, 1 dc in ea of the next 3 sts (you should be at the point of the pattern), *[work 3 dc in next st] twice, 1 dc in ea of the next 3 sts, [work dc3tog] twice, 1 dc in ea of the next 3 sts; rep * to the last “point” of the bottom edge. Work [3 dc in next st] twice, 1 dc in each of the next 3 sts, dc3tog over next 3 sts.
Work dc in first st (where the last of the dc3tog is) and evenly down the side ending with a sl st in the top of beg ch-3.
Fasten off and weave in all ends. This is when I wash and block the blanket, prior to adding the fringe.
Fringe:
Cut 4 strands that are 18” long for each point of the blanket on the shorter edges. I used 2 strands of the MC and 2 strands of a contrasting color, but feel free to get creative. Attach 4 strands to each point; then measure the fringe to 6” and trim.
A huge thank you to my wonderful testers!
Please show them some love on Instagram @radarandmomma, @gypsyinrhapsody, @designsbydali and @restless_philomath
Please tag me on your finished blanket @handmadebystacyj and #handmadebystacyj – I’d love to see it!
The Cozy Tablet Tote is a stylish way to store your tablet. It’s easily modified to fit any of your gizmos that may need a tote. This is designed to be a quick and easy gift to make. Enjoy!
Disclosure: There are links on this post that are for companies that I am an affiliate for. By clicking on and purchasing from these links, you are allowing the company to pay me a small commission, while not costing you a penny more. Thank you for your support.
2 Lockable stitch markers (Optional) I use these for indicating where my first and last stitches made are located and this helps for straight edges
Tapestry needle
Scissors
Button (I used a .75” button), sewing needle and sewing thread
To purchase an ad-free pdf of this pattern, please visit my Ravelry Store.
Gauge:
14 sts x 15 rows = 4” using sc
Measures:
8”x10” without flap, 8” x 14” with flap opened
Notes:
• To adjust width, you can add or subtract stitches in mulitples of 2; to adjust height, add or omit rows of the “Alpine Section” as desired.
• Ch 1 at the beginning of row does not count as a stitch
• Yarn tails should be left long (approximately 12” – 18”) as you finish each section for ease of sewing the panels together.
• Using a stitch marker at the first sc made on any sc rows and in the second ch of the ch-2 on dc rows to help keep your edges straight & not lose track of where the ch-2 on some rows are.
• Tote’s second panel is worked by joining in your FSC row, therefore eliminating some seaming; if you prefer to work 2 separate panels, you can do so by working panel 1 two times.
Directions for Cozy Tablet Tote:
Panel 1
1: With MC, make 30 FSc, then turn
2: Ch 1 (does not count as a st), work 1 sc in same st and in each st across, then turn. (30 sc)
3 – 7: Repeat row 2 for 5 more rows with Color A (Grey)
8: Repeat row 2 with Color C (White)
Alpine Section Directions
Notes:
• This panel always starts on the Wrong Side
• While drawing up first loop of FpDc, bring the loop to the height of the current dc to avoid puckering or pulling on this row (it should lay flat)
• As you work a FpDc, be sure NOT to work the st behind it, as you’ve already worked that stitch, only 2 rows below.
Directions:
With Color B (Scuba)
9: WS: Ch 1, work 1 sc in same st in ea st across, then turn. (30 sc)
10: RS: Ch 2 (counts as dc), 1 dc in next st & in ea st across, then turn. (30 dc)
11: WS: Ch 1, work 1 sc in same st in ea st across, (being sure not to miss the top of the ch-2), then turn. (30 sc)
12: RS: Ch 2 (counts as dc), 1 dc in ea of next 3 sts, *FpDc around next dc post 2 rows below, (the 5th post from the edge), 1 dc in next st; rep * until 2 st remains, 1 dc in ea of last 2 sts, turn. (12 FpDc, 18 dc)
13: WS: Rep row 11
14: RS: Ch 2 (counts as dc), 1 dc in ea of next 4 sts *FpDc around next dc post 2 rows below, 1 dc in next st; rep * until 3 sts rem, 1 dc in ea of last 3 sts, turn. (11 FpDc, 19 dc)
15: WS: Rep row 11
16: RS: Rep row 12
17: WS: Rep row 11, switch to Color C (White) and then break color B (Scuba) leaving a longer yarn tail for seaming later.
Single Crochet Transition
18: RS: With Color C, rep row 9, then switch to Color A (Grey) and break Color C.
19: WS: With Color A, rep row 9, then switch to Color C (White) and break Color A.
20: RS: With Color C, rep row 9, then switch to Color B (Scuba), and break Color C.
Alpine Section 2
Rows 21 – 29: With Color B (Scuba), repeat rows 9-17, then switch to color C (White) and break Color B
Row 30: With Color C, rep row 18, then switch to Color A (Grey) and break Color C.
Rows 31 – 37: With Color A, rep row 2, then fasten off.
Panel 2
This panel will start by joining in the original foundation made at the beg of Panel 1.
With Panel 1 upside down and wrong side facing, join Color A in right corner with standing sc and then work 1 sc in ea st across, turn. (30 sc)
Repeat Panel 1 starting with row 2 and fasten off when completed.
Assembly
With the right sides facing you, fold your panel in half and make sure all the stripes line up correctly.
Then, unfold the panel and fold it in half with the right sides facing each other (the wrong side should be showing on the exterior now.
While sandwiching the piece, use your yarn tails to seam the pouch together on the wrong side; For simplicity, you can loosely tie the yarn tails that meet up together or use stitch markers to hold it all in place.
Use a tapestry needle to sew the panel sides together and then turn the pouch right side out.
Whew – you’ve completed the biggest section; And, now it’ll all be easy peasy from here on out.
Top Border
With Color C (White), join in a seamed corner stitch with a standing sc (Insert stitch marker in top of this stitch for ease of joining), then work 1 sc in each st around top of pouch, joining with sl st to top of standing sc (where the sm is), fasten off and weave in ends. Depending on how you seamed your pouch, you should have approximately 60 sc.
If you prefer to sew in a zipper, this would be a good time to do so. And, if you prefer not to do the closure flap, then your pouch is finished!
Closure Flap
Look at your pouch and then decide which side will be the front and which side will be the back.
With the front side facing you, looking at the WS of the back (Basically, it’s open and your looking inside), place a sm in the top of the middle of the back where the Top Border is.
Then, count 12 sts to the left (including the st that has the sm) and place a sm or a scrap piece of yarn around the post of the st one row below the Top Border.
Count 12 sts to the right (including the st that has the sm) and place another sm or scrap piece of yarn around the post of the st one row below the Top Border.
Remove the middle sm, because your flap will be worked between where the left and right stitch markers are.
Take another look to see if your happy with that placement. If it doesn’t seem centered, you can shift it over a stitch or two if you like as long as you make sure that you shift both stitch markers; there will be 23 sts worked.
Turn pouch wrong side out, because you will be working this section flat.
Closure Flap Stitch Directions:
1: With Color A, join with standing FpSc to post with sm, work 1 FpSc in ea of the next 22 sts, turn and then remove stitch markers. (23 sc)
2 – 4: Ch 1, work 1 sc in ea st across, turn.
5: Ch 1, sc2tog, 1 sc in ea st to the last 2, sc2tog, turn. (21 sc)
Rep row 5 nine times – you will end up with a total of 3 sc left.
Ch 1, sc3tog, fasten off.
For these last rows, you will only be working the two sides of the flap that fold over (not the part that connects to the body of the tote).
• Color B and RS facing: join with standing sc to top corner where the flap begins at the body of the pouch, then work 1 sc in ea st down the edge, working (1 sc, ch 2, 1 sc) in corner where the sc3tog is located, and continue to work 1 sc in ea st on edge, joining to sc that is located on tote body; Fasten off.
• With Color C: Rep row 16, except in ch-2 sp work (1 dc, *ch5, 1dc), then fasten off. (You may need to add or subtract the ch quantity to adjust for your button size; Make sure that this fits snuggly and isn’t too loose or too tight in order to secure the button.)
• Determine button placement and then sew on button to the pouch.
• Weave in all ends and enjoy!
I’d love to see yours – please take pictures, tag me on social media with #handmadebystacyj and link to the Ravelry project page!
Stacy J
This pattern is copyright 2020 Handmade by Stacy J. Please do not duplicate or copy any portion of this pattern, as well as photographs. You are encouraged to share images of your final product and are allowed to sell final products; If you sell your final product, I just ask that you please purchase the ad-free pdf and credit Handmade by Stacy J as the designer. Thank you!
Today I’m sharing with you how to crochet the Herringbone Double Crochet. Not only am I showing you the traditional method, I’m also showing you how to modify the edges so that they’re much straighter. You’ll be amazed at how a simple, little trick makes such a big difference! The written directions are below, as well as the video tutorial.
The crochet hook used is my absolute favorite hook. It’s the Furls Odyssey in Turquoise; however, they now have a bunch of colors that I love! The yarn is also lovely! It’s a super soft, inexpensive and absolutely lovely yarn that I just love, as well (Oh, and it doesn’t split!). So much so that I became an affiliate with the Furls company and LoveCrafts. What that means for you is that when you purchase using my link, you allow the company to pay me a small commission without costing you a penny more. This helps me to continue making free tutorials and patterns. Here is the link if you’d like to check them out for yourself:
Herringbone Double Crochet (HbDc): Yo, insert hook, yo, draw through st and 1st loop on hook, yo, draw through 1 loop, yo, draw through both loops on hook.