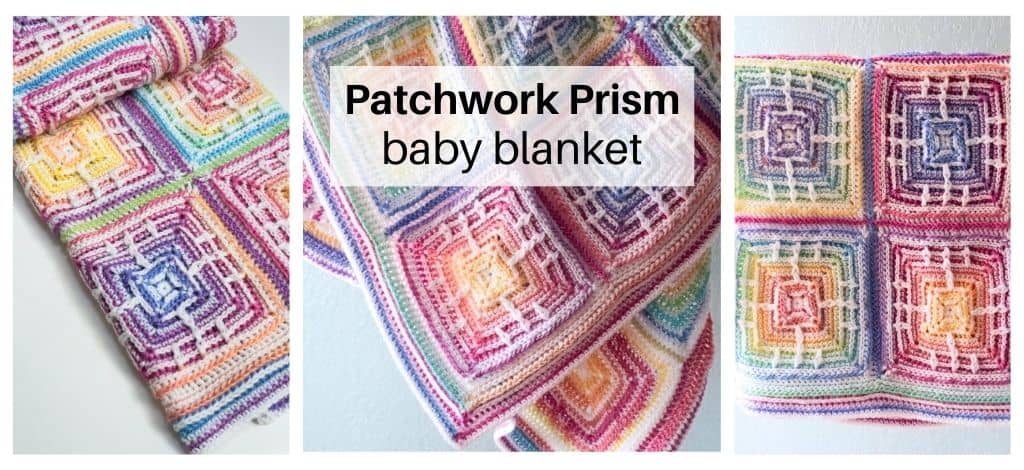
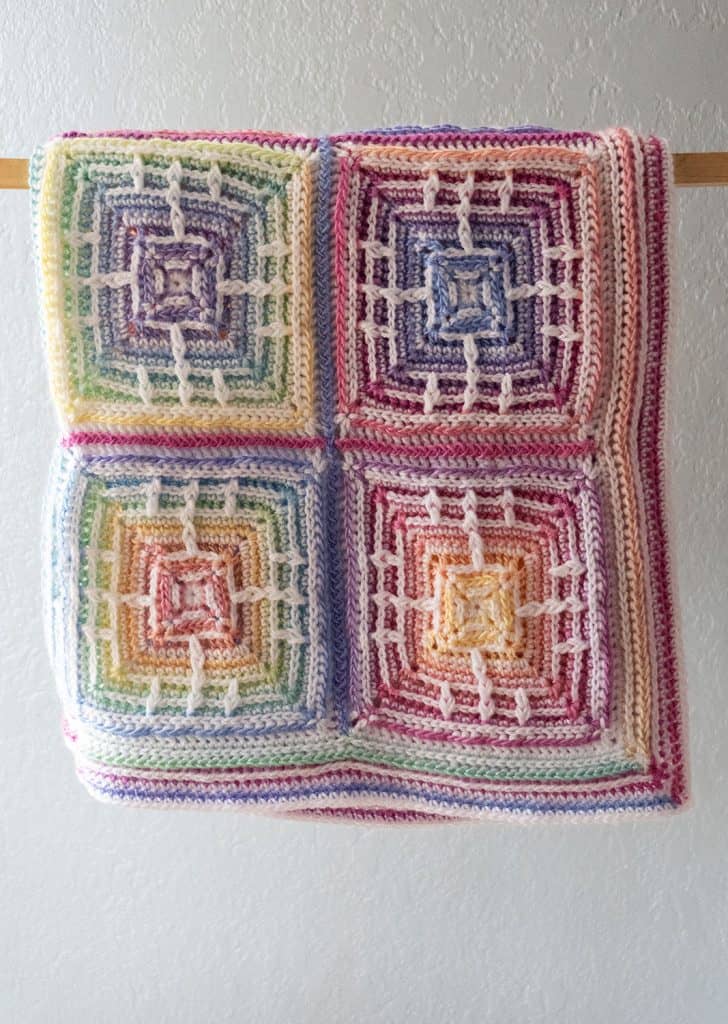
Today I am so excited to share with you the FREE crochet pattern for the Patchwork Prism Baby Blanket!
Disclosure: This post contains affiliate links. As an affiliate, when you purchase through my links, you allow the company to pay me a small commission without costing you a penny more, which allows me to continue making free content.
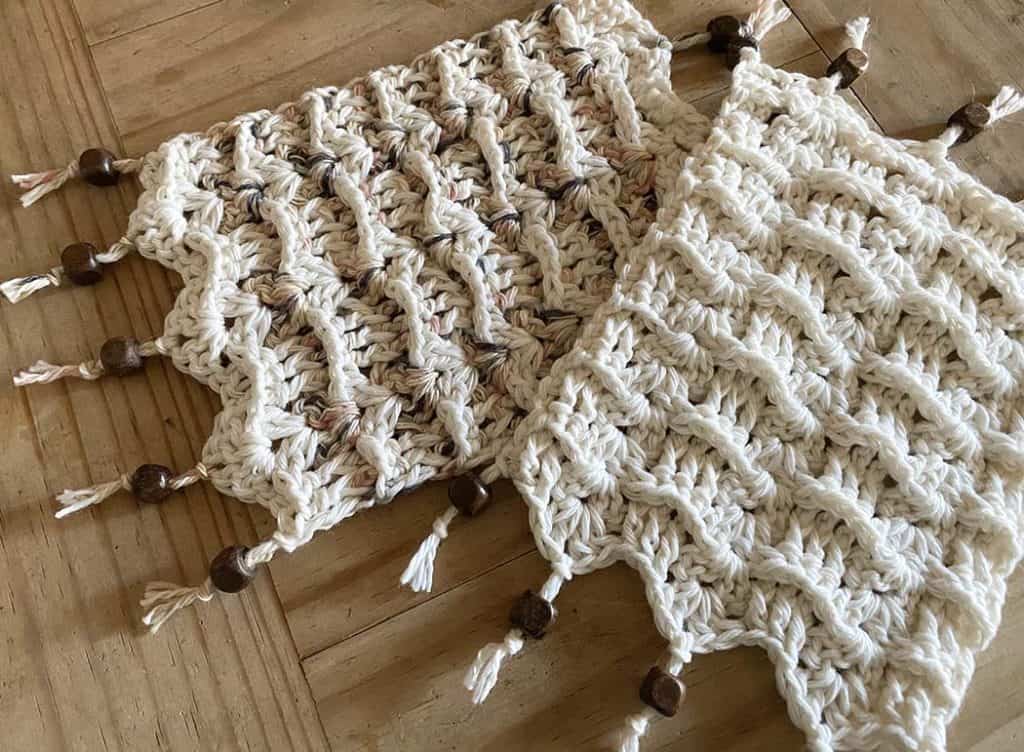
About the Patchwork Prism Baby Blanket
The Patchwork Prism Baby Blanket was inspired by Mary Maxim’s “Prism” yarn – it’s wonderfully colorful and so much fun to work with. I had used the “Prism” yarn for the Mary Maxim kit of the Birthday Sorbet Baby Blanket. The idea of using that particular yarn with a solid color and lots of texture really called out to me. So, after some fiddling with the stitches, the placement and some ideas, the Patchwork Prism Baby Blanket was born!
My testers rated this pattern as “Intermediate”, so it does require some concentration for the first square or two. But, don’t let that scare you. The squares use basic stitches with the occasional front post stitch placed in there and some back posts for texture. Also, there’s only 4 ends to weave in with each square! Instead of cutting the yarn with each round, I recommend simply carrying it up with your work. There are also videos to help you along with the square, the join and the border.
On a side note, I want to extend a big “Thank You!” to all of my testers that helped with this design and a huge “Thank You” to Mary Maxim for supporting my idea!

About the yarn
The yarn used was provided to me from Mary Maxim. The solid color (white) is Mary Maxim “Mellowspun DK”. This is a DK / #3 light weight yarn that is 100% acrylic. It works up beautifully, is machine washable and there are LOTS of colors to choose from.
The colorful yarn is the wonderful, self striping yarn named Mary Maxim “Prism”. It’s also a DK / #3 light weight yarn that is 100% acrylic. It works beautifully with the Mellowspun DK and comes in gorgeous colors to choose from. For this particular blanket, I used the color “Rainbow”.
To purchase a kit directly through Mary Maxim, please use my affiliate link HERE
If you prefer a printable pdf that includes a chart for the square, is written using US terminology, 14 point font for easier reading and a printable gift tag for gifting, you can purchase through Ravelry (or add to your favorites or que) or you can purchase through my Etsy store. To purchase a kit directly through Mary Maxim, please use my affiliate link HERE


Due to this being a digital download, no refunds will be given. Thank you!

Materials:
- Main Color (MC): Mary Maxim Mellowspun DK: 100% Acrylic; 3.5 oz / 100 g; 284 yd / 260 m; #3 Lightweight / DK – White – 3 skeins or 852 yds / 779 m of any other #3 / DK weight yarn
- Contrast Color (CC): Mary Maxim Prism yarn (100% Acrylic; 290 yds / 265 m; #3 DK weight) in color “Rainbow” – 3 skeins or 870 yds / 796 m of any other self striping #3 / DK weight yarn
- US G+ / 4.5 mm crochet hook (My favorite is Furls!)
- 4 removable stitch markers (optional)
- Tapestry needle
- Scissors
To purchase a kit that contains the printed pattern and the yarn needed directly through Mary Maxim, please use my affiliate link HERE
Measures:
-
Blanket: 34.5” x 34.5” / 88 cm x 88 cm
-
Each square: 7.25” x 7.25” / 18.4 cm x 18.4 cm
Difficulty Level:
Intermediate
Gauge:
After completing round 4 of the square, piece should measure 2.5” / 6.35 cm – Gauge isn’t critical, but will affect size and yarn usage
Stitches & Abbreviations Used
(Pattern is written in US terms):
-
Beg: Beginning
-
BpDc: Back post double crochet
-
BpHdc: Back post half double crochet
-
BpSc: Back post single crochet
-
CC: Contrast color
-
Ch (s): Chain (s)
-
Dc: Double crochet
-
FpDc: Front post double crochet
-
Hdc: Half double crochet
-
MC: Main color
-
Rep: Repeat
-
Rep *: Repeat the stitches that follow the * symbol as many times as indicated
-
Sl st: Slip stitch
-
Sp (s): Space (s)
-
St (s): Stitch (es)
-
X: Times (ex: 2x = 2 times)
If you prefer a printable pdf that includes a chart for the square, is written using US terminology, 14 point font for easier reading and a printable gift tag for gifting, you can purchase through Ravelry (or add to your favorites or que) or you can purchase through my Etsy store. To purchase a kit directly through Mary Maxim, please use my affiliate link HERE
Due to this being a digital download, no refunds will be given. Thank you!
Directions for Patchwork Prism Baby Blanket:
Notes:
-
Square is worked in the round; do not turn work.
-
Do not cut yarn for each round, instead carry it up with your work
-
Each square uses approximately 12 – 14g of each color
-
When working the Dc 2 rows below and the FpDc stitches, extend the height of the Dc or FpDc to be consistent with the height of the surrounding stitches
-
Stitch counts at the end of each round do not include ch-2 spaces
-
For ease of joining, please block each square prior to doing the join
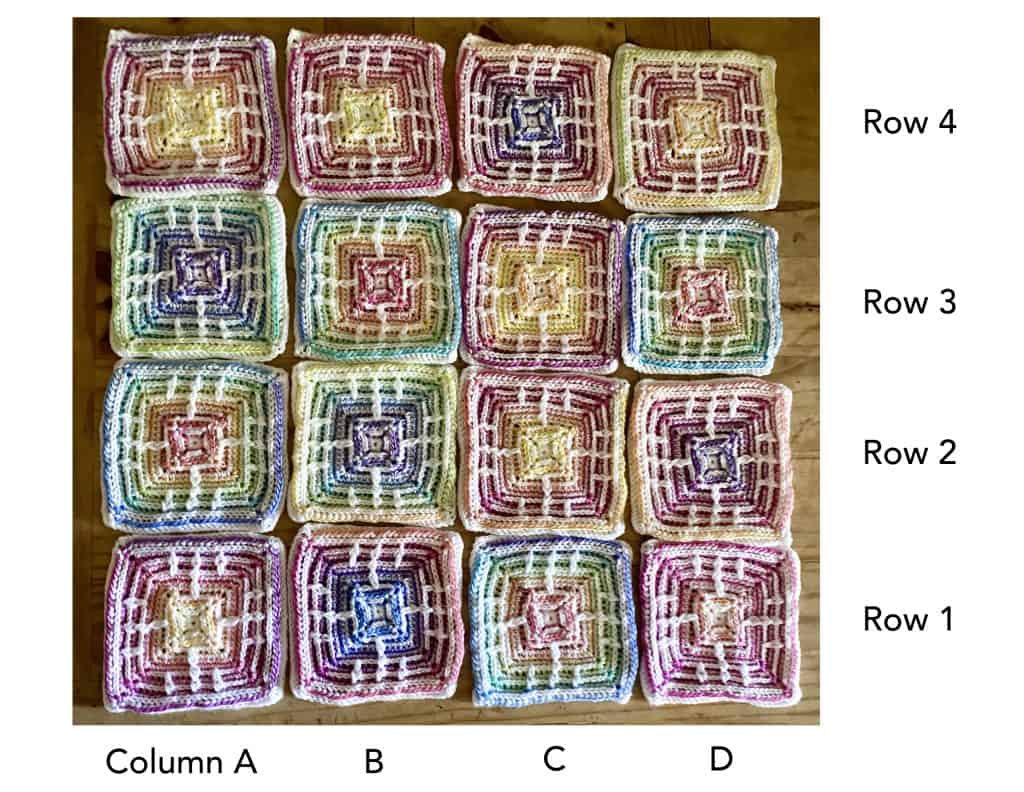
Directions for Square – Make 16
Make Magic Ring
Round 1 – MC: Ch 4 (counts as 1 hdc and ch-2), *3 hdc, ch 2; rep * 2 more times, 2 hdc, join CC with sl st to third ch of beg ch-4 (Each side: 3 hdc, 1 ch-2 sp)
Round 2 – CC: Ch 3 (counts as sc, ch-2), work 1 more sc in corner ch-2 sp, *1 BpHdc around ea of next 3 sts, in ch-2 sp work (1 sc, ch 2, 1 sc); rep * 2 more times, 1 BpHdc around ea of next 3 sts, join MC with sl st to second ch of beg ch-3 (Each side: 2 sc, 3 BpHdc)
Round 3 – MC: Ch 3 (counts as sc, ch-2), work 1 more sc in corner ch-2 sp, *1 BpHdc around ea of next 5 sts, in ch-2 sp work (1 sc, ch 2, 1 sc); rep * 2 more times, 1 BpHdc around ea of next 5 sts, join CC with sl st to second ch of beg ch-3 (Each side: 2 sc, 5 BpHdc)
Round 4 – CC: Ch 4 (counts as hdc & ch-2), work one more hdc in corner ch-sp, *1 BpDc around ea of next 7 sts, in ch-2 sp work (1 hdc, ch 2, 1 hdc); rep * 2 more times, 1 BpDc around ea of last 7 sts, join MC with sl st to third ch of beg ch-4 (Each side: 2 hdc, 7 BpDc)
Round 5 – MC: Ch 3 (counts as sc, ch-2), work 1 more sc in corner ch-2 sp, *1 sc in ea of next 4 sts, 1 dc in st 2 rows below, 1 sc in ea of next 4 sts, in ch-2 sp work (1 sc, ch 2, 1 sc); rep * 2 more times, 1 sc in ea of next 4 sts, 1 dc in st 2 rows below, 1 sc in ea of next 4 sts, join CC with sl st to second ch of beg ch-3 (Each side: 10 sc, 1 dc)
Round 6 – CC: Ch 3 (counts as sc, ch-2), work 1 more sc in corner ch-2 sp, *1 sc in ea of the next 11 sts, in corner sp work (1 sc, ch 2, 1 sc); rep * 2 more times, 1 sc in ea of the last 11 sts, join MC with sl st to second ch of beg ch-3 (Each side: 13 sc)
Round 7 – MC: Ch 3 (counts as sc, ch-2), work 1 more sc in corner ch-2 sp, *1 sc in ea of next 6 sts, 1 FpDc around dc made 2 rows below, 1 sc in ea of next 6 sts, in ch-2 sp work (1 sc, ch 2, 1 sc); rep * 2 more times, 1 sc in ea of next 6 sts, 1 FpDc around dc made 2 rows below, 1 sc in ea of next 6 sts, join CC with sl st to second ch of beg ch-3 (Each side: 14 sc, 1 FpDc)
Round 8 – CC: Ch 3 (counts as sc, ch-2), work 1 more sc in corner ch-2 sp, *1 BpHdc around ea of next 15 sts, in ch-2 sp work (1 sc, ch 2, 1 sc); rep * 2 more times, 1 BpHdc around ea of next 15 sts, join MC with sl st to second ch of beg ch-3 (Each side: 15 BpHdc, 2 sc)
Round 9 – MC: Ch 3 (counts as sc, ch-2), work 1 more sc in corner ch-2 sp, *1 sc in ea of next 4 sts, 1 dc in MC stitch 2 rows below, 1 sc in ea of next 3 sts, 1 FpDc around FpDc made 2 rows below, 1 sc in ea of next 3 sts, 1 dc in MC stitch 2 rows below, 1 sc in ea of next 4 sts, in ch-2 sp work (1 sc, ch 2, 1 sc); rep * 2 more times, 1 sc in ea of next 3 sts, 1 dc in MC stitch 2 rows below, 1 sc in ea of next 3 sts, 1 FpDc around FpDc made 2 rows below, 1 sc in ea of next 3 sts, 1 dc in MC stitch 2 rows below, 1 sc in ea of next 4 sts, join CC with sl st to second ch of beg ch-3 (Each side: 16 sc, 1 FpDc, 2 dc)
Round 10 – CC: Ch 3 (counts as sc, ch-2), work 1 more sc in corner ch-2 sp, *1 BpHdc around ea of next 19 sts, in ch-2 sp work (1 sc, ch 2, 1 sc); rep * 2 more times, 1 BpHdc around ea of next 19 sts, join MC with sl st to second ch of beg ch-3 (Each side: 19 BpHdc, 2 sc)
Round 11 – MC: Ch 3 (counts as sc, ch-2), work 1 more sc in corner ch-2 sp, *1 sc in ea of next 6 sts, 1 FpDc around post of dc 2 rows below, 1 sc in ea of next 3 sts, 1 FpDc around FpDc made 2 rows below, 1 sc in ea of next 3 sts, 1 FpDc around post of dc 2 rows below, 1 sc in ea of next 6 sts, in ch-2 sp work (1 sc, ch 2, 1 sc); rep * 2 more times, 1 sc in ea of next 6 sts, 1 FpDc around post of dc 2 rows below, 1 sc in ea of next 3 sts, 1 FpDc around FpDc made 2 rows below, 1 sc in ea of next 3 sts, 1 FpDc around post of dc 2 rows below, 1 sc in ea of next 6 sts, join CC with sl st to second ch of beg ch-3 (Each side: 20 sc, 3 FpDc)
Round 12 – CC: Ch 3 (counts as sc, ch-2), work 1 more sc in corner ch-2 sp, *1 BpHdc around ea of next 23 sts, in ch-2 sp work (1 sc, ch 2, 1 sc); rep * 2 more times, 1 BpHdc around ea of next 23 sts, join MC with sl st to second ch of beg ch-3 (Each side: 23 BpHdc, 2 sc)
Round 13 – MC: Ch 4 (counts as hdc & ch-2), work one more hdc in corner ch-sp, *1 BpDc around ea of next 25 sts across, work (1 hdc, ch 2, 1 hdc) in corner sp; rep * around ending with sl st in third ch of beg ch-4, fasten off (Each side: 25 BpDc, 2 hdc)
Joining the squares using the “Zigzag Slip Stitch Join” method
-
Before beginning the join, lay all squares out to determine placement of squares and take a picture to reference.
-
Lay out bottom row and next row (See picture below for visual reference).
1. Using removable stitch markers, mark the stitch that is after the first ch-2 sp and the stitch that is before the next ch-2 sp on each of the two squares sides that will be joined together (the ch-2 sp is easy to find, but the next st can be more difficult)
2. Using CC, make slip knot
3. Insert hook in bottom (closest to you) chain space in the right side square from front to back, then insert hook into the slip knot. Pull the hook through the ch-2 sp with slip knot
4. Insert hook in bottom (closest to you) chain space in the left side square from front to back
5. Work slip stitch
6. Insert hook in next st of right side square, work slip stitch
7. Insert hook in next st of left side square, work slip stitch
Continue repeating steps 6 – 7 until you come to the end of the row ending with the final slip stitches in the chain-2 spaces.
Joining the columns
Work the join for the columns the same as the rows, but when you come up to where the columns and rows intersect, work over the row join when slip stitching into the next block’s chain-2 space.
Border
Notes:
-
The border works with any stitch increment, so being off by a stitch or two isn’t critical
-
RS is always facing; do not turn your work