The Crossed Front Post Double Crochet Columns stitch pattern is a lovely (and easy) stitch to learn. The chain space between the columns offer a touch of lace, while the double crochet panels between the columns offer stability and a denser fabric. This stitch is worked in stitch multiples of 9 + 3 chains over a 2 row repeat.
Disclosure: This post contains affiliate links. That means that I may receive compensation when you purchase through my links at no additional cost to you. I am a King Cole Brand Ambassador and this post is part of our ongoing collaboration. Thank you for your support!
The 4 Day Throw was inspired by a knit stitch that I modified for a collaboration project with another designer. She directed her followers to my YouTube channel and had them pick out a stitch for her upcoming design. Well, they all picked a knit stitch. My fellow designer is not a knitter, so I adapted the stitch to slightly resemble the stitch chosen. Hence, the Leafy Lace Stitch was born!
As I created the stitch, it really called out to me to be a blanket. So, I gathered some yarn and gave it a shot. Although I loved the first version, it needed some adjustments. So, I made it again and had it tested. The testers did an amazing job and also gave me feedback that required going back to the drawing board. I reworked and rewrote the pattern, had it tested once more and here we have it!
I named it the “4 Day Throw” because I was able to make each version In just under 4 days. However, I did work on each blanket for about 8-10 hours each day. Your timing may vary depending on your skill level and the time that you have to dedicate to your project.
My testers rated the 4 Day Throw for an Intermediate to Advanced level crocheter. They did warn that this is not a project with which you can lose yourself in a television program or podcast. This project does require some concentration. However, the end result is worth it!
It’s sized for a 48″ x 58″ throw and the terms are written in US terminology. There’s a full length video tutorial (with time stamps) to help throughout the entire throw.
Also, THANK YOU to all of my wonderful testers! I couldn’t have done this pattern without you! And a big THANK YOU to Mary Maxim for providing the yarn for this gorgeous blanket!
If you prefer and ad free pdf that includes a chart, checklist, larger font and gift tags for gifting you blanket, you click here to purchase off of Ravelry (or add it to your favorites or que), or you can purchase from my Etsy store.
Materials:
This pattern contains affiliate links. That means that I may receive compensation when you purchase through my links at no additional cost to you.
Stitches & Terms Used (Pattern is written in US terms):
BPTR: Back Post Treble Crochet – Yo 2 times, insert hook back to front around indicated stitch, draw up a loop (4 loops on hook), [yo, draw through 2] three times
BPTR3tog: Back Post Treble 3 Together – Yo 2 times, insert hook back to front around first stitch, draw up a loop, [yo, draw through 2] two times (2 loops on hook), yo 2 times, insert hook back to front around next stitch, draw up a loop, [yo, draw through 2] two times (3 loops on hook), yo 2 times, insert hook back to front around next stitch, draw up a loop [yo, draw through 2] two times (4 loops on hook), yo, draw through remaining 4 loops
Ch: Chain
Dc: Double Crochet
Dc2tog: Double Crochet 2 Together – Yo, insert hook into next st, yo and draw up a loop, yo and draw through 2 (leaving 2 loops on hook), yo, insert hook into next stitch, yo and draw up a loop, yo and draw through 2 (3 loops remaining on hook), yo and then draw through all 3 loops on hook
Ea: Each
Fdc: Foundation Double Crochet – Ch 3; Yo, insert hook in 3rd chain from hook, yarn over and pull up loop (3 loops on hook); Yo and draw through 1 loop (1 chain made); [Yo and draw through 2 loops] 2x (1 Fdc with ch at bottom); *Yo, insert hook under the 2 loops of the chain at the bottom of the stitch just made, yo and pull up loop (3 loops on hook), yo and draw through 1 loop (1 chain made), (yo and draw through 2 loops) 2 times; rep *
FPTR3tog: Front Post Treble 3 Together – Yo 2 times, insert hook front to back around first stitch, draw up a loop, [yo, draw through 2] two times (2 loops on hook), yo 2 times, insert hook front to back around next stitch, draw up a loop, [yo, draw through 2] two times (3 loops on hook), yo 2 times, insert hook front to back around next stitch, draw up a loop [yo, draw through 2] two times (4 loops on hook), yo, draw through remaining 4 loops
FPTR: Front Post Treble Crochet – Yo 2 times, insert hook front to back around indicated stitch, draw up a loop (4 loops on hook), [yo, draw through 2] three times
modBPTR: Modified Back Post Treble Crochet – Yo 2 times, insert hook back to front around post that faces RS of indicated stitch, draw up a loop (4 loops on hook), [yo, draw through 2] twice (2 loops on hook), yo, insert hook in stitch behind post just worked, draw up a loop (4 loops on hook), yo, draw through 2, yo, draw through remaining 3 loops
modFPTR: Modified Front Post Treble Crochet – Yo 2 times, insert hook front to back around post that faces RS of indicated stitch, draw up a loop (4 loops on hook), [yo, draw through 2] twice (2 loops on hook), yo, insert hook in stitch behind post just worked, draw up a loop (4 loops on hook), yo, draw through 2, yo, draw through remaining 3 loops
Rep: Repeat
RS: Right Side
Sk: Skip
Sp: Space
St(s): Stitch (es)
Tch: Turning Chain
WS: Wrong Side
X: Times (Example: 5x = 5 times)
Yo: Yarn over
Gauge Swatch
The gauge swatch pattern is used to confirm that you are working with the same tension as I do. This helps in determining the amount of yarn needed. If your gauge swatch turns out larger, go down a hook size. If your swatch measures smaller, then go up a hook size.
The gauge swatch pattern has a slightly different border than the blanket does. However, it’s a great way for you to gain understanding of how the leaves are formed. You’ll get comfortable with the placement of your stitches, as well as understand the modified front and back post treble crochet stitches.
To see a video tutorial that walks you through the gauge swatch, please click the image below or click HERE; you can also visit the crochet stitchespage, if you prefer.
Gauge Swatch Pattern
Measures: 6” x 5” / 15.24 cm x 12.7 cm
Note (For Gauge Swatch only): Ch-3 at beg of row counts as first dc
Using J / 6 mm crochet hook, work 19 Foundation dc and skip to step 2 (only work step one is if the beginning ch method is your preferred method)
Row 1: Ch 22; Work 1 dc in fourth ch from hook (skipped chs count as first dc) and then in ea ch across
2: Ch 3, turn; (RS): 1 dc in next st, 1 modFPTR in next st, 1 dc in ea of the next 3 sts, ch 2, sk 3, 3 dc in next st, ch 2, sk 3, 1 dc in ea of next 3 sts, 1 modFPTR in next st, 1 dc in next st and 1 dc in top of tch
3: Ch 3, turn; (WS): 1 dc in next st, 1 modBPTR in next st, 1 dc in ea of next 2 sts, ch 2, sk 1 dc and ch-2 sp, 1 BPTR around first post of 3-dc cluster, [1 BPTR, 1 dc, 1 BPTR] in second st, 1 BPTR around third post of 3-dc cluster, ch 2, sk ch-2 sp and dc, 1 dc in ea of next 2 sts, 1 modBPTR in next st, 1 dc in next st and 1 dc in top of tch
4: Ch 3, turn; 1 dc in next st, 1 modFPTR in next st, 1 dc in next st, ch 2, sk 1 dc and ch-2 sp, 1 FPTR around ea of the next 2 posts, [1 FPTR, 1 dc, 1 FPTR] in next st, 1 FPTR around post of ea of the next 2 sts, ch 2, sk ch-2 sp and 1 dc, 1 dc in next st, 1 modFPTR in next st, 1 dc in next st and 1 dc in top of tch
5: Ch 3, turn; 1 dc in next st, 1 modBPTR in next st, 1 dc in next st and 1 dc in ch-2 sp, ch 2, 1 BPTR around ea of the next 2 posts, 1 BPTR3tog around next 3 posts, 1 BPTR around ea of next 2 posts, ch 2, 1 dc in ch-2 sp and 1 dc in next st, 1 modBPTR in next st, 1 dc in next stand 1 dc in top of tch
6: Ch 3, turn; 1 dc in next st, 1 modFPTR in next st, 1 dc in ea of next 2 sts and ch-2 sp, ch 2, 1 FPTR in next st, 1 FPTR3tog around next 3 posts, 1 FPTR in next st, ch 2, 1 dc in ch-2 sp and in ea of next 2 dcs, 1 modFPTR in next st, 1 dc in next st and 1 dc in top of tch
7: Ch 3, turn; 1 dc in next st, 1 modBPTR in next st, 1 dc in next 3 sts and 1 dc in ch-2 sp, ch 2, BPTR3tog around next 3 posts, ch 2, 1 dc in ch-2 sp and in ea of the next 3 sts, 1 modBPTR in next st, 1 dc in next st and 1 dc in top of tch
Take a look at your gauge swatch and it should look like the example below. It should measure 6” / 15.2 cm across and 5” / 12.7 cm tall. Now, let’s move on to the blanket.
If you prefer and ad free pdf that includes a chart, checklist, larger font and gift tags for gifting you blanket, you click here to purchase off of Ravelry (or add it to your favorites or que), or you can purchase from my Etsy store.
Pattern for the 4 Day Throw
Notes:
Ch-2 at beg of row does not count as st
First dc will be made in first st where tch is located
Each leaf is worked in a panel; Panels 1, 3, 5 & 7 begin and end with a full leaf, panels 2, 4, & 6 begin and end with a half leaf
There is a chart at the end of the written pattern for reference, as well as a check list
Optional: Using a lockable stitch marker, mark the right side of your work
Full length video tutorial (with time stamps), please click below
Directions:
Work 127 Fdc and skip to Bottom Border section (only the work step below is if the beginning ch is your preferred method)
Chain 129: Work 1 dc in third ch from hook (skipped chs do not count as first dc) and in ea ch across (127 dc)
Bottom Border:
Row 1: Ch 2, turn; (RS): 1 dc in first st, 1 dc in next st, *1 modFPTR, 1 dc; rep * across until 1 st remains; 1 dc in top of tch (62 modFPTR, 65 dc)
2. Ch 2, turn; (WS): 1 dc in first st, 1 dc in next st, *1 modBPTR around FPTR from previous row, 1 dc in next st; rep * until 1 st remains, 1 dc2tog in last st and top of tch (62 modBPTR, 64 dc, 1 dc2tog)
3. Ch 2, turn; (RS): 1 dc in first st, 1 dc in next st, *1 modFPTR, 1 dc; rep * across until 1 st remains; 1 dc2tog in last st and top of tch (62 modFPTR, 64 dc, 1 dc2tog)
Repeat rows 2-3 once more
Repeat row 2 once more
Body of Blanket
Row 1:
Ch 2, turn; (RS): 1 dc in first st, [1 dc in next st, 1 modFPTR in next st] 7x
Panel 1:
1 dc in ea of the next 3 sts, ch 2, sk 3, 3 dc in next st, ch 2, sk 3, 1 dc in ea of next 3 sts, 1 Fptr in next st
Panel 2:
dc in ea of the next 2 sts, ch 2, sk 2, 1 Fptr around ea of next 2 sts, 1 FpTr3tog around post just worked and ea of the next 2 posts, 1 Fptr around post just worked, 1 Fptr around next st, ch 2, sk 2, 1 dc in ea of next 2 sts, 1 Fptr in next st
Rep Panel 1 – Panel 2 twice more
Rep Panel 1 once more making last Fptr a ModFPTR, then end with [1 dc, 1 modFPTR] 6x, 1 dc in next st, 1 dc2tog in last dc and in top of tch (14 modFPTR, 51 dc, 14 ch-2, 4 3-dc clusters, 18 FPTR, 3 FPTR3tog, 1 dc2tog)
Row 2:
Ch 2, turn; (WS): 1 dc in first st, [1 dc in next st, 1 modBPTR in next st] 7x
Panel 1:
1 dc in ea of next 2 sts, ch 2, sk 1 dc and ch-2 sp, 1 BPTR around first post of 3-dc cluster, [1 BPTR, 1 dc, 1 BPTR] in second st, 1 BPTR around third post of 3-dc cluster, ch 2, sk ch-2 sp and dc, 1 dc in ea of next 2 sts, 1 Bptr in next st
Panel 2:
1 dc in ea of next 2 sts, 1 dc in ch-sp, ch 2, 1 BPTR, 1 BPTR3tog, 1 BPTR, ch 2, 1 dc in ch-sp, 1 dc in ea of next 2 sts, 1 Bptr in next st
Rep Panels 1-2 twice more
Rep Panel 1 once more making last Bptr a ModBptr and then end with [1 dc, 1 modBPTR] 6x, 1 dc in next st, 1 dc2tog in last dc and in top of tch (14 modBPTR, 49 dc, 14 ch-2, 20 BPTR, 4 [BPTR, 1 dc, BPTR] Cluster, 3 BPTR3tog, 1 dc2tog)
Row 3:
Ch 2, turn; 1 dc in first st, [1 dc in next st, 1 modFPTR in next st] 7x
Panel 1:
1 dc in next st, ch 2, sk 1 dc and ch-2 sp, 1 FPTR around ea of the next 2 posts, [1 FPTR, 1 dc, 1 FPTR] in middle st of 3-dc cluster, 1 FPTR around post of ea of the next 2 sts, ch 2, sk ch-2 sp and 1 dc, 1 dc in next st, 1 Fptr in next st
Panel 2:
1 dc in ea of next 3 sts, 1 dc in ch-sp, ch 2, FPTR3tog, ch 2, 1 dc in ch-sp, 1 dc in ea of next 3 sts, 1 Fptr in next st
Rep panels 1-2 twice more
Rep panel 1 once more making last Fptr a ModFPTR, then end with [1 dc, 1 modFPTR] 6x, 1 dc in next st, 1 dc2tog in last dc and in top of tch (14 modFPTR, 47 dc, 14 ch-2, 4 [FPTR, 1 dc, FPTR] clusters, 22 FPTR, 3 FPTR3tog, 1 dc2tog)
Row 4:
Ch 2, turn; 1 dc in first st, [1 dc in next st, 1 modBPTR in next st] 7x
Panel 1:
1 dc in next st, 1 dc in ch-2 sp, ch 2, 1 BPTR around ea of the next 2 posts, 1 BPTR3tog around next 3 posts, 1 BPTR around ea of next 2 posts, ch 2, 1 dc in ch-2 sp and 1 dc in next st, 1 Bptr in next st
Panel 2:
1 dc in each of next 3 sts, ch 2, sk 1 dc and ch-sp, 3 dc in top of FPTR3tog from previous row, ch 2, sk ch-sp and 1 dc, 1 dc in ea of the next 3 sts, 1 Bptr in next st
Rep panels 1 – 2 twice more
Rep panel 1 once more making last Bptr a ModBPTR, then end with [1 dc, 1 modBPTR] 6x, 1 dc in next st, 1 dc2tog in last dc and in top of tch (14 modBPTR, 49 dc, 14 ch-2, 22 BPTR, 3 3-dc clusters, 4 BPTR3tog, 1 dc2tog)
Row 5:
Ch 2, turn; 1 dc in first st, [1 dc in next st, 1 modFPTR in next st] 7x
Panel 1:
1 dc in ea of next 2 sts, 1 dc in ch-sp, ch 2, 1 FPTR in next st, 1 FPTR3tog around next 3 posts, 1 FPTR in next st, ch 2, 1 dc in ch-2 sp and in ea of next 2 dcs, 1 Fptr in next st
Panel 2:
1 dc in ea of next 2 sts, ch 2, sk 1 dc and ch-sp, 1 FPTR in next st, [1 FPTR, 1 dc, 1 FPTR] in middle st of 3-dc cluster, 1 FPTR in next st, ch 2, sk ch-sp and 1 dc, 1 dc in ea of next 2 sts, 1 Fptr in next st
Rep panels 1 – 2 twice more
Rep panel 1 once more making last Fptr a ModFPTR, then end with [1 dc, 1 modFPTR] 6x, 1 dc in next st, 1 dc2tog in last dc and in top of tch (14 modFPTR, 51 dc, 14 ch-2, 3 [FPTR, 1 dc, FPTR] clusters, 20 FPTR, 4 FPTR3tog, 1 dc2tog)
Row 6:
Ch 2, turn; 1 dc in first st, [1 dc in next st, 1 modBPTR in next st] 7x
Panel 1:
1 dc in next 3 sts and 1 dc in ch-2 sp, ch 2, BPTR3tog around next 3 posts, ch 2, 1 dc in ch-2 sp and in ea of the next 3 sts, 1 Bptr in next st
Panel 2:
1 dc in next st, ch 2, sk 1 dc and ch-sp, 1 BPTR in ea of next 2 sts, [1 BPTR, 1 dc, 1 BPTR] in middle st of 3-dc cluster, 1 BPTR in ea of next 2 sts, ch 2, sk ch-sp and 1 dc, 1 dc in next st, 1 Bptr in next st
Rep panels 1 – 2 twice more
Rep panel 1 once more making last Bptr a ModBPTR, then end with [1 dc, 1 modBPTR] 6x, 1 dc in next st, 1 dc2tog in last dc and in top of tch (14 modBPTR, 53 dc, 14 ch-2, 18 BPTR, 3 [BPTR, dc, BPTR] clusters, 4 BPTR3tog, 1 dc2tog)
Row 7:
Ch 2, turn; 1 dc in first st, [1 dc in next st, 1 modFPTR in next st] 7x
Panel 1:
1 dc in ea of next 3 sts, ch 2, sk 1 dc and ch-sp, 3 dc in top of BPTR3tog from previous row, ch 2, sk ch-sp and 1 dc, 1 dc in ea of next 3 sts, 1 Fptr in next st
Panel 2:
1 dc in next st, 1 dc in ch-sp, ch 2, 1 FPTR in ea of next 2 sts, 1 FPTR3tog, 1 FPTR in ea of next 2 sts, ch 2, 1 dc in ch-sp, 1 dc in next st, 1 Fptr in next st
Rep panels 1 – 2 twice more
Rep panel 1 once more but make last Fptr a ModFPTR, then end with [1 dc, 1 modFPTR] 6x, 1 dc in next st, 1 dc2tog in last dc and in top of tch (14 modFPTR, 51 dc, 14 ch-2, 4 3-dc clusters, 18 FPTR, 3 FPTR3tog, 1 dc2tog)
Repeat rows 2-7 eleven more times ending with last repeat with completion of row 6
(12 full leaves on panels 1, 3, 5, 7; 11 full leaves with 2 half leaves on panels 2, 4, 6)
Top Border
Row 1:
Ch 2, turn; 1 dc in first st, [1 dc in next st, 1 modFPTR in next st] 7x
Panel 1: [1 dc in next st, 1 modFPTR in next st] 2x, 2 dc in ch-sp, 1 dc next st (top of bptr3tog from previous row), 2 dc in ch-sp, [1 modFPTR in next st, 1 dc in next st] 2x, 1 modFPTR in next st
Panel 2: 1 dc in next st, 1 dc in ch-sp, 1 dc in next st, 1 modFPTR in next st, 1 dc in next st, 1 dc in between the next st and st just previously worked, 1 dc in next st (middle st of 7 sts worked in previous row), 1 dc in between the next st and st just previously worked, 1 dc in next st, 1 modFPTR in next st, 1 dc in next st, 1 dc in ch-sp, 1 dc in next st, 1 modFPTR in next st
Rep panels 1 – 2 twice more
Rep panel 1 once more ending with [1 dc, 1 modFPTR] 6x, 1 dc in next st, 1 dc2tog in last dc and in top of tch (84 dc, 42 modFPTR, 1 dc2tog)
Row 2:
Ch 2, turn; (WS): 1 dc in first st, [1 dc in next st, 1 modBPTR in next st] across to last 2 sts and tch, 1 dc in next st, 1 dc2tog in last st and tch (64 dc, 62 modBPTR, 1 dc2tog)
Row 3:
Ch 2, turn; 1 dc in first st, [1 dc in next st, 1 modFPTR in next st] across to last 2 sts and tch, 1 dc in next st, 1 dc2tog in last st and tch (64 dc, 62 modFPTR, 1 dc2tog)
Repeat rows 2-3 twice more
Fasten off and weave in ends
I hope you enjoy making this blanket as much as I did! Please tag me on social media @handmadebystacyj or #handmadebystacyj so that I can see your makes. Thank you so much for your support!
This pattern is copyright 2023 Handmade by Stacy J. Please do not duplicate or copy any portion of this pattern, as well as photographs. You are encouraged to share images of your final product and are allowed to sell final products; I just ask that if you sell your final product, please purchase the ad-free pdf, provide your own photographs and that you please credit Handmade by Stacy J as the designer. Thank you for your support!
The Wrapped Columns crochet stitch is a very simple and fun crochet stitch to learn. The columns in the stitch are wrapped with yarn overs around the post of the double crochet, creating an interesting look.
This stitch is a combination of double crochet, chains and yarn overs. It creates a wonderful fabric and, as a result, works up very quickly, too!
The Wrapped Columns crochet stitch is a beginner friendly stitch that be wonderful for a fun accent to a garment, a shawl or a scarf!
Disclosure: This post contains affiliate links; I am an affiliate with these companies and highly recommend them. As an affiliate, when you purchase from those links, you allow the companies to pay me a small commission. This doesn’t cost you any more, and allows me to making free content. Thank you for your support!
To see a video tutorial of the Wrapped Columns crochet stitch, click on the video above or you can also clickHERE.
For the tutorial, I used King Cole “Baby Superball DK” yarn in the color “Silver”. To find your local store that stocks King Cole yarns, here is the stockist finder link.
If you’re looking for your next favorite hook, click HEREto check out Furls!
Stitches and abbreviations used:
Pattern is written in US terms
Ch: Chain
Dc: Double crochet
Ea: Each
Rem: Remaining
Rep: Repeat
RS: Right Side
Sk: Skip
Sp: Space
St(s): Stitch (es)
Tch: Turning Chain
WS: Wrong Side
Yo: Yarn over
Special stitch:
FP Puff St: Front Post Puff Stitch – [Yo once, insert hook from front to back around post of indicated stitch, Yo and pull up a loop] three times, Yo and draw through all 7 loops on hook.
Here’s a pin to add to your Pinterest board 🙂
Notes:
Ch-3 at beg of row counts as first dc
Ch-4 at beg of row counts as first dc and ch 1
Directions for the Wrapped Columns crochet stitch
Stitch works in multiples of 4 + 1 (+ 2 for the base chain)
1 (RS): Work 1 dc in fourth ch from hook (skipped chs count as first dc) and then 1 dc in ea ch across
2 (WS): Ch 4, turn. Sk 1, 1 dc I next st, work FP Puff St around post of dc just made, *[ch 1, sk 1, 1 dc] 2 times, FP Puff St around post of dc just made; rep * until 2 sts rem ending with ch 1, sk 1, 1 dc in top of tch.
3: Ch 3, turn. *1 dc in ch-1 sp, sk FP Puff St, 1 dc in top of dc that FP Puff St is made around, 1 dc in ch-1 sp, 1 dc in top of next dc; rep * ending with dc in top of tch.
Repeat rows 2-3 to desired length.
I hope you enjoyed learning this stitch as much as I did. When you make something with it, could you please tag me @handmadebystacyj or #handmadebystacyj? I’d love to see what you create!
The Little Boxes stitch is a very simple and fun crochet stitch to learn. It has a textured front and the back is flat. And, although it looks very similar to the crocheted Waffle stitch, it is worked just a little bit differently.
This stitch is a combination of front and back post double crochet. It creates a wonderful fabric and, as a result, works up very quickly, too!
The Little Boxes stitch is a beginner friendly stitch that be wonderful for a warm blanket, scarf or a hat!
Disclosure: This post contains affiliate links; I am an affiliate with these companies and highly recommend them. As an affiliate, when you purchase from those links, you allow the companies to pay me a small commission. This doesn’t cost you any more, and allows me to making free content. Thank you for your support!
To see a video tutorial of the Little Boxes stitch, click on the video above. You can also clickHERE. At the bottom of the post there is also a chart for your reference.
If you’re looking for your next favorite hook, click HEREto check out Furls!
Stitches and abbreviations used:
Pattern is written in US terms
Ch: Chain
Dc: Double crochet
Ea: Each
Hdc: Half double crochet
Rep: Repeat
RS: Right Side
St(s): Stitch (es)
Tch: Turning Chain
WS: Wrong Side
Yo: Yarn over
Special stitches:
BPDC: Back Post Double Crochet – Yo once, insert hook back to front around indicated stitch, draw up a loop (3 loops on hook), [yo, draw through 2] two times
FPDC: Front Post Double Crochet – Yo once, insert hook front to back around indicated stitch, draw up a loop (3 loops on hook), [yo, draw through 2] two times
Here’s a pin for your Pinterest board 🙂
Notes:
Ch-2 at beg of row counts as first hdc
Ch-3 at beg of row counts as first dc
Directions for the Little Boxes stitch
Chain in multiples of 4 + 5 for base chain
1 (RS): Work 1 dc in fourth ch from hook (skipped chs count as first dc) and then in ea ch across
2: Ch 2, turn; (WS): 1 FPDC around ea of the next 2 sts, 1 BPDC around next st, *1 FPDC around ea of the next 3 sts, 1 BPDC around next st; rep * to last 3 sts, work 1 FPDC around ea of next 2 sts, 1 hdc in top of tch
3: Ch 3, turn; (WS): Dc in ea of the next 2 sts, 1 FPDC around next st, *1 dc in ea of the next 3 sts, 1 FPDC around next st; rep * to last 3 sts, 1 dc in ea of the last 3 sts
Repeat rows 2-3 to desired length.
I hope you enjoyed learning this stitch as much as I did. When you make something with it, could you please tag me @handmadebystacyj or #handmadebystacyj? I’d love to see what you create!
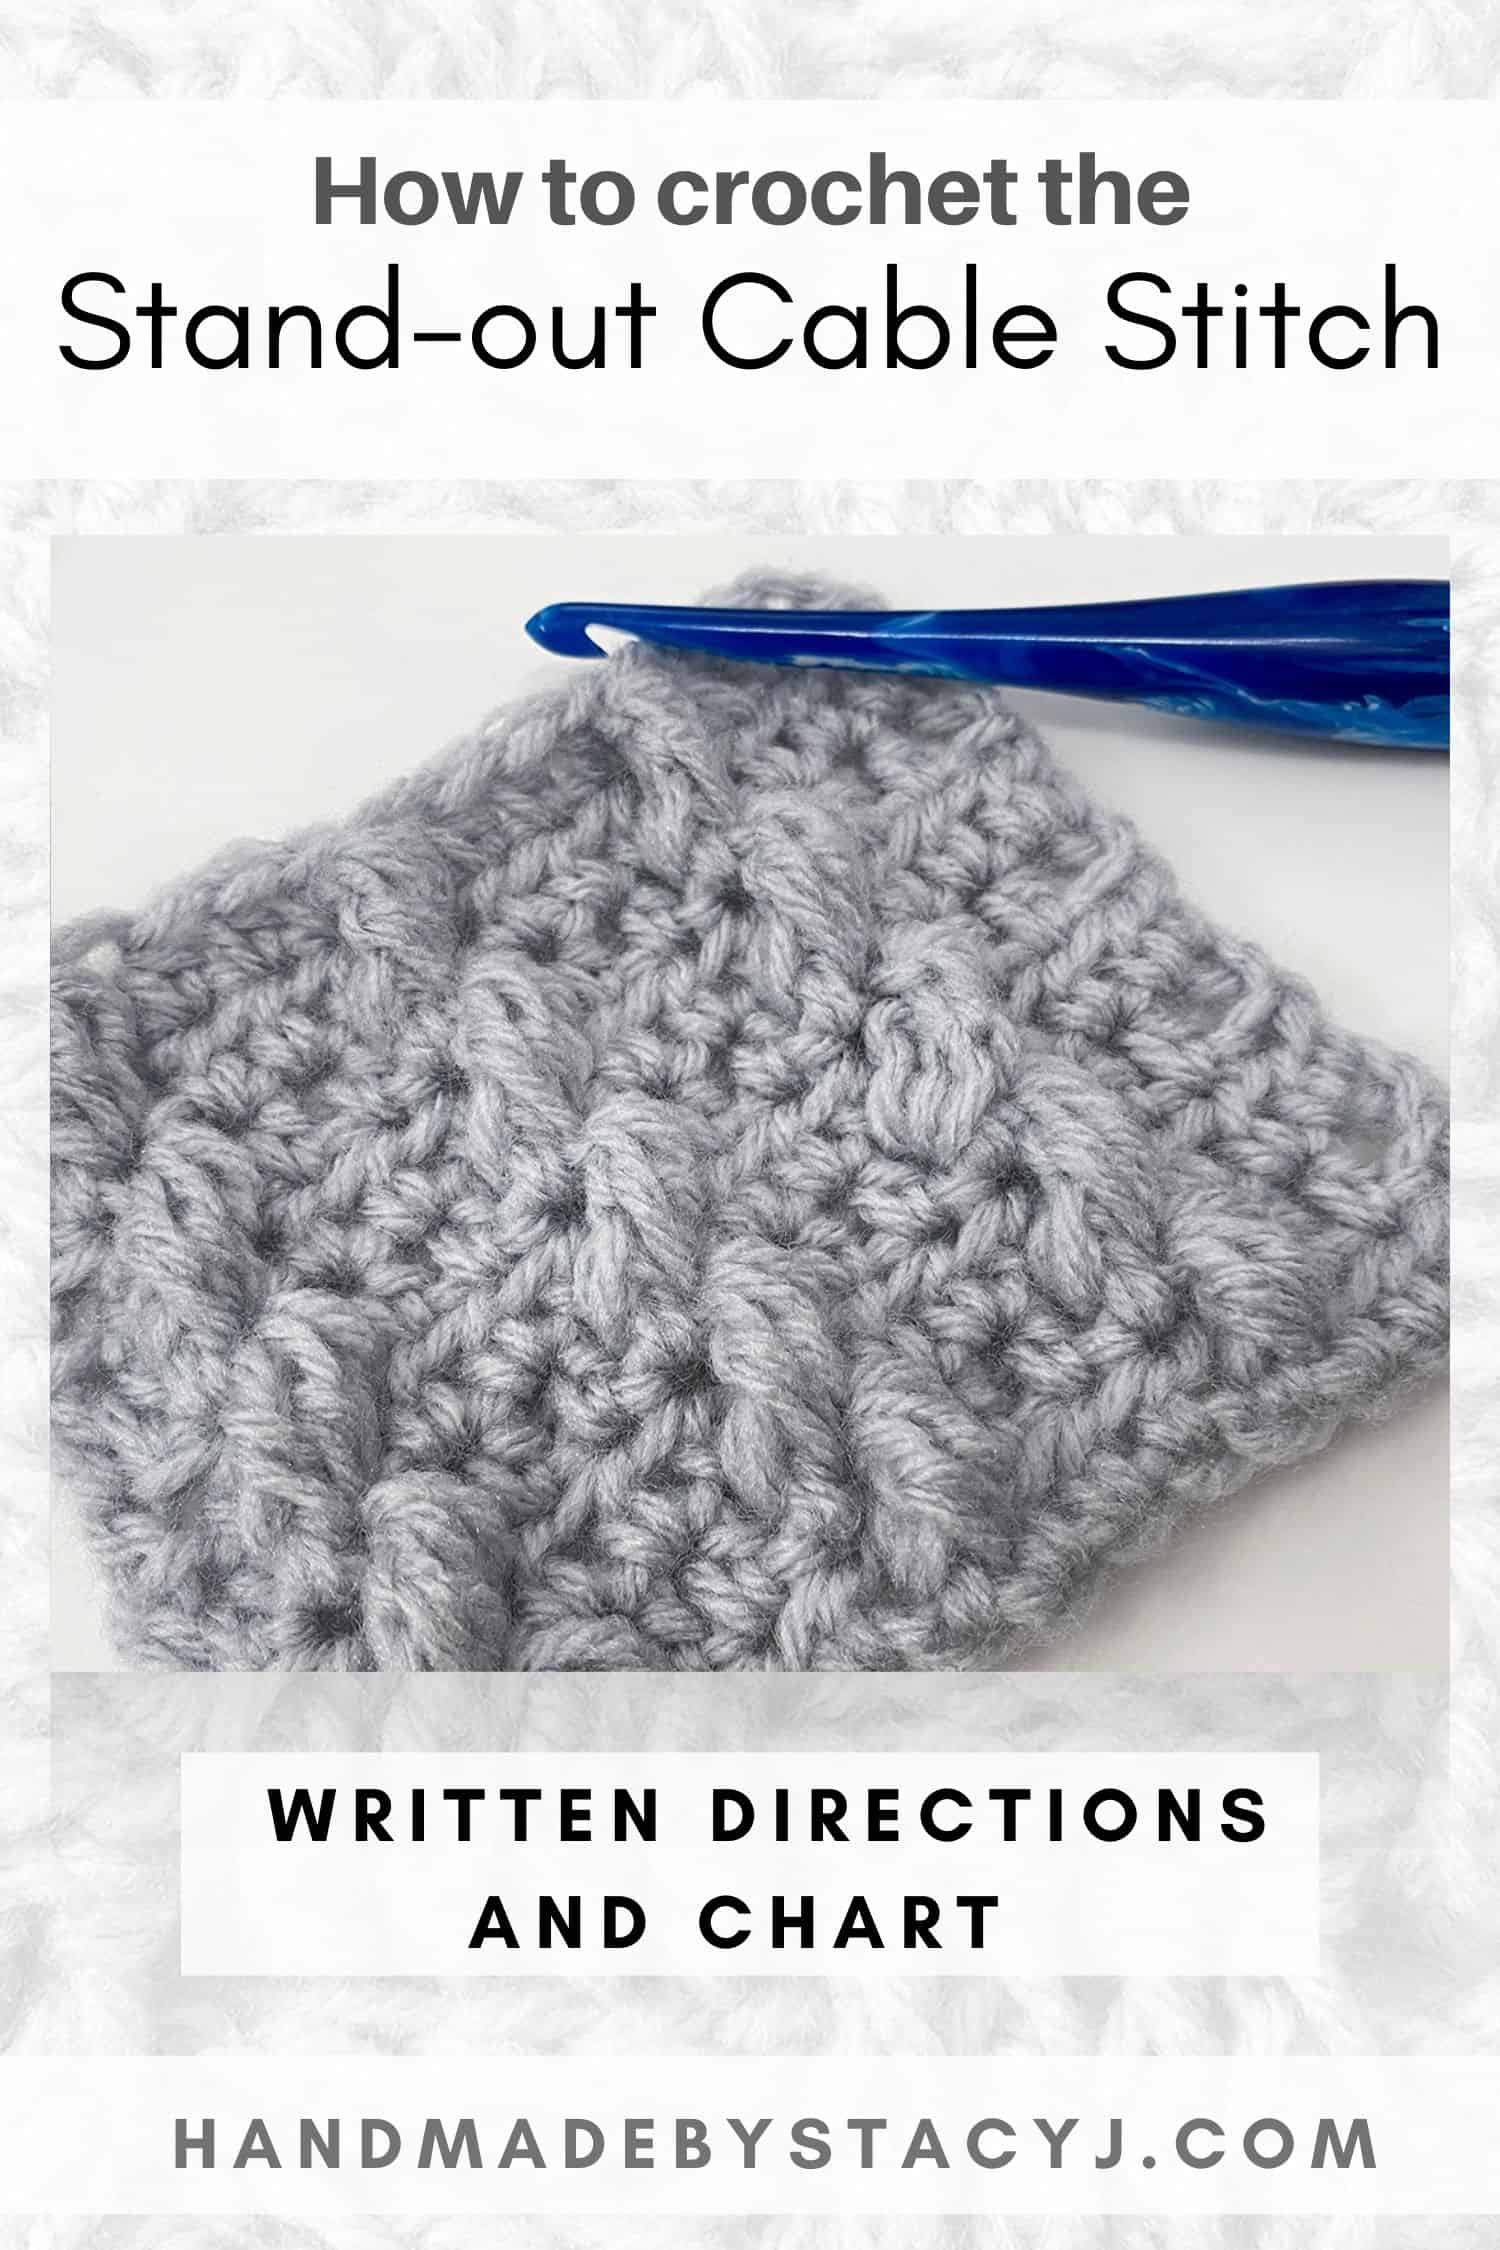
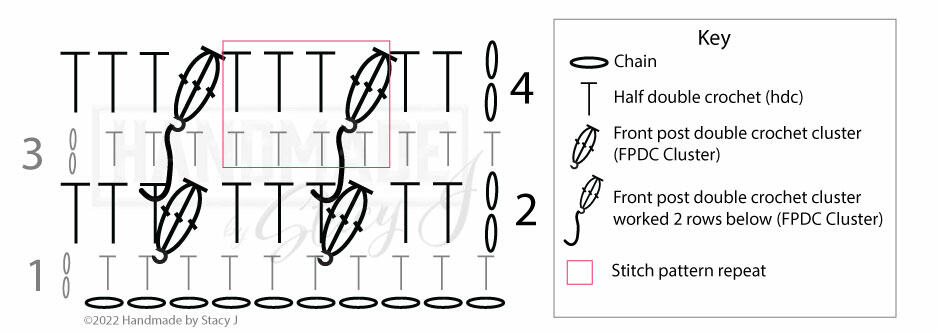
The Stand-Out Cable stitch is a combination of half double crochet and front post double crochet clusters. The combination of stitches create a cable look with a flat back. As a result of using those stitches, this works up very quickly and also works over a 2 row repeat.
It’s a fun stitch to add to your stitching knowledge and would be wonderful for a blanket, scarf or a hat!
Disclosure: This post contains affiliate links. As an affiliate, when you purchase through my links, you allow the company to pay me a small commission without costing you a penny more, which allows me to continue making free content. Thank you for your support!
Here’s a pin for your Pinterest board 🙂
If you’d like to see a video tutorial of this stitch, please scroll to the top of this post or you can clickHERE. Also, at the bottom of the post there is a chart for your reference.
If you’re looking for your next favorite hook, click HERE to check out Furls!
Stitches and abbreviations used:
Pattern is written in US terms
Ch(s): Chain(s)
Ea: Each
Hdc: Half double crochet
Rep: Repeat
RS: Right Side
Sk: Skip
St(s): Stitch (es)
WS: Wrong Side
Yo: Yarn over
Special stitches:
FPDC Cluster: Front Post Double Crochet Cluster – *YO once, insert hook front to back around post of indicated stitch, YO and draw up a loop (3 loops on hook), [yo, draw through 2]; rep * twice more, YO and draw through all 4 loops on hook.
Directions
Note: Ch-2 at beg of row counts as first hdc
Chain in multiples of 4
1 (WS): Work 1 hdc in third ch from hook (2 skipped chs count as first hdc) and in ea ch across
2: Ch 2, turn; (RS): work 1 hdc in ea of next 2 sts, *sk next hdc, work FPDC Cluster around next hdc, 1 hdc in top of hdc just worked, 1 hdc in ea of the next 2 sts; rep * across
3: Ch 2, turn; (WS): 1 hdc in next st and in ea st across
4: Ch 2, turn; (WS): Work 1 hdc in ea of the next 2 sts, *sk next st, working in front of previous row, work FPDC Cluster around hdc one row below next hdc, 1 hdc in ea of the next 3 sts; rep * across
Repeat rows 3-4 to desired length.
Here’s a tip to even out the symmetry of the edge stitches
Try working the pattern by adding 2 more hdc to your beginning ch / row and then work them at the end of RS rows and beg of WS rows.
I hope you enjoyed learning this stitch as much as I did. When you make something with it, could you please tag me @handmadebystacyj or #handmadebystacyj – I’d love to see what you create!
The Basketweave stitch is one of the first stitches that I ever learned how to crochet when I was young and my mom was teaching me. It was so amazing to me how creating a combination of stitches would create such a wonderful fabric; plus, it was fun AND easy!
It’s a combination of front and back post double crochet and it creates a wonderful weave with a reversible fabric that looks like a basketweave! As a result of using double crochet stitches, it works up very quickly, too! This stitch is very beginner friendly and would be wonderful for a blanket, scarf or a hat!
Disclosure: This post contains affiliate links; I am an affiliate with these companies and highly recommend them. As an affiliate, when you purchase from those links, you allow the companies to pay me a small commission. This doesn’t cost you a penny more and allows me to continue making free content. Thank you for your support!
Stitches and abbreviations used:
Pattern is written in US terms
Ch: Chain
Dc: Double crochet
Ea: Each
Hdc: Half double crochet
Rep: Repeat
RS: Right Side
St (s): Stitch (es)
Tch: Turning Chain
WS: Wrong Side
Yo: Yarn over
Special stitches:
BPDC: Back Post Double Crochet – Yo once, insert hook back to front around indicated stitch, draw up a loop (3 loops on hook), [yo, draw through 2] two times
FPDC: Front Post Double Crochet – Yo once, insert hook front to back around indicated stitch, draw up a loop (3 loops on hook), [yo, draw through 2] two times
Here’s a pin for you Pinterest board 🙂
Directions for how to crochet the Basketweave Stitch
Note: Ch-2 at beg of row counts as first hdc
Chain in multiples of 8 + 4 for base chain
1 (RS): Work 1 dc in fourth ch from hook (skipped chs count as first dc) and in ea ch across
2: Ch 2, turn; (WS): *1 fpdc around ea of the next 4 sts, 1 bpdc around ea of the next 4 sts; rep * ending with hdc in top of tch
3: Ch 2, turn; (WS): *1 fpdc around ea of the next 4 sts, 1 bpdc around ea of the next 4 sts; rep * ending with hdc in top of tch
4: Ch 2, turn; (WS): *1 bpdc around ea of the next 4 sts, 1 fpdc around ea of the next 4 sts; rep * ending with hdc in top of tch
5: Ch 2, turn; (WS): *1 bpdc around ea of the next 4 sts, 1 fpdc around ea of the next 4 sts; rep * ending with hdc in top of tch
Repeat rows 2-5 to desired length.
I hope you enjoyed learning the Basketweave stitch as much as I did. When you choose to make something with it, could you please tag me @handmadebystacyj and #handmadebystacyj – I’d love to see what you create with this stitch!
For this tutorial, I’ve decided to demonstrate how to crochet a modified version of the Horizontal Chevron Stitch. It uses only single crochet and a modified version of Front Post Treble Crochet. It’s modified in the sense that there is no gap in the back where a stitch is usually skipped when working post stitches. That modification makes it great for use with garments and even blankets when you aren’t wanting gaps in your fabric. There is a video tutorial below the written directions, as well.
Disclosure: This post contains affiliate links. As an affiliate, when you purchase through my links, you allow the company to pay me a small commission without costing you a penny more, which allows me to continue making free content. Thank you for your support!
Have you ever used a Furl’s hook?? I just got my first ones earlier this year and all I can say is “WOW!” I love it! They have a lovely weight to them and I love how the tip is not too blunt. I feel like it even shaved a bit of time off of a baby afghan I made a couple months ago. If you ever feel like trying one, please consider using my affiliate links below in the Materials section.
Difficulty level:
Easy-ish
Terms and Abbreviations used:
Directions are written using US terminology
Ch: Chain
Ea: Each
Lp: Loop
Rep: Repeat
Sc: Single Crochet
St (s): Stitch (es)
Here’s a pin for your Pinterest board 🙂
Special Stitches used:
Modified Front Post Treble Crochet (Mod FpTr): Yarn over twice and insert hook around indicated post from front to back, yo, draw up a lp, yo, draw through 2 loops, yo, draw through 2 loops (2 loops remain on hook), insert hook in next sc st (the one that you would normally skip when working a front post stitch), yo, draw through remaining 3 loops.
Note: Ch 1 at the beg of row does not count as a stitch
Stitch is worked in increments of 6+3; For the sample in the YouTube video, I chained 21.
1 (WS): Sc in second ch from hook and in ea ch across; turn.
2 (RS): Ch 1, sc in first 2 sts, using a lockable stitch marker mark the post of the sc that was just made, then work 1 sc in ea st across; turn.
3: Ch 1, sc in ea st across; turn.
4: Ch 1, sc in first 6 sts, work Mod FpTr around marked st 2 rows below, *1 sc in ea of next 2 sc sts from previous row, work 1 Mod FpTr around post in the third st past the previous one worked (there will always be 2 sts between the posts); rep * to last st, 1 sc, turn.
5: Ch 1, sc in ea st across; turn.
6: Ch 1, 1 sc in same st, *work 1 Mod FpTr around Mod FpTr post in the 2 rows below (remember, there will always be 2 sts between the posts), 1 sc in ea of next 2 sts; rep * to last 4 sts, 1 sc in ea of last 4 sts; turn
7 – 9: Ch 1, sc in ea st across; turn.
Repeat rows 2-9 for pattern
If you prefer a printable pdf of the stitch pattern, you can download the file below
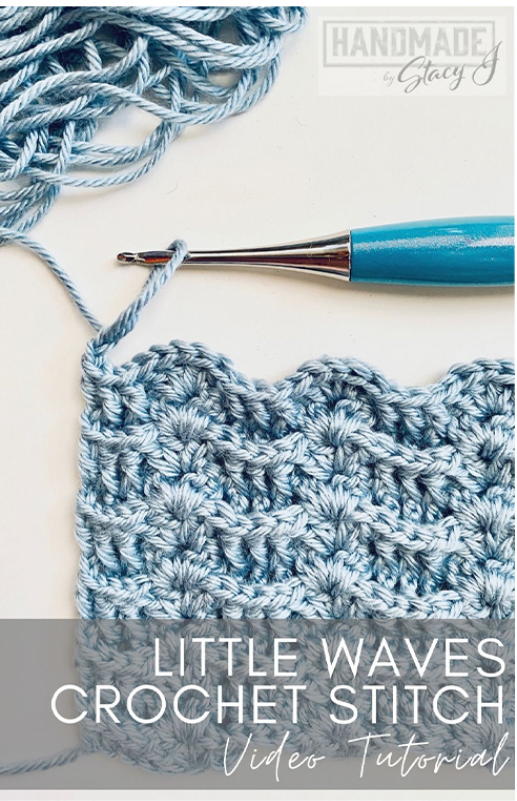
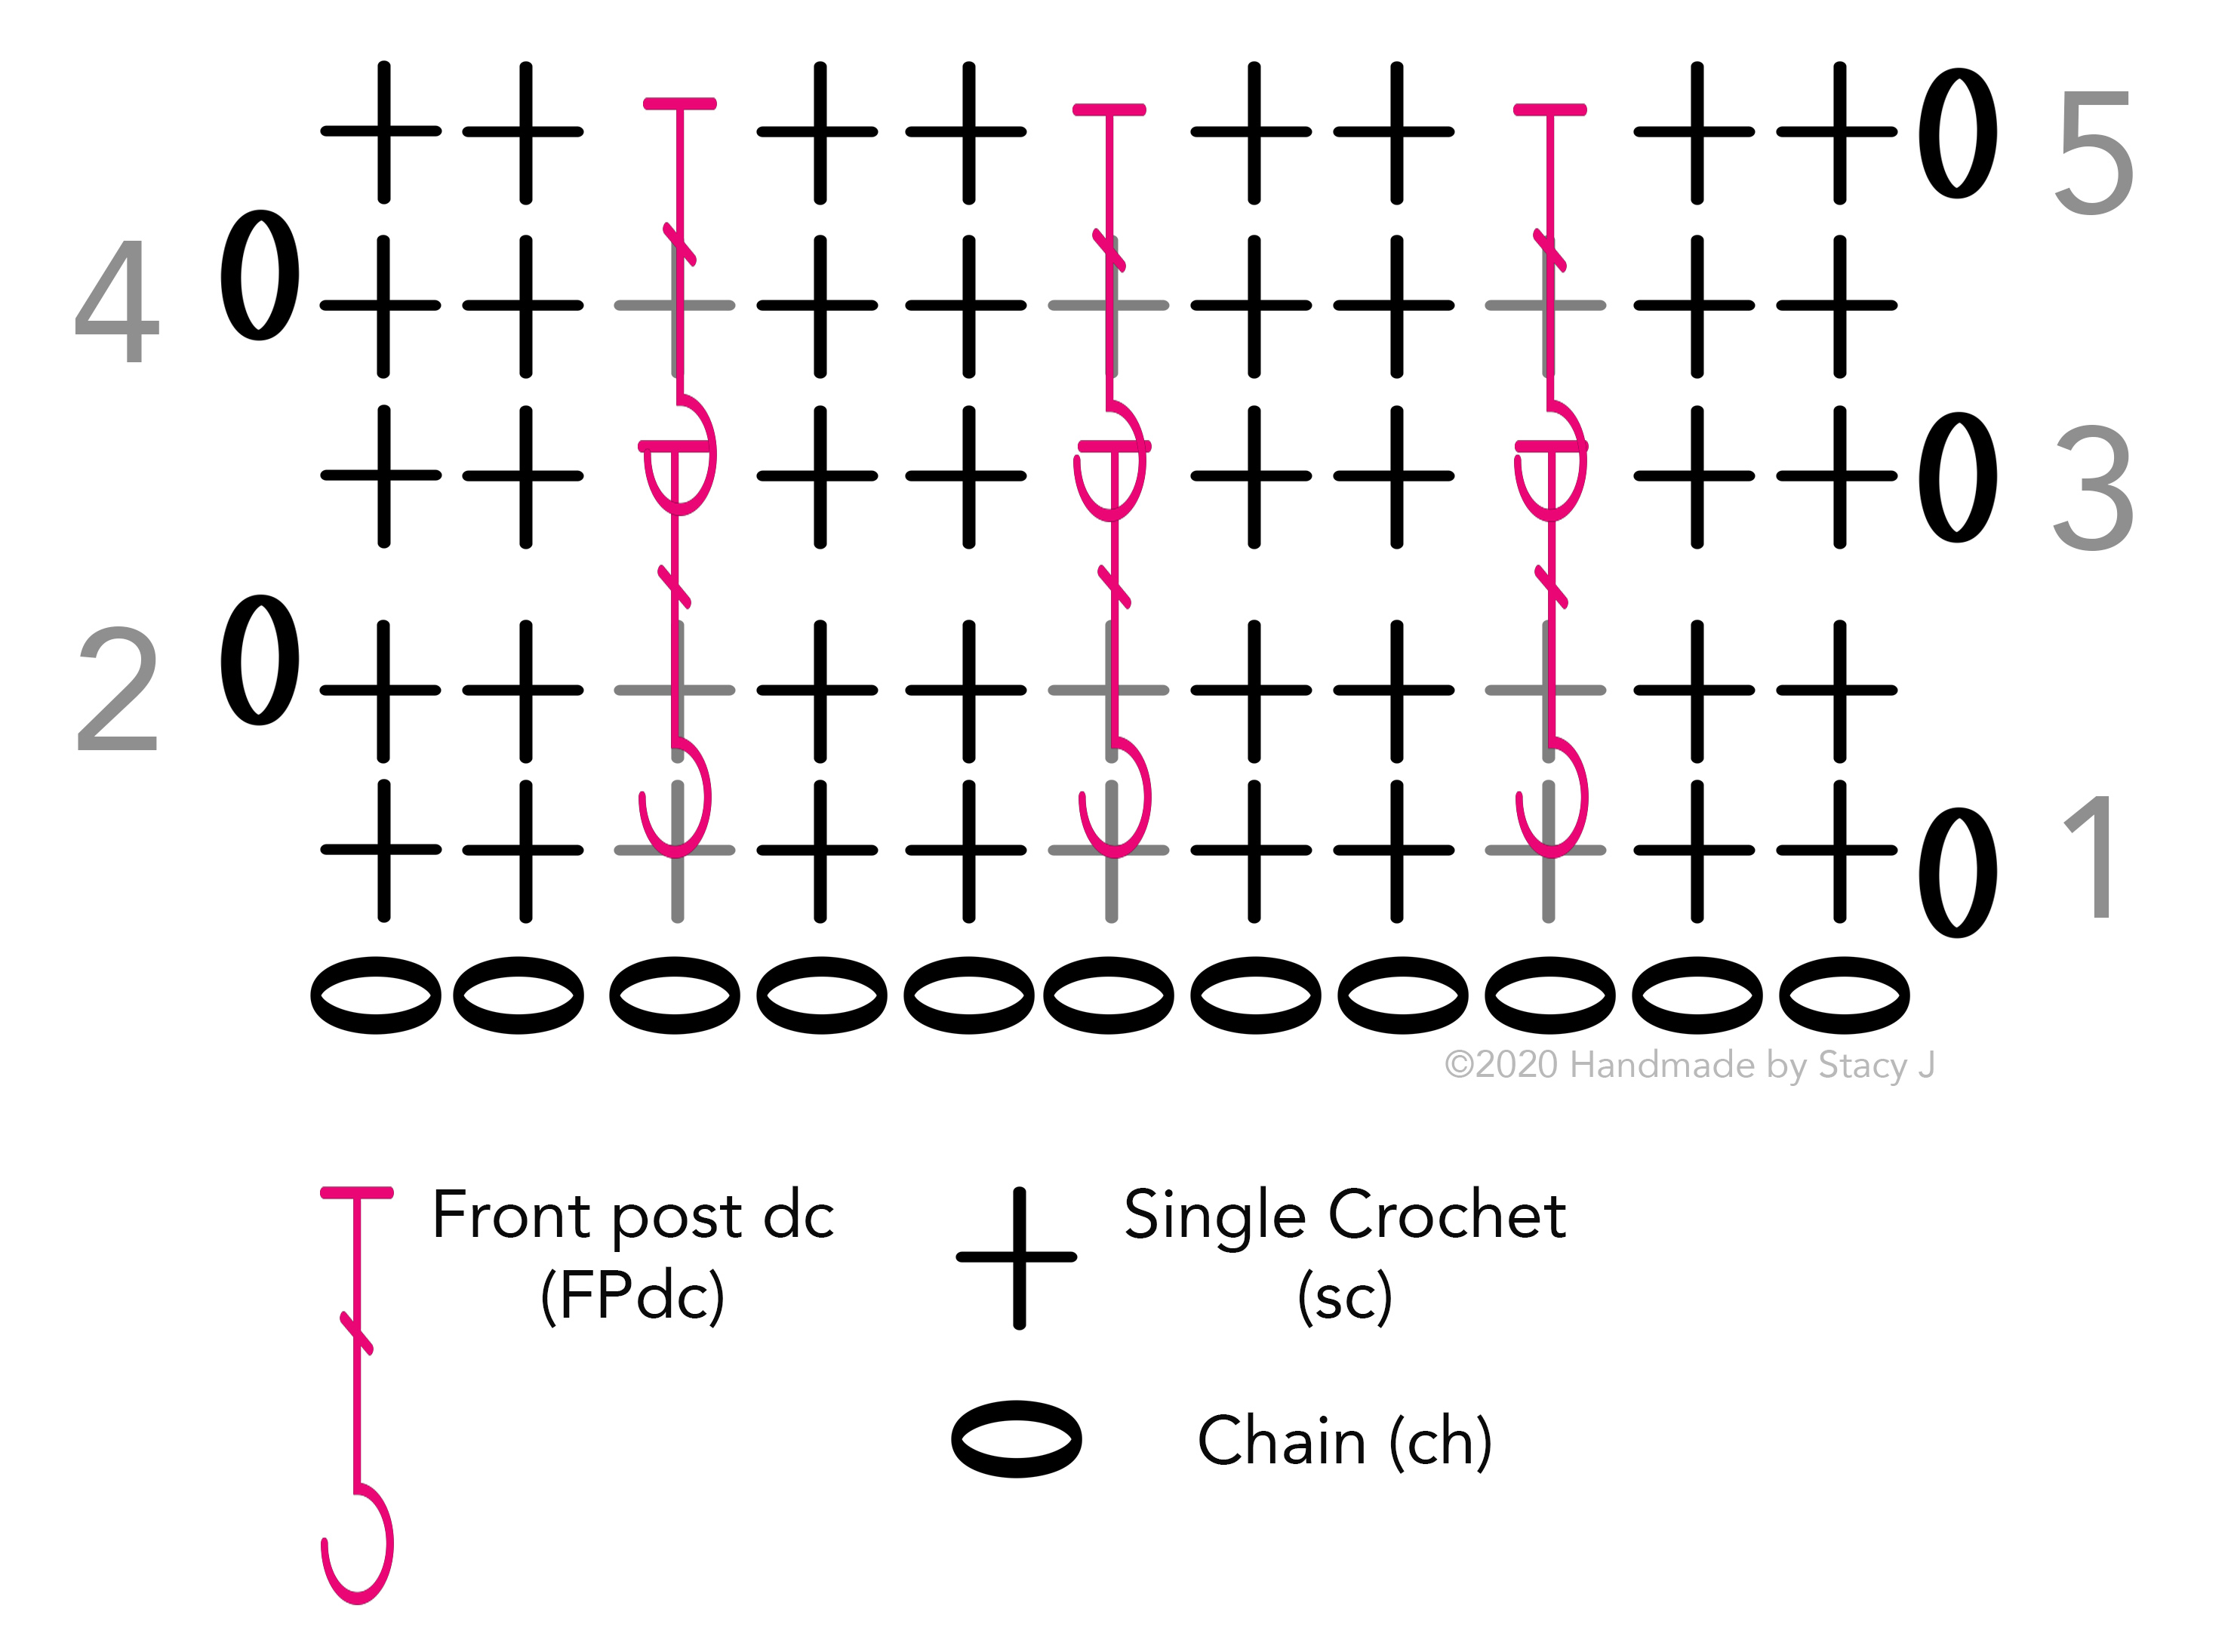
The Little Waves Crochet Stitch is a fun and simple stitch that incorporates Double Crochet and Front Post Double Crochet stitches. It makes a beautiful, reversible pattern that is both airy and fairly dense. Below you will find the written directions and a video tutorial to walk you through creating this beautiful stitch. Also, I have a pin for you to save to your Pinterest Boards 🙂
Disclosure: This post contains affiliate links. As an affiliate, when you purchase through my links, you allow the company to pay me a small commission without costing you a penny more, which allows me to continue making free content. Thank you for your support!
About the hook!
The hook that I’m using is the Furl’s Odyssey hook in Turquoise and Silver (I absolutely LOVE this hook!). And, I just happen to be an affiliate for Furl’s. What that means is that if you click on this link and decide to purchase a hook, you will NOT be charged a penny more and I’ll receive a small commission (which helps me continue to make free content). Here is the link 🙂
If you’d like to see the Making Waves Table Set that uses the Little Waves crochet stitch, all three patterns from this set are free to view on my website. Simply click on the image and you’ll be directed to the free crochet patterns.
Directions for the Little Waves Crochet Stitch:
Chain in multiples of 8 +5
Row 1: Dc in 4th chain from hook (3 skipped chains count as dc) and in next ch, *sk next 2 chs (2dc, ch1, 2dc) in next ch, sk next 2 chs, 1 dc in ea of next 3 chs; rep * across. Turn
Row 2 (Pattern Repeat): Ch 2 (some folks ch3, but I prefer to ch2), work Fpdc around ea of the next 2 dc posts, (2dc, ch1, 2dc) in next ch-1 sp, *sk next 2 dc, work Fpdc around ea of next 3 dc, sk next 2 dc, work (2dc, ch1, 2dc) in next ch-1 sp; rep * to last 5 sts, sk next 2 dc, work Fpdc around next 2 dc, dc in top of turning ch.
Repeat row 2 until desired length is reached. Fasten off and weave in ends.
Here’s a pin for your Pinterest board 🙂
Thank you so much for visiting and supporting our yarny adventures. Please tag me @handmadebystacyj so that I can see your makes – I love to see them!
Learn how to crochet the Split Front Post Treble Crochet Stitch (or the Modified Prong Stitch). Today you’ll learn how to add incredible texture and design to your crochet pieces without having the gap in the back that results from front post crochet. I’ll walk you through the steps and you’ll get to experience for yourself how fun this stitch really is.
Courtney, from Creations by Courtney, asked me to make this tutorial for her. She designs amazing garments that utilize this stitch and I know that she would just LOVE if you would visit her website. She’s constantly creating beautiful, new and innovative garment patterns made for all body types. Her website is: https://creationsbycourtney.com
Please consider subscribing to my YouTube channel, as I’m uploading fun stitches that are easy to follow on a weekly (or more!) basis! Thank you!!
Disclosure: This post contains affiliate links. As an affiliate, when you purchase through my links, you allow the company to pay me a small commission without costing you a penny more, which allows me to continue making free content. Thank you for your support!
Stitch Technique for Split Front Post Treble Crochet
1. YO twice, working in front of previous row, insert hook from front to back around post of dc indicated 2 rows below, YO, pull up a loop, [YO, pull through 2 loops on hook] twice
2. YO, insert hook in next st, YO, pull up a loop (4 loops on hook), YO, pull through 2 loops (3 loops on hook)
3. YO twice, sk next 3 sts 2 rows below, insert hook front to back around the post of next dc, YO, pull up a loop (6 loops on hook), [YO, pull through 2 loops] twice, YO, pull through 4 loops.
Note: There will always be 3 dc between the legs of each Split FpTr
Directions for Split Front Post Treble Crochet stitch pattern
Stitch is worked in multiples of 8 + 9
1: (Right side): Dc in fourth ch from hook and in ea ch across. Mark this as your right side; turn
2: Ch 1, sc in ea st across, turn
3: Ch 2 (counts as dc), 1 dc in ea of next 2 sts, Split FpTr beg around second dc 2 rows below, *dc in next 7 sts, sk next 3 dc 2 rows below, Split FpTr beg around next dc; rep from * until 3 sts remain, dc in last 3 sts; turn
4: Ch 1, sc in ea st across, turn
5: Ch 2 (counts as dc), 1 dc in ea of next 6 sts, Split FpTr beg around sixth dc 2 rows below, *dc in next 7 sts, sk next 3 dc 2 rows below, Split FpTr beg around next dc; rep from * until 7 sts remain, dc in last 7 sts; turn
The Bar Stitch is a very quick and easy crochet stitch to learn. It only uses a couple of stitches and creates a very beautiful pattern. This would work well for a baby blanket, wash cloth or variety of garments. Below you will find the written directions, a chart and an image to pin to your Pinterest board. Enjoy!
Difficulty level:
Easy
Terms and Abbreviations used:
Directions are written in US terminology
Ch: Chain
FPdc: Front Post double crochet – work 1 dc around stem of stitch 2 rows below, inserting hook from right to left to draw up loops. You will skip the st behind this one, as it was just worked 2 rows below.
Rep: Repeat
Sc: Single Crochet
Directions for the Bar Stitch
Multiple of 3 sts +3
Note: Ch 1 does not count as a stitch.
Ch in increments of 3 to your desired length, then ch 3 more; work 1 sc in 2nd ch from hook and 1 sc in each ch across, turn.
Ch 1, work 1 sc across, turn.
Ch 1, work 1 sc in each of the first 2 sc, * work 1 FPdc around next sc 2 rows below, work 1 sc in each of next 2 sc (being sure to skip the st behind the FPdc). Rep from * to end, turn
Ch 1, work 1 sc across
Ch 1, work 1 sc in each of the next 2 sc, *1 FPdc around stem of FPdc in 2 rows below, 1 sc in each of the next 2 sts; rep from * across.
Repeat rows 4 & 5 until desired length, ending with a row 4.
Here’s a pin to add to your Pinterest board 🙂
If you would like a printable pdf, here is the file to download: