Quail Cable Stitch

The Quail Cable Stitch is an interesting cable fabric. It can be used for all-over pattern knitting, or as a fun detail to add to a project. It works in multiples of 18+3 over a 12 row repeat. Below are the written directions, a chart and a video for your reference. The video walks you through how to use the Quail Cable stitch while making a head band / ear warmer. To see the free pattern for that project, click HERE.

Below there is a video that shows how to make the ear warmer, but it also shows to make the cable stitch. There are time stamps, as well, to help you along.

Disclosure: This post contains affiliate links. That means that I may receive compensation when you purchase through my links at no additional cost to you. I am a King Cole Brand Ambassador and this post is part of our ongoing collaboration.

Stitches and abbreviations used:

K: Knit.
P: Purl.
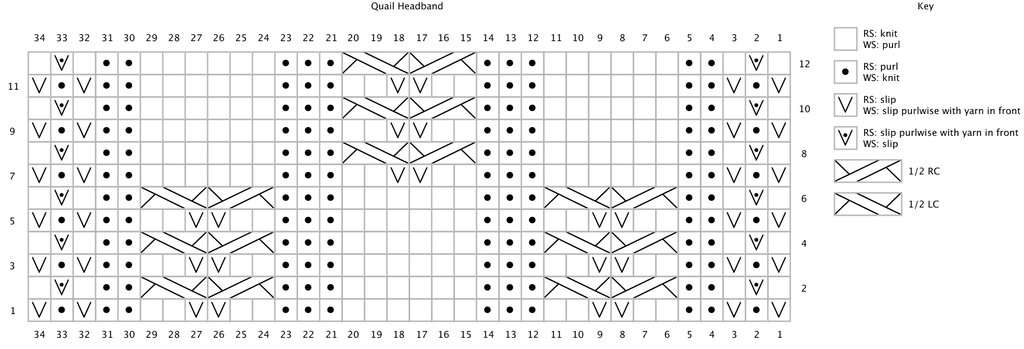
Sl wyif: Slip 1 stitch purlwise with yarn in front.
1/2 LC : Slip next stitch to cable needle purlwise and place at front of work, k2, then k1 from cable needle.
1/2 RC : Slip next 2 stitches to cable needle purlwise and place at back of work, k1, then k2 from cable needle.

Pin of Quail Cable Stitch from Handmade by Stacy J
Here’s a pin for your Pinterest board 🙂

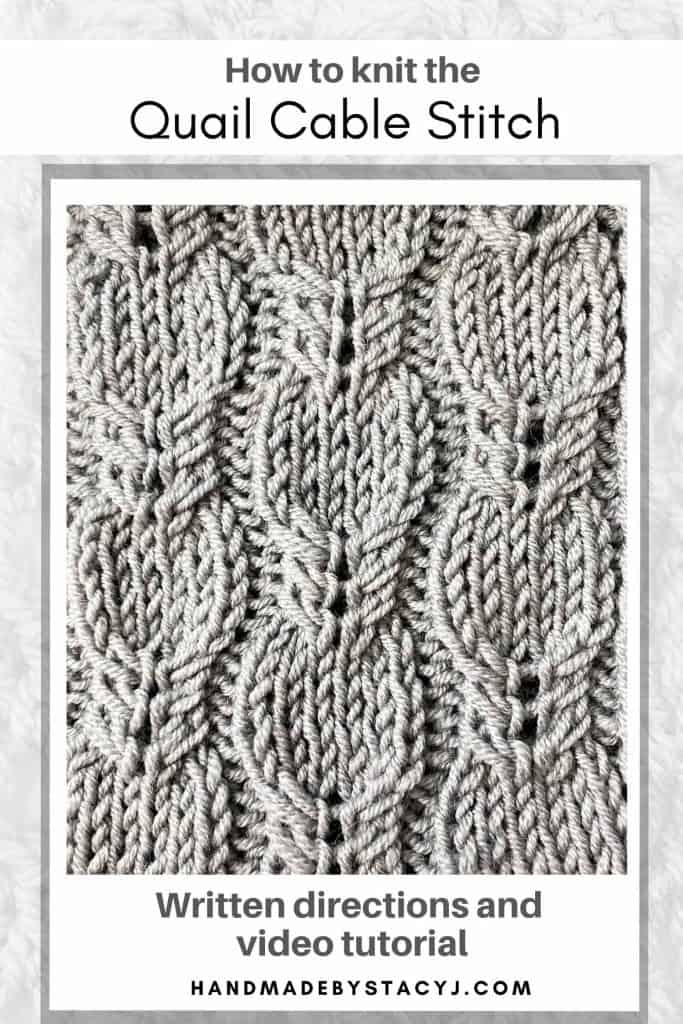
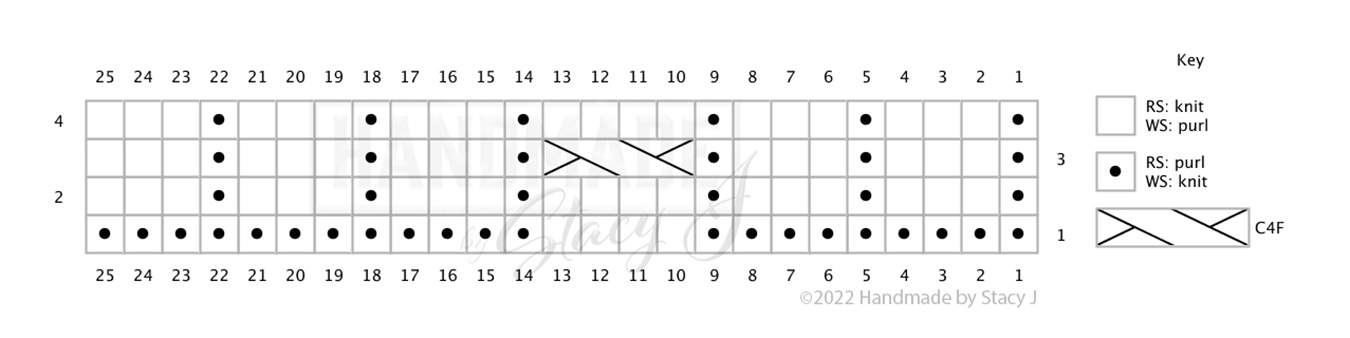
Directions for Quail Cable Stitch

  • 1 (WS): K3, *p2, sl wyif × 2, p2, k3, p6, k3; rep * to end.
  • 2 (RS): *P3, k6, p3, 1/2 RC, 1/2 LC; rep * to last 3 sts, p3.
  • 3 – 6: Repeat rows 1 – 2.
  • 7: K3, *p6, k3, p2, sl wyif × 2, p2, k3; rep * to end.
  • 8: *P3, 1/2 RC, 1/2 LC, p3, k6; rep * to last 3 sts, p3.
  • 9 – 12: Repeat rows 7 – 8.

If you love this stitch, why not try making a head band / ear warmer with it? For a free pattern click HERE.


Chart for how to knit the quail cable Ear Warmer / headband from Handmade by Stacy J

Subscribe on YouTube • Join me on Facebook • Follow on Instagram

 Patterns on Ravelry • Inspiration on Pinterest

Baby Cable & Garter Ridges


The Baby Cable & Garter Ridges is a simple cable stitch that creates a beautiful pattern with loads of texture and interest. It’s worked in multiples of 25 stitches and uses a Cable 4 Front stitch, and as a result adds interest and creates a lovely dense fabric that would be a great to use for a sweater, hat, scarf or a blanket.

There is a knitting chart below for reference, as well as a video link above to help you.


Disclosure: This post contains affiliate links. As an affiliate, when you purchase through my links, you allow the company to pay me a small commission without costing you a penny more, which allows me to continue making free content. Thank you for your support!

Materials needed

(listed below is what I used to create the sample of the stitch pattern)

Stitches and abbreviations used

K: Knit

P: Purl

RS: Right side

St(s): Stitch (es)

C4F: Cable 4 Front – slip next 2 sts from left hand needle to cable needle, hold to front, k2 from left hand needle, then k2 from cable needle

Rep: Repeat

WS: Wrong side

X: Times (example: 3x = 3 times)

Pin for how to knit the Baby Cable and Garter Ridges stitch from Handmade by Stacy J
Here’s a pin for your Pinterest board 🙂

Notes:

  • If you’d like to minimize the gap from the cable, try giving the yarn a light tug on the stitch afterward to close up the gap a little bit.

Directions for Baby Cable and Garter Ridges Stitch:

  • Row 1 (RS): *P9, k4, p12; rep * to end
  • Row 2 (WS): *[P3, k1] 3x, p4, k1, [p3, k1] 2x; rep * to end
  • Row 3: *[P1, k3] 2x, p1, c4f, [p1, k3] 3x; rep * to end
  • Row 4: As row 2

Repeat rows 1-4 to desired length and then bind off in pattern.


If you enjoyed learning this stitch, here are a few more that are available to view on the website 🙂

How to knit the Double Eyelet Rib from Handmade by Stacy J
Pin of Quail Cable Stitch from Handmade by Stacy J

Knitting chart that shows how to knit the Baby Cable and Garter Ridges stitch from Handmade by Stacy J

I hope you enjoyed learning this stitch as much as I did. Please tag me @handmadebystacyj when posting on social media – I’d love to see your makes!

Stacy J

YouTube • Facebook • Instagram • Ravelry • Pinterest

Horn Cable – How to knit

The Horn Cable is a fairly simple cable stitch that uses two 4-stitch cables to create an interesting fabric. It’s worked over a panel of 16 stitches with a background of reverse stockinette and uses Cable 4 front and back stitches to create a dense fabric. This stitch would be a lovely stitch pattern to use for a sweater, hat, scarf and / or a blanket.

There is a chart below for reference, as well as a video link above to help you. And, if you’d like to see a fun time-lapse video I made while working on this stitch, simply scroll to the very bottom of this post.


Disclosure: This post contains affiliate links. As an affiliate, when you purchase through my links, you allow the company to pay me a small commission without costing you a penny more, which allows me to continue making free content. Thank you for your support!

Materials needed

(listed below is what I used to create the sample of the Horn Cable stitch pattern)

  • Paintbox Yarns Simply DK yarn in color Light Grey (#104), approximately 21 yds
  • Size 6 / 4 mm knitting needles
  • Cable needle
  • 2 stitch markers (optional)

Stitches and abbreviations used

K: Knit

P: Purl

PB1: Purl through the back loop

RS: Right side

St(s): Stitch (es)

C4b: Cable 4 back – slip next 2 sts from left hand needle to cable needle, hold to back, k2 from left hand needle, then k2 from cable needle

C4f: Cable 4 front – slip next 2 sts from left hand needle to cable needle, hold to front, k2 from left hand needle, then k2 from cable needle

WS: Wrong side

X: Times (example: 3x = 3 times)

Notes:

  • To make this stitch a little easier and to keep track of the panel, try inserting stitch markers between panels. This way it’s easier not to not get confused as to where the background of reverse stockinette section and the cable panel is.
  • To help minimize the gap of the cable, I give a light tug on the stitch afterward and it helps to close up the gap a bit.

Pin of the knitted Horn Cable from Handmade by Stacy J
Here’s a pin for your Pinterest board 🙂

Directions

(worked over panel of 16 sts with background of reverse stockinette). Directions are for the cable panel only.

  • Row 1 (RS): K4, c4b, c4f, k4
  • Row 2 and all WS rows: Purl
  • Row 3: K2, c4b, k4, c4f, k2
  • Row 5: C4b, k8, c4f
  • Row 6: Purl

Repeat rows 1-6 to desired length.

Chart showing how to knit the Horn Cable stitch created by Handmade by Stacy J

I hope you enjoyed learning this stitch as much as I did. Please tag me @handmadebystacyj when posting on social media – I’d love to see your makes!

Stacy J

YouTube • Facebook • Instagram • Ravelry • Pinterest

Fudge Swirl Cable

The Fudge Swirl Cable might be exactly what you’re looking for If you’ve ever wanted to learn how to knit cables. It looks complex, but it’s actually a fairly simple cable stitch. It uses ribbing to create an interesting fabric and is worked over a panel of 18 stitches. The panel is worked over a background of reverse stockinette and uses a 8 Stitch Left Purl Cross stitch. The Fudge Swirl Cable creates a dense fabric that would be a lovely stitch pattern to use for a sweater, hat, scarf or a blanket.

To help you along with learning this stitch, there is a chart below for reference, a video link is also at the top of this post to help you with the 8 stitch Left Purl Cross (8-st LPC).


Disclosure: This post contains affiliate links for companies that I am proudly affiliated with. If you choose to shop with them by clicking on my link, you allow the company to pay me a small commission. This doesn’t cost you any more and allows me to continue providing free content. Thank you for your support!


How to knit the Fudge Swirl Cable tutorial pin from Handmade by Stacy J
Here’s a pin for your Pinterest board 🙂

Materials needed

(listed below is what I used to create the sample of the stitch pattern)

  • Paintbox Yarns Simply DK yarn in color Light Grey (#104), approximately 45 yds
  • Size 6 / 4 mm knitting needles
  • Cable needle
  • 2 stitch markers (optional)

Stitches and abbreviations used

K: Knit

P: Purl

RS: Right side

St(s): Stitch (es)

8-st LPC: 8 Stitch Left Purl Cross – slip next 3 sts from left hand needle to cable needle, hold to front, k3 and p2 from left hand needle, then k3 from cable needle

WS: Wrong side

X: Times (example: 3x = 3 times)

Notes:

  • I find it easier to follow the pattern by inserting stitch markers between panels. By doing this, the markers help me to not get confused and see where the background of reverse stockinette section begins and ends, as well as where the cable panel is.
  • To help minimize the gap of the cable, I give a light tug on the stitch afterward to close it up a bit

Directions:

This stitch is worked over a panel of 18 stitches with a background of reverse stockinette stitch. For the example, I cast on 38 for a 10 stitch background of reverse stockinette stitch on each side of the panel.

Directions are for the cable panel only.

To see how to do the 8-st LPC, click here or scroll to the top of this post.

  • Row 1 (RS): [K3, p2] 3x, k3
  • Row 2 and all WS rows: P3, [k2, p3] 3x
  • Row 3: As row 1
  • Row 5: K3, p2, 8-st LPC, p2, k3
  • Row 7: 8-st LPC, p2, 8-st LPC
  • Row 9: As row 5
  • Row 11: As row 7
  • Row 13: As row 5
  • Row 15: As row 7
  • Row 17: As row 5
  • Rows 19, 21, 23, 25 & 27: As row 1
  • Row 28: As row 2

Continue repeating rows 1-28 of the stitch pattern until you get to your desired length. For consistency, I bound off after completing row 19 and then bound off on WS as pattern.

Stitch chart showing how to knit the Fudge Swirl Cable from Handmade by Stacy J

I hope you enjoyed learning this stitch as much as I did and I hope that you will tag me on social media @handmadebystacyj when posting. I’d love to see your makes!

Stacy J

YouTube • Facebook • Instagram • Ravelry • Pinterest

Medallion Seed Stitch Cable

The Medallion Seed Stitch Cable is worked on a panel of 13 stitches with a background of reverse stockinette over 16 rows. The cables have a lovely stockinette that frame a seed stich insert. It creates a dense fabric that would be a lovely stitch pattern to use for a sweater, hat, scarf or a blanket.

There is a chart below for reference

Disclosure: This post contains affiliate links for companies that I am proudly affiliated with. If you choose to shop with them by clicking on my link, you allow the company to pay me a small commission without costing you a penny more, which allows me to continue providing free content. Thank you for your support!


Pin of the Medallion Seed Stitch Cable from Handmade by Stacy J
Here’s a pin for your Pinterest board 🙂

Materials needed

Listed below is what I used to create the sample of the stitch pattern

Stitches and abbreviations used

C6B: Cable 6 Back – slip 3 sts from left hand needle to cable needle, hold to back, knit 3 from left hand needle, then knit 3 from cable needle

C6F: Cable 6 Front – slip 3 sts from left hand needle to cable needle, hold to front, knit 3 from left hand needle, then knit 3 from cable needle

K: Knit

P: Purl

Notes:

  • I find it easier to insert stitch markers between panels, so as not to get confused to where the background of reverse stockinette section is
  • To help minimize the gap of the cable, I give a light tug on the stitch afterward to close it up a bit

Directions for the Medallion Seed Stitch Cable

  • 1 (RS): K4, [p1, k1] 3 times, k3
  • 2: P3, [k1, p1] 4 times, p2
  • 3: As row 1
  • 4: As row 2
  • 5: C6F, k1, C6B
  • 6, 8 & 10: Purl
  • 7, 9 & 11: Knit
  • 12: Purl
  • 13: C6B, k1, C6F
  • 14: As row 2
  • 15: As row 1
  • 16: As row 2

Repeat rows 1-16 to desired length, then bind off as pattern

Chart for how to knit the Medallion Seed Stitch Cable from Handmade by Stacy J

I hope you enjoyed learning this stitch as much as I did. Please tag me @handmadebystacyj when posting on social media – I’d love to see your makes!

Stacy J

YouTube • Facebook • Instagram • Ravelry • Pinterest

Knotted Cable Stitch

The Knotted Cable Stitch is such a fun stitch. It’s worked with a background of reverse stockinette with the cable working over 6 stitches. The knot in the middle of the cable is created by doing a Cross 6 or C6 stitch, and then the cable is worked as a 2×2 ribbing. The Knotted Cable Stitch pattern works in multiples of 6 over a 10 row repeat.

Disclosure: Please note that this post contains links for companies that I’m a proud affiliate for. That means that if you choose to purchase from that link, you allow the company to pay me a small commission without costing you a penny more. Thank you so much for your support!

To see a video tutorial of the Knotted Cable stitch, click on the box below.


Stitches and abbreviations used:

Written using US terms

K: Knit

P: Purl

RS: Right side

WS: Wrong side


Pin on knit Knotted Cable Stitch from Handmade by Stacy J
Here’s a pin for your Pinterest board ??

Special Stitches:

C6: Cross 6 – Slip 4 onto cable needle and hold in front of work, k2, sl2 from cable needle back to left needle, pass cable needle with 2 remaining knit sts to back of work, p2 from left needle, k2 from cable needle

Instructions are for cable panel only; this stitch is worked on a background of reverse stockinette

Note: If you prefer to have the first knot higher up the panel (instead of towards the bottom where you begin), simply work a few more rows of 1-2

Directions for the Knotted Cable Stitch:

1 (RS): K2, p2, k2

2 & every alt row: P2, k2, p2

3: C6

5, 7 & 9: As row 1

10: As row 2

Rep rows 1-10 until desired length is reached.


I hope you enjoyed learning this stitch as much as I did. When you make something with it, could you please tag me @handmadebystacyj or #handmadebystacyj – I’d love to see what you create!

Stacy J

Subscribe on YouTube • Join me on Facebook • Follow on Instagram

Patterns on Ravelry • Inspiration on Pinterest