Medallion Seed Stitch Cable

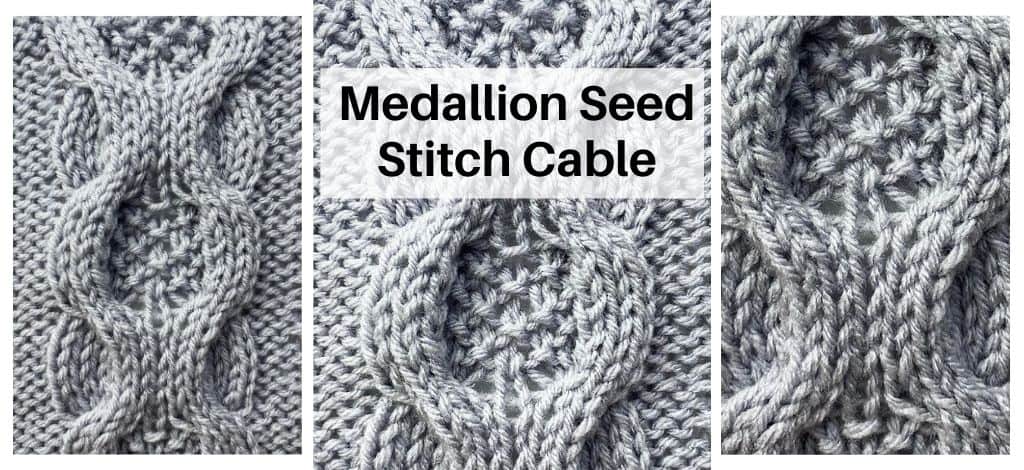
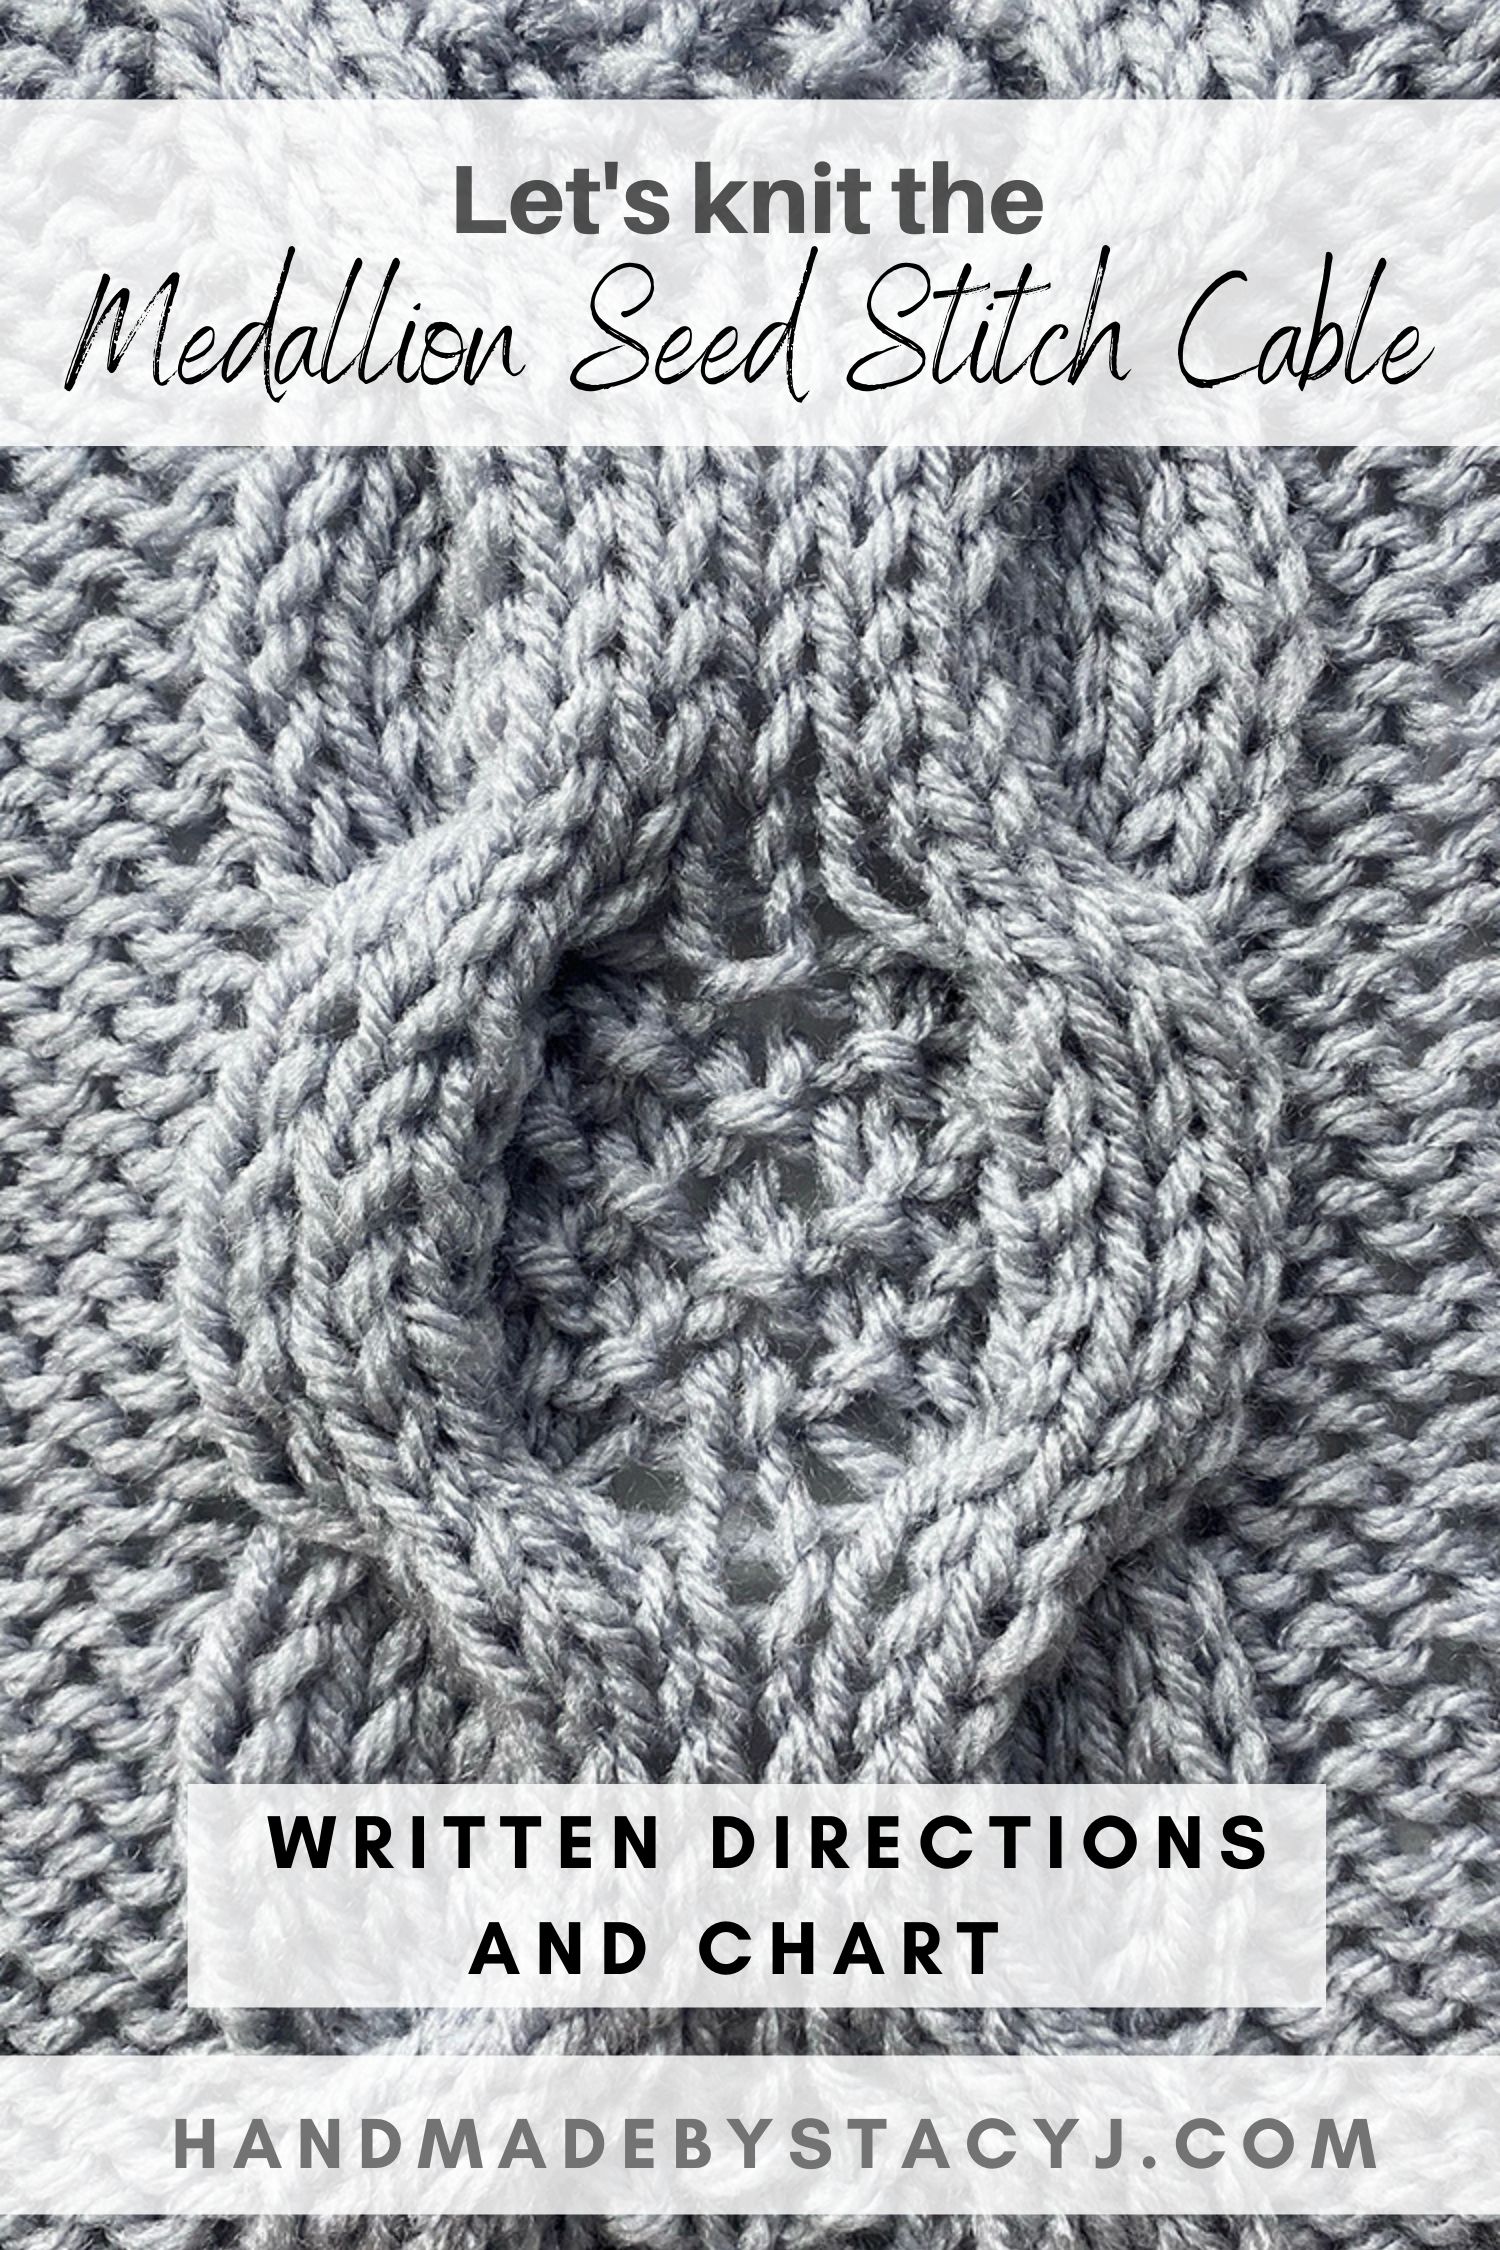
The Medallion Seed Stitch Cable is worked on a panel of 13 stitches with a background of reverse stockinette over 16 rows. The cables have a lovely stockinette that frame a seed stich insert. It creates a dense fabric that would be a lovely stitch pattern to use for a sweater, hat, scarf or a blanket.

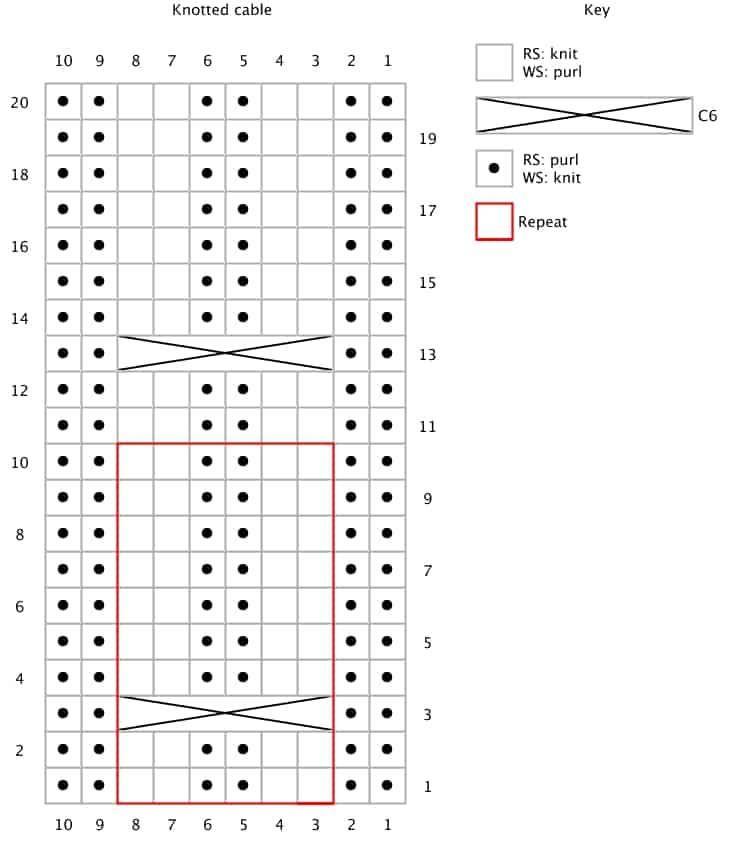
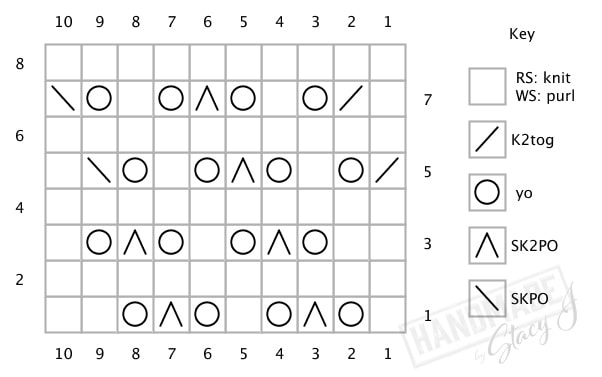
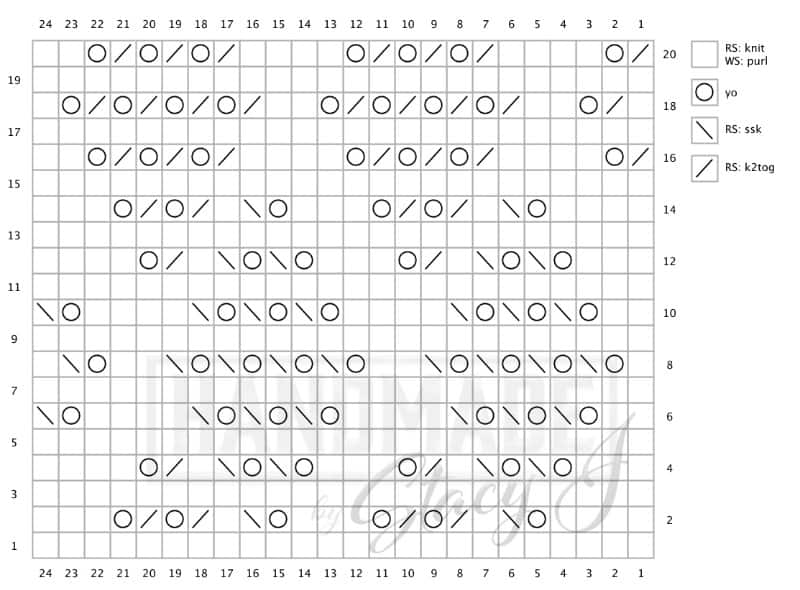
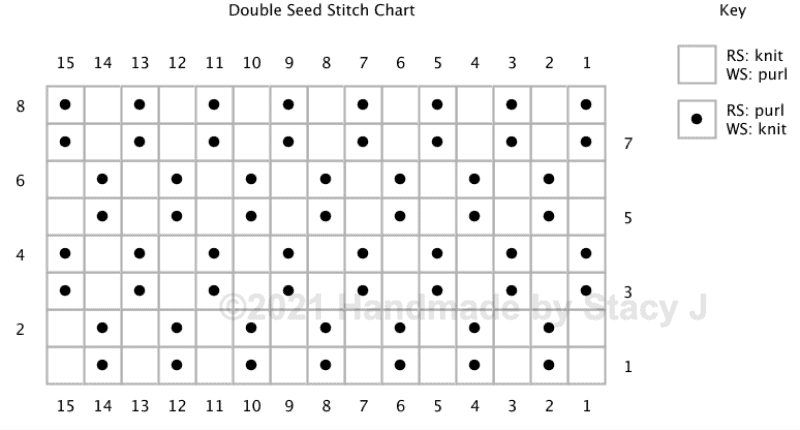
There is a chart below for reference

Disclosure: This post contains affiliate links for companies that I am proudly affiliated with. If you choose to shop with them by clicking on my link, you allow the company to pay me a small commission without costing you a penny more, which allows me to continue providing free content. Thank you for your support!


Pin of the Medallion Seed Stitch Cable from Handmade by Stacy J
Here’s a pin for your Pinterest board πŸ™‚

Materials needed

Listed below is what I used to create the sample of the stitch pattern

Stitches and abbreviations used

C6B: Cable 6 Back – slip 3 sts from left hand needle to cable needle, hold to back, knit 3 from left hand needle, then knit 3 from cable needle

C6F: Cable 6 Front – slip 3 sts from left hand needle to cable needle, hold to front, knit 3 from left hand needle, then knit 3 from cable needle

K: Knit

P: Purl

Notes:

  • I find it easier to insert stitch markers between panels, so as not to get confused to where the background of reverse stockinette section is
  • To help minimize the gap of the cable, I give a light tug on the stitch afterward to close it up a bit

Directions for the Medallion Seed Stitch Cable

  • 1 (RS): K4, [p1, k1] 3 times, k3
  • 2: P3, [k1, p1] 4 times, p2
  • 3: As row 1
  • 4: As row 2
  • 5: C6F, k1, C6B
  • 6, 8 & 10: Purl
  • 7, 9 & 11: Knit
  • 12: Purl
  • 13: C6B, k1, C6F
  • 14: As row 2
  • 15: As row 1
  • 16: As row 2

Repeat rows 1-16 to desired length, then bind off as pattern

Chart for how to knit the Medallion Seed Stitch Cable from Handmade by Stacy J

I hope you enjoyed learning this stitch as much as I did. Please tag me @handmadebystacyj when posting on social media – I’d love to see your makes!

Stacy J

YouTube β€’ Facebook β€’ Instagram β€’ Ravelry β€’ Pinterest

Knotted Cable Stitch

The Knotted Cable Stitch is such a fun stitch. It’s worked with a background of reverse stockinette with the cable working over 6 stitches. The knot in the middle of the cable is created by doing a Cross 6 or C6 stitch, and then the cable is worked as a 2×2 ribbing. The Knotted Cable Stitch pattern works in multiples of 6 over a 10 row repeat.

Disclosure: Please note that this post contains links for companies that I’m a proud affiliate for. That means that if you choose to purchase from that link, you allow the company to pay me a small commission without costing you a penny more. Thank you so much for your support!

To see a video tutorial of the Knotted Cable stitch, click on the box below.


Stitches and abbreviations used:

Written using US terms

K: Knit

P: Purl

RS: Right side

WS: Wrong side


Pin on knit Knotted Cable Stitch from Handmade by Stacy J
Here’s a pin for your Pinterest board ??

Special Stitches:

C6: Cross 6 – Slip 4 onto cable needle and hold in front of work, k2, sl2 from cable needle back to left needle, pass cable needle with 2 remaining knit sts to back of work, p2 from left needle, k2 from cable needle

Instructions are for cable panel only; this stitch is worked on a background of reverse stockinette

Note: If you prefer to have the first knot higher up the panel (instead of towards the bottom where you begin), simply work a few more rows of 1-2

Directions for the Knotted Cable Stitch:

1 (RS): K2, p2, k2

2 & every alt row: P2, k2, p2

3: C6

5, 7 & 9: As row 1

10: As row 2

Rep rows 1-10 until desired length is reached.


I hope you enjoyed learning this stitch as much as I did. When you make something with it, could you please tag me @handmadebystacyj or #handmadebystacyj – I’d love to see what you create!

Stacy J

Subscribe on YouTube β€’ Join me on Facebook β€’ Follow on Instagram

Patterns on Ravelry β€’ Inspiration on Pinterest

Lace and Cable Panel

The Lace and Cable Panel is a gorgeous stitch worked with a background of reverse stockinette with lace framed by cables. The cables are a little different in the sense that the RS is knit in the back loop and the WS is purled in the back loop. The Lace and Cable Panel stitch pattern works in multiples of 21 over an 8 row repeat.

Below there is a chart for you, as well.

Disclosure: Most of my posts contain links for companies that I’m a proud affiliate for. That means that if you choose to purchase from that link, you allow the company to pay me a small commission without costing you a penny more. Thank you so much for your support!

To see a video tutorial of this stitch, click above this post or view it on Youtube HERE.

Stitches and abbreviations used:

K: Knit

K2tog: Knit 2 together

K2tog tbl: Knit 2 together through the back loop

KB1: Knit through the back loop

P: Purl

PB1: Purl through the back loop

RS: Right side

Sk2po: Slip 1 stitches purl wise, knit the next 2 stitches together, pass the slipped stitch over the knit 2 together stitch just made

WS: Wrong side

Yo: yarn over

Pin of knitted Lace and Cable Panel from Handmade by Stacy J
Here’s a pin for your Pinterest board πŸ™‚

Special Stitches:

CB4F: Slip 2 stitches off left needle and place on cable needle, hold cable needle at front of work, knit the 2 stitches on left needle through the back loop, then knit the 2 stitches off the cable needle through the back loop.

CB4B: Slip 2 stitches off left needle and place on cable needle, hold cable needle at back of work, knit the 2 stitches on left needle through the back loop, then knit the 2 stitches off the cable needle through the back loop.

Directions for the Lace and Cable Panel:

Written using US terms

Instructions are for lace panel only

1 (RS): P2, [KB1] 4x, k1, yo, k2tog tbl, k3, k2tog, yo, k1, [KB1] 4x, p2

2 and every WS row: K2, [PB1] 4x, k1, p7, k1, [PB1] 4x, k2

3: P2, [KB1] 4x, k2, yo, k2tog tbl, k1, k2tog, yo, k2, [KB1] 4x, p2

5: P2, CB4F, k3, yo, sk2po, yo, k3, CB4B, p2

7: P2, [KB1] 4x, k9, [KB1] 4x, p2

8: As row 2

Rep rows 1-8 until desired length is reached.

Lace and Cable Panel knitting chart from Handmade by Stacy J

I hope you enjoyed learning this stitch as much as I did. When you make something with it, could you please tag me @handmadebystacyj or #handmadebystacyJ – I’d love to see what you create!

Stacy J

Subscribe on YouTube β€’ Join me on Facebook β€’ Follow on Instagram

Patterns on Ravelry β€’ Inspiration on Pinterest

Diagonal Openwork

Learn how to knit the Diagonal Openwork knit stitch. This is a fairly simple stitch that involves a combination of knits, purls, increases and decreases to create an interesting diagonal design. This Diagonal Openwork knit stitch pattern works in multiples of 4 + 2 over an 8 row repeat.

To practice this beautiful stitch, check out the block pattern that I designed – it’s a free knit pattern just for you.

Scroll to the bottom of the post to see the chart for this stitch.

Disclosure: Most of my posts contain affiliate links. That means that if you choose to purchase from that link, you allow the company to pay me a small commission without costing you a penny more. Thank you so much for your support!

Stitches and abbreviations used:

Written using US terms

K: Knit

K2tog: Knit 2 together

P: Purl

RS: Right side

Skpo: Slip 1 stitch purl wise, knit the next stitch, pass slipped stitch over knit stitch just made

Sk2po: Slip 1 stitch purl wise, knit the next 2 stitches together, pass the slipped stitch over the knit 2 together stitch just made

St(s): Stitch (es)

WS: Wrong side

Yo: yarn over


Pin of Diagonal Openwork Knit Stitch from Handmade by Stacy J
Here’s a pin for your Pinterest board πŸ™‚

Stitch pattern for Diagonal Openwork Knit Stitch:

1 (RS): *K1, yo, sk2po, yo: rep * to last 2 sts, k2

2 and all WS rows: Purl

3: K2, *yo, sk2po, yo, k1; rep * to end

5: K2tog, yo, k1, yo, *sk2po, yo, k1, yo; rep * to last 3 sts, skpo, k1

7: K1, k2tog, yo, k1, yo, *sk2po, yo, k1, yo; rep * to last 2 sts, skpo

8: Purl

Rep these 8 rows to desired length

Knitting chart for Diagonal Openwork Knit Stitch

I hope you enjoyed learning this stitch as much as I did. When you make something with it, could you please tag me @handmadebystacyj or #handmadebystacyJ – I’d love to see what you create!

Stacy J

Subscribe on YouTube β€’ Join me on Facebook β€’ Follow on Instagram

Patterns on Ravelry β€’ Inspiration on Pinterest

Leafy Lace knitting stitch

The Leafy Lace knitting stitch is a beautiful lace stitch. Although it does take some concentration while working the rows, it’s worth the effort when you complete it. After a couple repeats, it’s not too hard to get the hang of it. This stitch pattern works in multiples of 10 + 1 over a 16 row repeat.

Below there is a chart for you, as well.

To see a video tutorial of this stitch, click the box below or view on YouTube by clicking HERE.

Stitches and abbreviations used:

K: Knit

K2tog: Knit 2 together

KB1: Knit through the back loop

P: Purl

P2tog: Purl 2 together

PB1: Purl through the back loop

Rep: Repeat

RS: Right side

Sk2po: Slip 1 stitch purl wise, knit the next 2 stitches together, pass the slipped stitch over the knit 2 together stitch just made

WS: Wrong side

Yo: yarn over


Pin of Leafy Lace Stitch from Handmade by Stacy J
Here’s a pin for your Pinterest board πŸ™‚

Stitch pattern for Leafy Lace Stitch:

Written using US terms

1 (RS): K1, *p9, KB1; rep * to end

2 (WS): P1, *k9, p1; rep * to end

3: As row 1

4: As row 2

5: K1, *p2, p2tog, yo, KB1, yo, p2tog, p2, KB1; rep * to end

6: P1, *k4, PB1, k4, p1; rep * to end

7: K1, *p1, p2tog, yo, [KB1] 3x, yo, p2tog, p1, KB1; rep * to end

8: P1, *k3, [PB1] 3x, k3, p1; rep * to end

9: K1, *p2tog, yo, [KB1] 5x, yo, p2tog, KB1; rep * to end

10: P1, *k2, [PB1] 5x, k2, p1; rep * to end

11: K1, *p1, yo, [KB1] 2x, sk2po, [KB1] 2x, yo, p1, KB1; rep * to end

12: As row 10

13: K1, *p2, yo, KB1, sk2po, KB1, yo, p2, KB1; rep * to end

14: As row 8

15: K1, *p3, yo, sk2po, yo, p3, KB1; rep * to end

16: As row 6

Rep these 16 rows to desired length

Note: To end with an even edge of top and bottom, work rows 1-3 once more and bind off on WS in pattern of row 4


Chart for how to knit the Leafy Lace Stitch from Handmade by Stacy J

I hope you enjoyed learning this stitch as much as I did. When you make something with it, could you please tag me @handmadebystacyj or #handmadebystacyJ – I’d love to see what you create!

Stacy J

Subscribe on YouTube β€’ Join me on Facebook β€’ Follow on Instagram

Patterns on Ravelry β€’ Inspiration on Pinterest

Ruching Stitch

also known as the Ribbon Stitch

The Ruching stitch is very fun, easy to do, easy to memorize and offers a lovely squishy texture that would be great for a scarf, hat or baby blanket. The ruching of this stitch pattern is created by doubling the amount of stitches in indicated rows using a smaller needle. The ruching is then brought together by reducing the amount of stitches and then switching to larger needles.

I’ve designed a block pattern that would be wonderful for a blanket that utilizes 10” x 10” or 9.5″ x 9.5″ blocks. The patterns are free and can be located on my website.

For option 1: Ruching Block 1

For option 2: Ruching Block 2

If you’d like to see the video tutorial, you can click on the box above or click HERE. And, if you don’t have time to try this amazing stitch right away, there’s a Pin below that you can save to your Pinterest board.

There are two options for working this stitch. Option 1 uses the stockinette stitch to separate the ruching (see purple example below); Option 2 uses garter stitch to separate the ruching.

Pin of 2 ways to make the Ruching stitch from Handmade by Stacy J
Here’s a pin for your Pinterest board πŸ™‚

Stitches & abbreviations used:

K: Knit

K2tog: Knit 2 together

Kfb: Knit front and back

P: Purl

Multiples of 1

Uses 2 different sized needles

For my blocks, I use sizes US 6 / 4 mm & US 5 / 3.75 mm for DK weight yarn and for the video tutorial I use sizes US 8 / 5 mm and US 7 / 4.5 mm for worsted weight yarn


Directions for Ruching Stitch option 1

This has the stockinette stitch as the divider of the ruching

  1. (WS): Purl
  2. (RS): Knit
  3. Purl
  4. Knit
  5. Purl
  6. Knit
  7. Purl
  8. Kfb in ea st; change to smaller needles for next row
  9. Purl
  10. Knit
  11. Purl
  12. Knit
  13. Purl
  14. K2tog across row; change to larger needles for next row

Rep rows 1-14 to desired length

** If working a square or a scarf, you can repeat rows 1 – 6 or 7 once more for an even top and bottom of the project.


Directions for Ruching Stitch option 2

This option has the garter stitch for separating the ruching

Note: This option does scrunch up a little bit more than the first option, but it does lay flatter and the edges appear straighter.

  1. (WS): Knit
  2. (RS): Knit
  3. Knit
  4. Knit
  5. Knit
  6. Knit
  7. Knit
  8. Kfb in ea st; change to smaller needles for next row
  9. Purl
  10. Knit
  11. Purl
  12. Knit
  13. Purl
  14. K2tog across row; change to larger needles for next row

Rep rows 1-14 to desired length

** If working a square or a scarf, you can repeat rows 1 – 6 or 7 once more for an even top and bottom of the project.


I hope you enjoyed learning this lovely stitch and try it out on a project. If you do make something with the Ruching Stitch, please tag me on social media @handmadebystacyj – I’d love to see your makes! To know when more stitches and patterns are added, please check back often or subscribe to my newsletter.

Stacy J

Subscribe on YouTube β€’ Join me on Facebook β€’ Follow on Instagram

Patterns on Ravelry β€’ Inspiration on Pinterest

Zigzag Eyelet Lace Stitch

The Zigzag Eyelet Lace Stitch written directions can be used with the video tutorial on the β€œHandmade by Stacy J” YouTube channel. This is a stitch that requires a little concentration, however the chart that accompanies the written directions will make it easier for you. The Zigzag Eyelet Lace stitch pattern in worked in multiples of 11 over 12 rows with a background of Stockinette Stitch.

Disclosure: If you choose to purchase from any of the links that I have on this tutorial, you are allowing me to continue providing free tutorials by letting the companies that I am affiliated with pay me a small commission. Thank you for your support!

Difficulty level:

Easy

Stitches used:

Knit (k)

Purl (p)

Knit 2 Together (k2tog)

Slip a stitch knitwise, knit 1, pass the slipped stitch over (Sl1, k1, psso)

Yarn over (yo)

Materials Needed:

Paintbox Yarns – Simply DK (100% Acrylic; 100g / 3.5oz; Light #3 weight); Color #136 Dolphin Blue

KnitPicks Straight Knitting needles, size 6 (4.00 mm)

Works in multiples of 11 sts over 12 rows with background of Stockinette Stitch – For the sample in the YouTube video, I cast on 21


Pin of Zigzag lace panel from Handmade by Stacy J
Here’s a pin for you Pinterest board πŸ™‚

Directions for Zigzag Lace Panel

For lace panel section only

  • 1 (RS): K6, yo, sl1, k1, psso, k3. (11 sts)
  • 2 and all WS rows: Purl.
  • 3: K7, yo, sl1, k1, psso, k2.
  • 5: K3, k2tog, yo, k3, yo, sl1, k1, psso, k1.
  • 7: K2, k2tog, yo, k5, yo, sl1, k1, psso.
  • 9: K1, k2tog, yo, k8.
  • 11: K2tog, yo, k9.
  • 12: Purl

Rep rows 1-12 until desired length is reached.


Chart of Zigzag Lace Panel from Handmade by Stacy J

Here is the link to the video tutorial for you: https://youtu.be/bs2pyyZUxEo

If you prefer a printable pdf, here is one to download:

 Zigzag-Eyelet-Lace-Tutorial

I do hope that enjoy this stitch and it finds a way into your knitting repertoire. Thank you so much for joining me on our yarny adventures. Happy Knitting and I’ll see you soon!

Stacy J

Subscribe on YouTube β€’ Join me on Facebook β€’ Follow on Instagram

Patterns on Ravelry Inspiration on Pinterest

Checkerboard Lace

The Checkerboard Lace Stitch Pattern is a stitch pattern that requires a little concentration. However, the chart that accompanies the written directions will make it easier for you. The Checkerboard Lace stitch pattern in worked in multiples of 10 + 4 over 20 rows. Written directions are below, as well as a chart and a link to the video tutorial.

Disclosure: If you choose to purchase from any of the links that I have on this tutorial, you are allowing me to continue providing free tutorials by letting the companies that I am affiliated with pay me a small commission. Thank you for your support!

Difficulty level:

Intermediate

Stitches used:

Knit (k)

Purl (p)

Knit 2 Together (k2tog)

Slip slip knit (ssk)

Yarn over (yo)

Pin of Checkerboard Lace Stitch Pattern from Handmade by Stacy J
Here’s a pin for your Pinterest board πŸ™‚

Materials Needed:

Paintbox Yarns – Simply DK (100% Acrylic; 100g / 3.5oz; Light #3 weight); Color #136 Dolphin Blue

KnitPicks Straight Knitting needles, size 6 (4.00 mm)


Directions for Checkerboard Lace Stitch Pattern

Works in multiples of 10 sts + 4

For the sample in the YouTube video, I cast on 24

1 (WS) and all WS rows: Purl across

2 (RS): K4, *Yo, ssk, k1, [k2tog, yo] Γ— 2, k3; rep * to end.

4: K3, *[Yo, ssk] Γ— 2, k1, k2tog, yo, k3; rep from * to last st, k1.

6: K2, *[Yo, ssk] Γ— 3, k4; rep * to last 2 sts, yo, ssk.

8: K1, *[Yo, ssk] Γ— 4, k2; rep * to last 3 sts, yo, ssk, k1.

10: Repeat row 6.

12: Repeat row 4.

14: Repeat row 2.

16: K2tog, yo, *k4, [k2tog, yo] Γ— 3; rep * to last 2 sts, k2.

18: K1, k2tog, yo, *k2, [k2tog, yo] Γ— 4; rep * to last st, k1

20: Repeat row 16.

Rep rows 1-20 until desired length is reached, binding off as pattern.

Chart showing how to knit the Checkerboard Lace Stitch Pattern from Handmade by Stacy J

Here’s the link to the video tutorial for you: https://youtu.be/peCBZIKZxl0

I do hope you found this tutorial helpful. If you have any stitches are that giving you fits, please feel free to email me with your suggestions – I absolutely love making tutorials from requests. Also, please remember to tag me @handmadebystacyj with your makes!

Stacy J

Subscribe on YouTube β€’ Join me on Facebook β€’ Follow on Instagram

Patterns on Ravelry β€’ Inspiration on Pinterest

Chinese Lace Stitch

Chinese Lace is a beautiful lace stitch that is worked over 12 stitches and 24 rows. I have been intrigued by this pattern for as long as I’ve been knitting and decided to jump in and learn it. Then, a tutorial was born because I just HAD to share it with you!

This pattern does require concentration, but once you get the hang of it, it isn’t very difficult. Please join me as I show you how to create this beautiful lace pattern with step by step instructions.

For your reference, written directions and chart are below. There is also a video tutorial link for you to view for this stitch that is available at the box below and at the bottom of this post.

Disclosure: This post contains affiliate links. As an affiliate, when you purchase through my links, you allow the company to pay me a small commission without costing you a penny more, which allows me to continue making free content. Thank you for your support!

Difficulty level:

Intermediate / Advanced

Stitches used:

K: Knit

K2tog: Knit 2 stitches together

P: Purl

P2tog: Purl 2 stitches together

Yo: Yarn Over

Ssk: Slip slip knit

Ssp: Slip slip purl


Pin of knitted Chinese Lace from Handmade by Stacy J
Here’s a pin for your Pinterest board πŸ™‚

Materials Needed:

Paintbox Yarns – Simply DK (100% Acrylic; 100g / 3.5oz; Light #3 weight); Color #143 Raspberry Pink

KnitPicks Straight Knitting needles, size 6 (4.00 mm)


Directions for Chinese Lace

For the sample in the video, I cast on 39 stitches.

Note: This is stitch pattern is worked flat.

1 (RS): P1, k1, p1, *ssk, k7, yo, p1, k1, p1; rep from * to end

2 (WS): K1, p1, k1, *p1, yo, p6, ssp, k1, p1, k1; rep from * to end.

3: P1, k1, p1, *ssk, k5, yo, k2, p1, k1, p1; rep from * to end.

4: K1, p1, k1, *p3, yo, p4, ssp, k1, p1, k1; rep from * to end.

5: P1, k1, p1, *k3, k2tog, k4, yo, p1, k1, p1; rep from * to end.

6: K1, p1, k1, *p1, yo, p4, p2tog, p2, k1, p1, k1; rep from * to end.

7: P1, k1, p1, *k1, k2tog, k4, yo, k2, p1, k1, p1; rep from * to end.

8: K1, p1, k1, *p3, yo, p4, p2tog, k1, p1, k1; rep from * to end.

9:P1, k1, p1, *yo, k3, k2tog, k4, p1, k1, p1; rep from * to end.

10: K1, p1, k1, *p4, p2tog, p2, yo, [p1, k1] twice; rep from * to end.

11: P1, k1, p1, *k2, yo, k1, k2tog, k4, p1, k1, p1; rep from * to end.

12: K1, p1, k1, *p4, p2tog, yo, p3, k1, p1, k1; rep from * to end.

13: P1, k1, p1, *yo, k7, k2tog, p1, k1, p1; rep from * to end.

14: K1, p1, k1, *p2tog, p6, yo, [p1, k1] twice; rep from * to end.

15: P1, k1, p1, *k2, yo, k5, k2tog, p1, k1, p1; rep from * to end.

16: K1, p1, k1, *p2tog, p4, yo, p3, k1, p1, k1; rep from * to end.

17: P1, k1, p1, *yo, k4, ssk, k3, p1, k1, p1; rep from * to end.

18: K1, p1, k1, *p2, ssp, p4, yo, [p1, k1] twice; rep from * to end.

19: P1, k1, p1, *k2, yo, k4, ssk, [k1, p1] twice; rep from * to end.

20: K1, p1, k1, *ssp, p4, yo, p3, k1, p1, k1; rep from * to end.

21: P1, k1, p1, *k4, ssk, k3, yo, p1, k1, p1; rep from * to end.

22: K1, p1, k1, *p1, yo, p2, ssp, p4, k1, p1, k1; rep from * to end.

23: P1, k1, p1, *k4, ssk, k1, yo, k2, p1, k1, p1; rep from * to end.

24: K1, p1, k1, *p3, yo, ssp, p4, k1, p1, k1; rep from * to end.

Rep rows 1-24 until desired length is reached then end by binding off as pattern.


In case you missed it at the top, here’s the video tutorial for you: https://youtu.be/gxBNsaYs-vs

I hope you’ve enjoyed learning this stitch as much as I did! And, as always, thank you so much for supporting me on my yarny journeys! Please remember to tag me @handmadebystacyj so that I can see your makes – I love seeing them!

Stacy J

Subscribe on YouTube β€’ Join me on Facebook β€’ Follow on Instagram

Patterns on Ravelry β€’ Inspiration on Pinterest

Double Seed Stitch

Also known as the Moss Stitch

The Double Seed Stitch is a very simple, beginner friendly stitch that is worked over 2 stitches and 4 rows using only knits and purls. This stitch is also knows as the Moss stitch. Join me as I show you step by step how to create the Double Seed Stitch, a super easy and beautiful stitch.

Below you will find the written directions with a chart, as well as the video tutorial. If you’d like to save this idea for later, there’s a pin for you, as well πŸ™‚

Disclosure: This post contains links for companies that I am an affiliate for. By purchasing through those links you continue to allow me to provide free tutorials by allowing the company to pay me a small commission. Thank you for your support!

Difficulty level:

Easy / Beginner

Stitches used:

K: Knit

P: Purl


Double Seed Stitch Pin from Handmade by Stacy J
Here’s a pin for your Pinterest board πŸ™‚

Materials Needed:

Paintbox Yarns – Simply DK (100% Acrylic; 100g / 3.5oz; Light #3 weight); Color #142 Tea Rose

KnitPicks Straight Knitting needles, size 6 (4.00 mm)

Directions for Double Seed Stitch

For the sample in the YouTube video, I cast on 15

1 (RS): K1, *p1, k1; rep from * to end

2 (WS): P1, *k1, p1; rep from * to end

3: Rep row 2

4: Rep row 1

Rep rows 1-4 until desired length is reached, binding off as pattern.

Chart of the Double Seed Stitch from Handmade by Stacy J

Here’s the video tutorial for you: https://youtu.be/9nsbwhi5YhA

If you would like a pdf, you can download that below.

Thanks again for visiting! I’m so grateful to have you joining on our yarny adventures.

Stacy J

Subscribe on YouTube β€’ Join me on Facebook β€’ Follow on Instagram

Patterns on Ravelry β€’ Inspiration on Pinterest