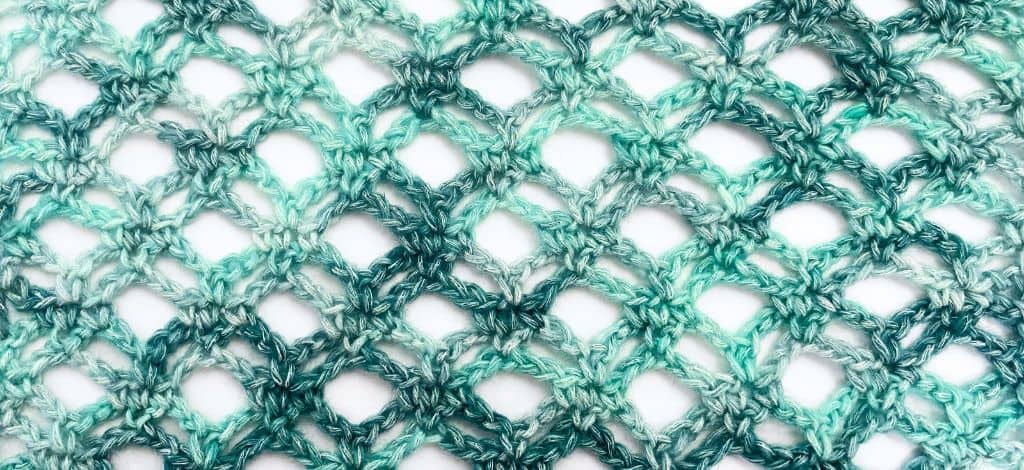
Welcome to the Double Diamond Mesh crochet stitch! If you’re looking to add a touch of elegance and intricacy to your projects, you’re in the right place. This lacy and beautiful stitch does require a bit of concentration, but trust me, the effort is absolutely worth it. Imagine the stunning scarves or the eye-catching accents on sweaters you can create with this stitch!
In addition to the written directions below, there’s also a step-by-step video tutorial to help you along the way. The Double Diamond Mesh stitch is worked in multiples of six over a four-row repeat.
For a free, downloadable and printable pdf, scroll down to the bottom of this post and click on the blue “Pdf Download” box.
Disclosure: This post contains affiliate links. That means that I may receive compensation when you purchase through my links at no additional cost to you. Thank you for your support!
The Boxed shell stitch is a very simple crochet stitch to learn. It has a blend of delicate lace, yet also has the added structure with a 5 double crochet cluster. The Boxed shell stitch works over a two-row repeat and only uses double crochet and chains, making it a very easy pattern to memorize. This would be a beautiful stitch to use for a scarf or as an accent for a pull over or wrap.
Disclosure: This post contains affiliate links. That means that I may receive compensation when you purchase through my links at no additional cost to you. I am a King Cole Brand Ambassador and this post is part of our ongoing collaboration. Thank you for your support!
The Fantasia stitch was my very first YouTube crochet tutorial that I put out to the world a few years ago. However, I just looked at it again and realized that the written directions, as well as the video needed an overhaul…desperately! (If you’d like to check out the original Fantasia stitch video, here’s the link)
This week I’ve reworked the stitch. I made some small changes to the stitch pattern. Then re-filmed the video and updated the verbiage on the pattern (it’s so much easier to read now!). There’s even better step-by-step photos.
Disclosure: This post contains affiliate links. As an affiliate, when you purchase through my links, you allow the company to pay me a small commission. This doesn’t cost you any more, and allows me to continue making free content. Thank you for your support!
About the Fantasia stitch
This stitch works in chain multiples of 12 + 5 over a 4 row repeat. It uses a combination of chain, single crochet and treble crochet. Even though it looks complicated, once you get the hang of it, it isn’t too bad at all. So, let’s give it a try!
To see a video tutorial of this stitch, scroll to the top of this post or clickHERE.
Need a new hook? Want a super beautiful hook? Check out Furls!
Stitches and abbreviations used:
Ch: Chain
Lp (s): Loop (s)
Rep: Repeat
RS: Right side
Sc: Single crochet
Sk: Skip
St (s): Stitch (es)
WS: Wrong side
Yo: Yarn over
Here’s a pin for your Pinterest board
Special stitches:
FPTR3tog – Front post treble crochet 3 together: *Yarn over two times and insert hook from front to back around post from previous row, draw up a lp, [yo, draw through 2 lps] 2 times; rep * 2 more times around the next 2 posts, 4 loops should be on your hook, yo and draw through all 4 lps
FPTR6tog – Front post treble crochet 6 together: *Yarn over two times and insert hook from front to back around post from previous row, draw up a lp, [yo, draw through 2 lps] 2 times; rep * 5 more times around the next 5 posts, 7 loops should be on your hook, yo and draw through all 7 lps
Directions for the Fantasia Stitch
Chain in multiples of 12 + 5 (for this example I chained 41)
1: In 5th ch from hook (counts as first tr), work 3 tr, ch 1; sk 5 ch, 1 sc in next ch, ch 1, *sk 5 ch, in next ch work [3 tr, ch 3, 3 tr], sk 5 ch, 1 sc in next ch, ch 1; Rep * across ending with 4 tr in last ch
2: (Note: When working around the tr posts, be careful not to confuse the ch-5 from the previous row for a tr post) Ch 1, turn; Sc in first st, ch 5, *work FPTR6tog, ch 5, sc in ch-3 sp from previous row, ch 5; rep * across ending with sc in top of 4th ch of previous row’s turning ch
3: Ch 1, turn; Sc in first st, ch 1, *work [3 tr, ch 3, 3 tr] in st that joins FPTR6tog from previous row, ch 1, 1 sc in sc from previous row, ch 1; rep * across ending with sc in last sc
4: Ch 4, turn; work FPTR3tog around posts below, ch 5, *sc in ch-3 sp, ch 5, FPTR6tog, ch 5; rep * across ending with 1 sc in last ch-3 sp, ch 5, FPTR3tog on last 3 tr from previous row, ch 4, sc in last sc
5: Ch 4, turn; 3 tr in first sc, ch 1, sk (ch-4, FPTR3tog & ch-5 sp), *sc in sc from previous row, ch 1, work [3 tr, ch 3, 3 tr] in st that joins FPTR6tog; rep * across ending with 4 tr in third ch of turning ch
Repeat rows 2 – 5 to desired length ending on a row 2 or row 4 repeat.
I hope you enjoyed learning this stitch as much as I did. When you make something with it, could you please tag me @handmadebystacyj or #handmadebystacyj – I’d love to see what you create!
The Lacy Fan and V Stitch Pattern is a super beautiful lace crochet stitch that is actually quite simple. This stitch is very similar to the Fan and V stitch, except it’s lacy! It’s light, airy and would absolutely gorgeous as a lightweight cardigan, a shawl or even a light throw.
Below you will find the written instructions for the Lacy Fan and V Stitch, as well as a pin to save to your boards. Enjoy!
Difficulty Level:
Easy-ish
Stitches & Abbreviations Used:
Stitch pattern is written in US terminology
Ch: Chain
Sc: Single Crochet
Dc: Double Crochet
Sk: Skip
Tch: Turning Chain
Rep: Repeat
Here’s a pin for your Pinterest board 🙂
Directions for the Lacy Fan and V Stitch
Stitch is worked in multiples of 8+6 (+3 for the base chain)
For the YouTube video, I chained 25 and for the green lace sample in the pictures that uses fingering weight yarn, I chained 41.
1: In 6th ch from hook, work *7 dc in same ch, sk 2 ch, 1 sc in next ch, ch 3, sk 1 ch, sc in next ch, sk 2 ch; rep * until 6 ch remain, work 7 dc in next ch, sk 2 ch, 1 dc in last ch; turn.
2: Ch 5, in 4th dc of 7-dc cluster from row 1 work 1 sc, *ch 3, in ch-2 space work (1 dc, ch 2, 1 dc), ch 3, in 4th dc of 7-dc cluster from row 1 work 1 sc; rep * across ending with ch 2, 1 dc in tch; then turn.
3: Ch 2, 2 dc in first st, r sc in ch-sp below, *ch 3, 1 sc in ch-3 sp, 7 dc in in ch-2 sp, 1 sc in ch-3 sp; rep * across ending with ch 3, 1 sc in ch-3 sp, 3 dc in first ch of tch; then turn
4: Ch 4, in ch-3 sp work (1 dc, ch 2, 1 dc), *ch 3, 1 sc in 4th dc of 7-dc cluster, ch 3, in ch-3 sp work (1 dc, ch 2, 1 dc); rep * across ending with ch 2, 1 dc in tch; then turn
5: Ch 2, *7 dc in ch-2 sp, 1 sc in ch-3 sp, ch 3, 1 sc in ch-3 sp; rep * ending with 7 dc in ch-2 sp, 1 dc in tch; then turn
I hope you’ve enjoyed this stitch for the week and I’d love to see what you make! Please tag me @handmadebystacyj and #handmadebystacyj and thank you for joining me on our yarny adventures. Happy crocheting!
The Diamond Shells Lace Stitch is such a beautiful crochet lace that is light and airy, plus it works up very quickly! The Diamond Shells Lace stitch uses only a few stitches and a four row repeat. Below is the written directions, as well as the link to the video tutorial. And, if you enjoy this stitch tutorial, please consider subscribing to my newsletter and my YouTube channel.
Also, my friend Kris with Krissy’s Over the Mountain Crochet has a lovely pattern that she designed using this stitch. To check her pattern out, click here!
Disclosure: This post contains affiliate links. By purchasing through my link, you are allowing the company to pay me a small commission at no additional cost to you. This allows me to continue making free content. Thank you for your support!
Sh: Shell – [2 dc, ch 3, 2 dc] in same stitch or space indicated
HdcV: Half Double V – [1 hdc, ch 1, 1 hdc] in same stitch or space indicated
Directions for Diamond Shells Lace:
Stitch works in multiples of 10 + 12
1 (RS): Sc in second ch from hook and next ch, *sk 3 ch, work Sh in next ch, sk 3 ch, sc in next ch, ch 1, sk 1 ch, sc in next ch, rep from * to last 9 ch, sk 3 ch, Sh in next ch, sk 3 ch, sc in last 2 ch, then turn.
Row 1
2: Ch 2, hdc in first sc, *ch 3, sc in ch-3 sp of Sh, ch 3, HdcV in ch-1 sp between 2 sc, rep from * to last Sh, ch 3, sc in ch-3 sp of Sh, ch 3, 2 hdc in last sc, then turn.
Row 2
3: Ch 4, 2 dc in first hdc, *sc in ch-3 sp, ch 1, sc in next ch-3 sp, Sh in ch-1 sp between HdcV, rep from * to last 2 ch-3 sps, sc in ch-3 sp, ch 1, sc in next ch-3 sp, [2 dc, ch 1, dc] in beg ch-2, then turn.
Row 3
4: Ch 1, sc in first dc, *ch 3, HdcV in ch-1 sp between 2 sc, ch 3, sc in ch-3 sp of Sh, rep from * to last ch-1 sp between 2 sc, ch 3, HdcV in ch-1 sp, ch 3, sc in beg ch-4 sp, then turn.
Row 4
5: Ch 1, sc in first sc and in ch-3 sp, *Sh in ch-1 sp between 2 hdc, sc in next ch-3 sp, ch 1, sc in next ch-3 sp, rep from * to last ch-1 sp between HdcV, Sh in last ch-1 sp, sc in ch-3 sp, sc in last sc, then turn.
The Fan and V Stitch is a fairly simple crochet pattern that works over a 4 row repeat. The Fan and V Stitch would look great as a shawl, wrap or even a blanket. I’m so happy to be able to show you step by step how to create this beautiful stitch pattern.
Disclosure: This post contains affiliate links. As an affiliate, when you purchase through my links, you allow the company to pay me a small commission without costing you a penny more, which allows me to continue making free content. Thank you for your support!
The crochet hook used is my absolute favorite hook. It’s the Furls Odyssey in Turquoise; however, they now have a bunch of colors that I love! The yarn is also lovely! It’s a super soft, inexpensive and absolutely lovely yarn that I just love, as well (Oh, and it rarely splits!). So much so that I became an affiliate with the Furls company and LoveCrafts. What that means for you is that when you purchase using my link, you allow the company to pay me a small commission without costing you a penny more. This helps me to continue making free tutorials and patterns. Below are the links if you’d like to check them out for yourself:
Stitch is worked in increments of 8 + 1 (+1 for the base chain)
Ch-3 at the beginning of row counts as a dc
Directions for the Fan and V Stitch:
1 (RS): 1 sc in second ch from hook, *sk 3 chs, work 9 dc in next ch, sk 3 chs, work 1 sc in next ch; rep * across, ending with 1 sc in last ch, turn
2 (RS): Ch 3, 1 dc in same st, *ch 5, sk 9 dc cluster, work V stitch in next sc,; rep from * ending with ch 5, sk 9 dc cluster, work 2 dc in last sc, turn.
3: Ch 3, 4 dc in same st, *working over ch-5, work 1 sc in 5th dc in 9dc cluster from row below, 9 dc in ch-sp at center of V stitch; rep across ending with 5 dc in top of turning ch, turn.
4: Ch 3, sk 5 dc, V stitch in next sc, *ch 5, sk 9dc cluster, V stitch into next sc; rep from * across ending with ch 2, sl st to top of turning ch, turn
5: Ch 1, 1 sc in same st, 9 dc into ch-sp in center of V stitch from row below, work 1 sc in 5th dc from row below working over the ch-5; rep from * ending with 1 sc in first ch of turning ch, turn
Repeat rows 2 & 5 until you reach desired length.
If you would like the scalloped edge, you can end when you finish a RS row.
For straighter edge, end with a WS row, working ch 3, 1 dc in same st, *ch 2, sl st to 5th dc in 9dc cluster from row below, ch 2, work V st in sc from row below; rep * across ending with ch 2, 2 dc in last sc from previous row.
The Cable Crochet Stitch is such a beautiful, lacy and fairly simple stitch once you get the hang of it. It involves yarn overs, single crochet and a 2 row repeat. The Cable Crochet Stitch pattern is worked over multiples of 6+2
Disclosure: The yarn and hook used are some of my absolute favorites. So much so that I became an affiliate with the companies. What that means for you is that when you purchase using my link, you allow the company to pay me a small commission without costing you a penny more. This helps me to continue making free tutorials and patterns. The links are below with the Materials Needed if you’d like to check them out.
Difficulty level:
Intermediate
Terms and Abbreviations used:
Directions are written using US terminology
Ch: Chain
Rep: Repeat
Sc: Single Crochet
Sk: Skip
St (s): Stitch (es)
Tch: Turning chain
X: Times (example: 2x means 2 times)
Yo: Yarn Over
Here’s a pin for your Pinterest board 🙂
Materials Needed:
Paintbox Yarns – Simply DK (100% Acrylic; 100g / 3.5oz; Light #3 weight); Color #142 Tea Rose
Notes: Ch-1 at beginning of sc row does not count as a st.
Directions for the Cable Crochet Stitch:
(For YouTube sample, I chained 26)
1: Ch 1 (does not count as st), sc across.
2: Ch 7, sk 3 sts, *yo 5x, insert hook in next st, (yo, draw through 2 loops) 6x; rep *2x. Yo 5x and insert in first skipped st (there are 3 sts between tch and first st made in row 2). Work *in ea of the 3 skipped stitches. Continue working in this pattern across the row. In last st, yo 4 times, insert hook in top of last st and (yo, draw through 2 loops) 5x. Turn.
3: Ch 1, work 1 sc in same st and in ea st across. Turn.
Repeat rows 2 & 3 until desired length.
I did my best to create a chart to help along with this stitch and the video tutorial is below: