The Little Shell Pattern is an easy stitch pattern to learn. It’s worked in multiples of 7 stitches + 2 over a 4-row repeat, which also makes it easy to memorize. This stitch uses only a variation of knits and purls, which creates a beautiful pattern of little shells separated by columns of eyelets and stockinette stitch. This would be a wonderful stitch to use for a hat, trim on a sweater or a scarf!
A video tutorial is included to demonstrate how to create this stitch. You’ll also find a chart and a downloadable PDF (look for the blue “PDF Download button) of this stitch at the bottom of this post.
Disclosure: This post contains affiliate links. That means that I may receive compensation when you purchase through my links at no additional cost to you. Thank you for your support!
In this tutorial, I’m going to show you how to knit extended openwork stitches. These stitches are absolutely gorgeous with the lace a cabling effect. This stitch contains knitting (no purls here!) only and works over a four row repeat. This stitch is also reversible! Extended openwork stitches would be a great to use for a cowl, a scarf or as a fun accent to a sweater or cardigan
Disclosure: This post contains affiliate links. That means that I may receive compensation when you purchase through my links at no additional cost to you. I am a King Cole Brand Ambassador and this post is part of our ongoing collaboration. Thank you for your support!
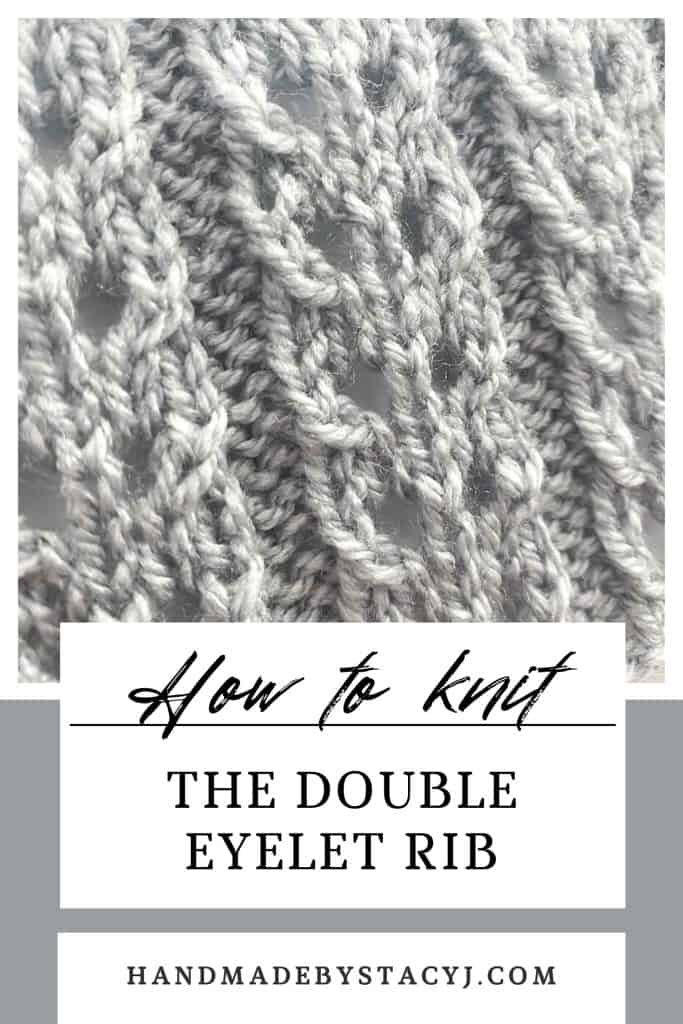
The Double Eyelet Rib is a beautiful, lacy ribbing knit stitch. The lace ribbing creates a light fabric with wonderful stretch that would be a great to use for a dishcloth, scarf or a slouchy beanie. This stitch is worked in stitch multiples of 7 + 2 over a 4 row repeat.
Disclosure: This post contains affiliate links. That means that I may receive compensation when you purchase through my links at no additional cost to you. I am a King Cole Brand Ambassador and this post is part of our ongoing collaboration. Thank you for your support!
Materials needed
(listed below is what I used to create the sample of the stitch pattern)
King Cole Baby DK yarn in color Silver (#1711), approximately 25 yds (To find your local store that stocks King Cole yarns, here is the stockist finder link; Or, if you need to shop online, here is LoveCrafts link)
To view the video tutorial of how to knit the Double Eyelet Rib, please click on the video above or visit: https://youtu.be/1q5ob8Iti_Y
Front view of Double Eyelet Rib
Back View of Double Eyelet Rib
Stitches and abbreviations used
K: Knit
K2tog: Knit 2 stitches together
P: Purl
RS: Right side
Skpo: Slip, knit, pass slipped stitch over – Slip next stitch purlwise to right hand needle, knit the next stitch, slip the slipped stitch from right hand needle over the knit stitch just worked.
St(s): Stitch (es)
Rep: Repeat
WS: Wrong side
Yo: Yarn over
Here’s a pin for your Pinterest board 🙂
Notes:
Stitch is worked in multiples of 7 + 2; for the YouTube video I cast on 30
Directions for the Double Eyelet Rib:
Row 1 (RS): P2, *k5, p2; rep * to end
Row 2 (WS): K2, *p5, k2; rep * to end
Row 3: P2, *k2tog, yo, k1, yo, skpo, p2; rep * to end
Row 4: As row 2
Repeat rows 1-4 to desired length.
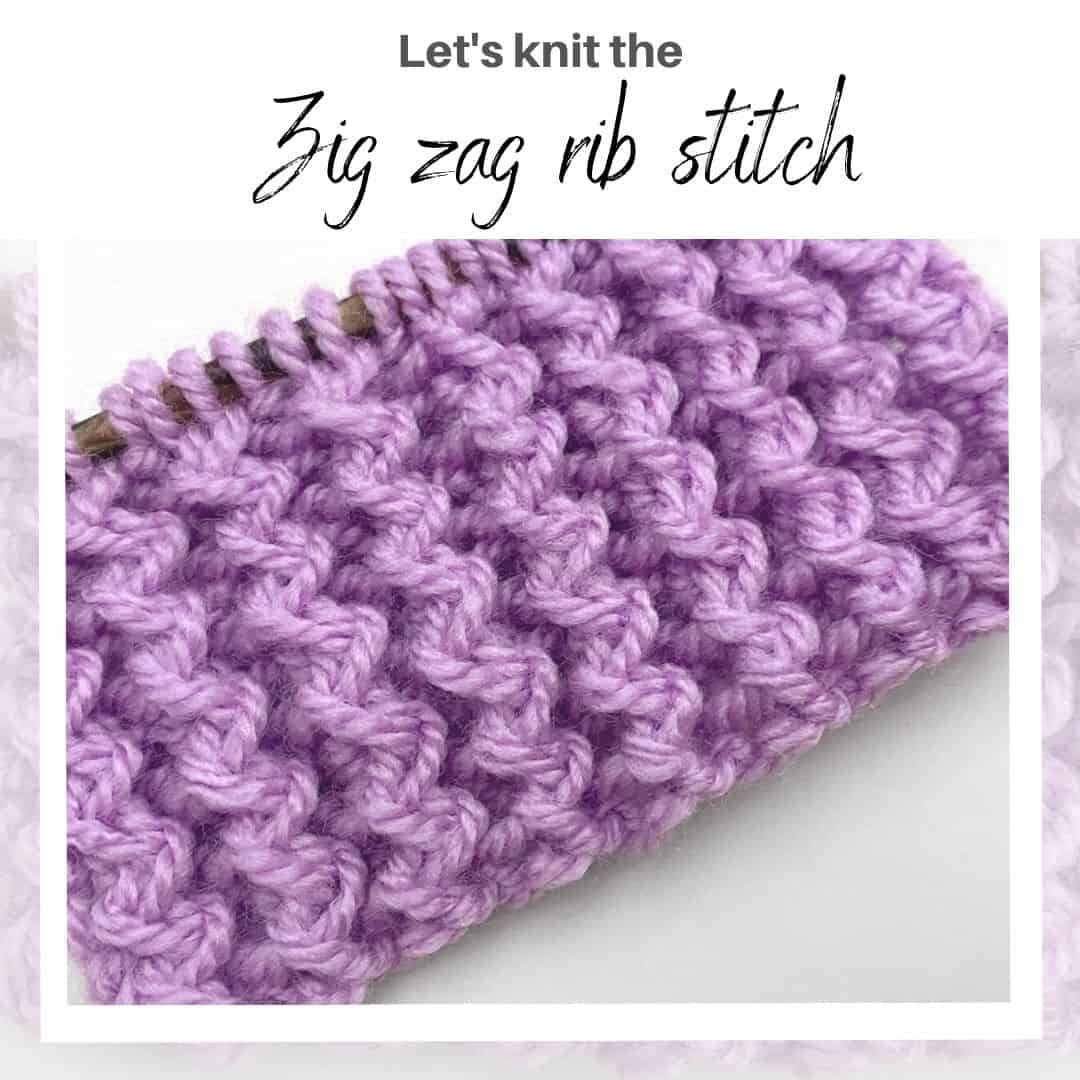
If you’d like to check out a couple other fun rib stitches, here are a few. Simply click on the image to be directed to the stitch tutorial page.
I hope you enjoyed learning this stitch as much as I did. Please tag me @handmadebystacyj when posting on social media – I’d love to see your makes!
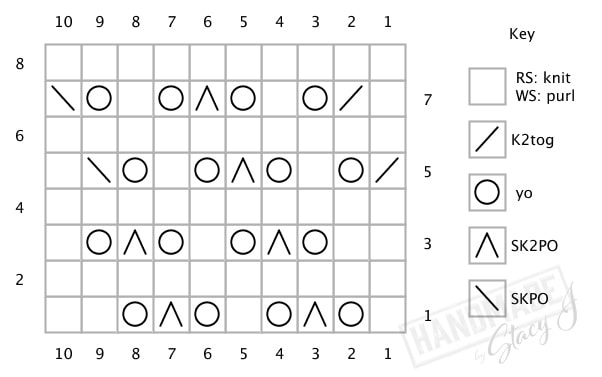
Learn how to knit the Diagonal Openwork knit stitch. This is a fairly simple stitch that involves a combination of knits, purls, increases and decreases to create an interesting diagonal design. This Diagonal Openwork knit stitch pattern works in multiples of 4 + 2 over an 8 row repeat.
Scroll to the bottom of the post to see the chart for this stitch.
Disclosure: Most of my posts contain affiliate links. That means that if you choose to purchase from that link, you allow the company to pay me a small commission without costing you a penny more. Thank you so much for your support!
Stitches and abbreviations used:
Written using US terms
K: Knit
K2tog: Knit 2 together
P: Purl
RS: Right side
Skpo: Slip 1 stitch purl wise, knit the next stitch, pass slipped stitch over knit stitch just made
Sk2po: Slip 1 stitch purl wise, knit the next 2 stitches together, pass the slipped stitch over the knit 2 together stitch just made
St(s): Stitch (es)
WS: Wrong side
Yo: yarn over
Here’s a pin for your Pinterest board 🙂
Stitch pattern for Diagonal Openwork Knit Stitch:
1 (RS): *K1, yo, sk2po, yo: rep * to last 2 sts, k2
2 and all WS rows: Purl
3: K2, *yo, sk2po, yo, k1; rep * to end
5: K2tog, yo, k1, yo, *sk2po, yo, k1, yo; rep * to last 3 sts, skpo, k1
7: K1, k2tog, yo, k1, yo, *sk2po, yo, k1, yo; rep * to last 2 sts, skpo
8: Purl
Rep these 8 rows to desired length
I hope you enjoyed learning this stitch as much as I did. When you make something with it, could you please tag me @handmadebystacyj or #handmadebystacyJ – I’d love to see what you create!
The Leafy Lace knitting stitch is a beautiful lace stitch. Although it does take some concentration while working the rows, it’s worth the effort when you complete it. After a couple repeats, it’s not too hard to get the hang of it. This stitch pattern works in multiples of 10 + 1 over a 16 row repeat.
Below there is a chart for you, as well.
To see a video tutorial of this stitch,click the box below or view on YouTube by clicking HERE.
Stitches and abbreviations used:
K: Knit
K2tog: Knit 2 together
KB1: Knit through the back loop
P: Purl
P2tog: Purl 2 together
PB1: Purl through the back loop
Rep: Repeat
RS: Right side
Sk2po: Slip 1 stitch purl wise, knit the next 2 stitches together, pass the slipped stitch over the knit 2 together stitch just made
WS: Wrong side
Yo: yarn over
Here’s a pin for your Pinterest board 🙂
Stitch pattern for Leafy Lace Stitch:
Written using US terms
1 (RS): K1, *p9, KB1; rep * to end
2 (WS): P1, *k9, p1; rep * to end
3: As row 1
4: As row 2
5: K1, *p2, p2tog, yo, KB1, yo, p2tog, p2, KB1; rep * to end
6: P1, *k4, PB1, k4, p1; rep * to end
7: K1, *p1, p2tog, yo, [KB1] 3x, yo, p2tog, p1, KB1; rep * to end
8: P1, *k3, [PB1] 3x, k3, p1; rep * to end
9: K1, *p2tog, yo, [KB1] 5x, yo, p2tog, KB1; rep * to end
10: P1, *k2, [PB1] 5x, k2, p1; rep * to end
11: K1, *p1, yo, [KB1] 2x, sk2po, [KB1] 2x, yo, p1, KB1; rep * to end
12: As row 10
13: K1, *p2, yo, KB1, sk2po, KB1, yo, p2, KB1; rep * to end
14: As row 8
15: K1, *p3, yo, sk2po, yo, p3, KB1; rep * to end
16: As row 6
Rep these 16 rows to desired length
Note: To end with an even edge of top and bottom, work rows 1-3 once more and bind off on WS in pattern of row 4
I hope you enjoyed learning this stitch as much as I did. When you make something with it, could you please tag me @handmadebystacyj or #handmadebystacyJ – I’d love to see what you create!
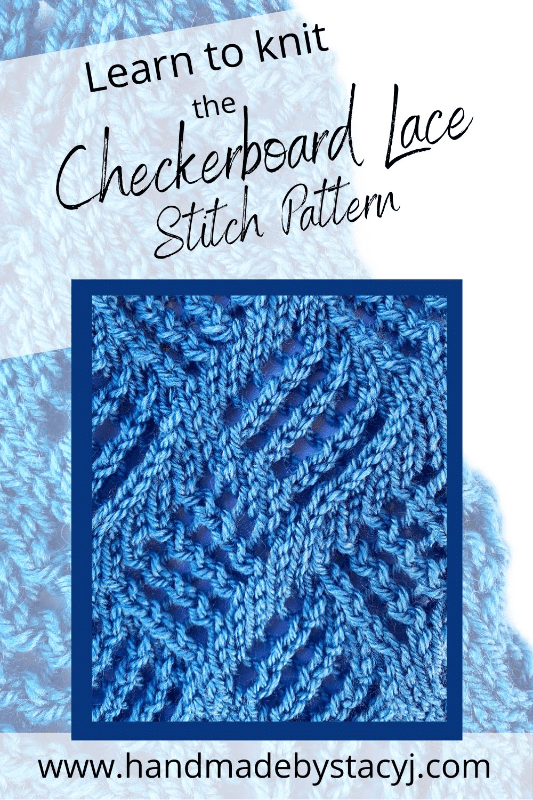
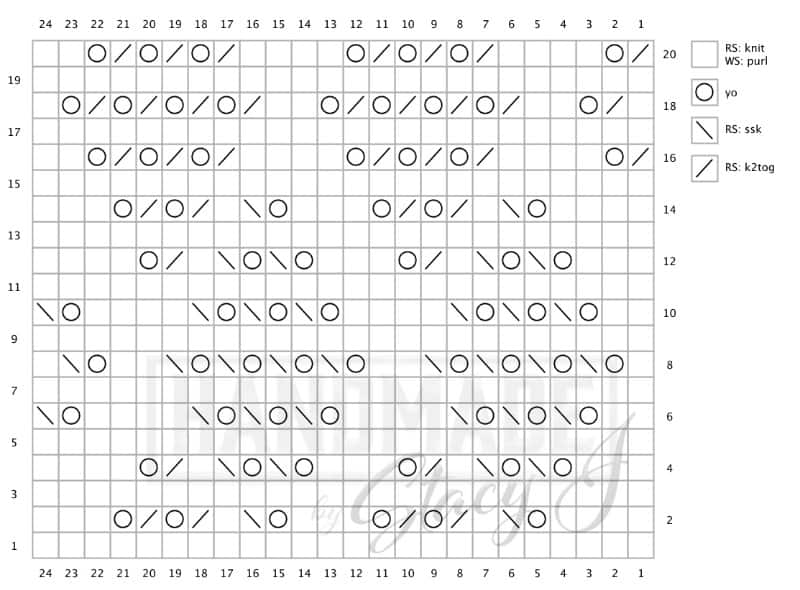
The Checkerboard Lace Stitch Pattern is a stitch pattern that requires a little concentration. However, the chart that accompanies the written directions will make it easier for you. The Checkerboard Lace stitch pattern in worked in multiples of 10 + 4 over 20 rows. Written directions are below, as well as a chart and a link to the video tutorial.
Disclosure: If you choose to purchase from any of the links that I have on this tutorial, you are allowing me to continue providing free tutorials by letting the companies that I am affiliated with pay me a small commission. Thank you for your support!
I do hope you found this tutorial helpful. If you have any stitches are that giving you fits, please feel free to email me with your suggestions – I absolutely love making tutorials from requests. Also, please remember to tag me @handmadebystacyj with your makes!
Chinese Lace is a beautiful lace stitch that is worked over 12 stitches and 24 rows. I have been intrigued by this pattern for as long as I’ve been knitting and decided to jump in and learn it. Then, a tutorial was born because I just HAD to share it with you!
This pattern does require concentration, but once you get the hang of it, it isn’t very difficult. Please join me as I show you how to create this beautiful lace pattern with step by step instructions.
For your reference, written directions and chart are below. There is also a video tutorial link for you to view for this stitch that is available at the box below and at the bottom of this post.
Disclosure: This post contains affiliate links. As an affiliate, when you purchase through my links, you allow the company to pay me a small commission without costing you a penny more, which allows me to continue making free content. Thank you for your support!
I hope you’ve enjoyed learning this stitch as much as I did! And, as always, thank you so much for supporting me on my yarny journeys! Please remember to tag me @handmadebystacyj so that I can see your makes – I love seeing them!
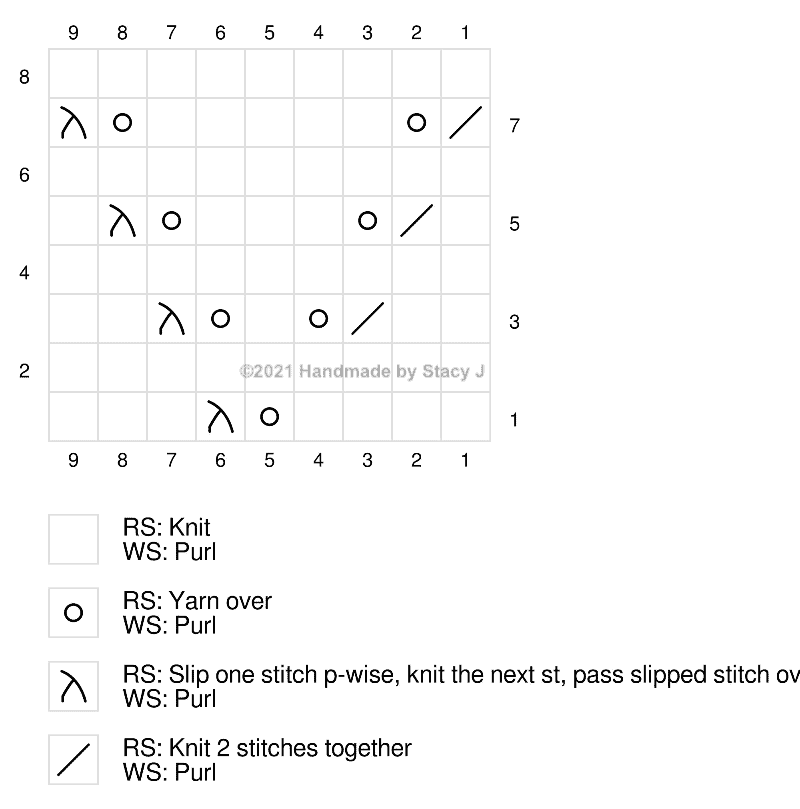
The Vandyke Lace Panel is a very simple knit panel that is worked over 9 stitches and 8 rows on a background of Stockinette Stitch. Join me as I show you step by step how to create this beautiful lace panel. It creates a gorgeous panel that can be used in so many ways – shawls, scarves, garments, blankets….I could go on. I just love this stitch!
Written directions are below, as well as a chart and a video tutorial.
The yarn and needles used are some of my absolute favorites. So much so that I became an affiliate with the companies. What that means for you is that when you purchase using my link, you allow the company to pay me a small commission without costing you a penny more. This helps me to continue making free tutorials and patterns. Here are the links if you’d like to check them out:
The Lace Rib Panel is a great way to get started if you haven’t knit lace before. The Lace Rib Panel is worked over 7 stitches and 4 rows – easy peasy, right? The video shows you step by step how to work the stitch which is really beautiful! (Oh! And, I apologize ahead of time. When you listen to the background, my little dog was snoring ?).
Disclosure: This post contains links to companies that I am affiliated with. By purchasing through that link, you allow the companies to pay me a small commission. And, as a result allows me to continue providing free content. Thank you for your support!
Difficulty level:
Easy
Stitches used:
Knit (k)
Purl (p)
Yarn Over (yo)
Here’s a pin for your Pinterest board 🙂
Special Stitches used:
Skpo: Slip, knit, pass over (slip one stitch purl wise, knit the next st, then pass slipped stitch over – one stitch decreased)
Sk2po: Slip, k2tog, pass over (slip one st purlwise, knit next 2 stitches together, then pass slipped stitch over – 2 stitches decreased)