
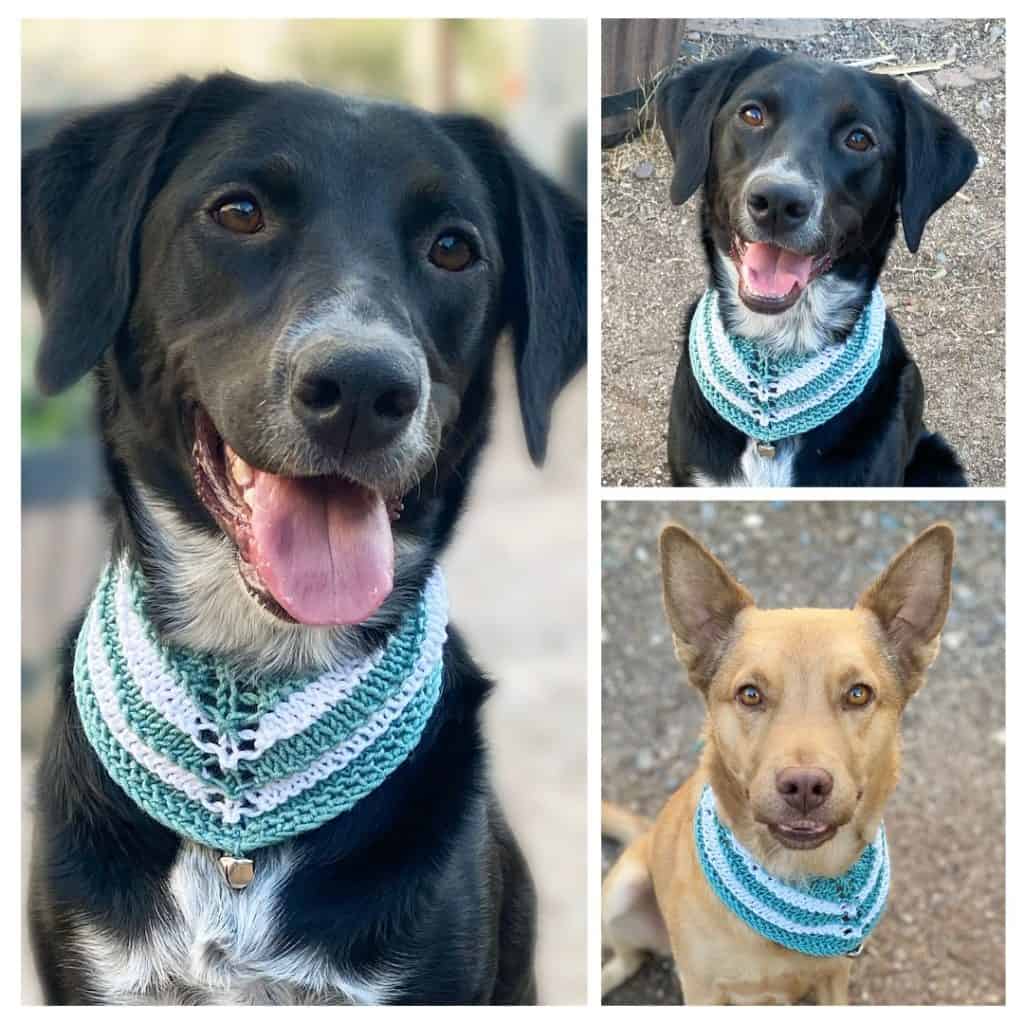
Today I am so excited to share with you the Holiday Snarf Scarf! The Holiday Snarf Scarf? What’s that, you might be asking yourself…
The Holiday Snarf Scarf is a dog scarf that was inspired by our latest addition to our family: Moxxi! She makes the funniest sound when she gets a treat and it sounds like a big “SNARF!” Since we hadn’t had a little girl dog for ages, I decided that she needed a little wardrobe – hence, the Snarf Scarf was born!
Disclosure: This post contains affiliate links. As an affiliate, when you purchase through my links, you allow the company to pay me a small commission without costing you a penny more, which allows me to continue making free content. Thank you for your support!

About the Holiday Snarf Scarf
The Snarf Scarf is triangular in shape and uses very little yarn, so it would be a great stash diving project. It uses DK weight yarn with only one color at a time, works up in just a couple hours and is completely customizable to the size of your critter. Bucket and Moxxi are both medium size dogs and the scarf fits them as the pattern is written. However, if you have a very large dog, there is a section where you would just repeat until it’s the right size and there’s a place marked where to stop if you have a smaller critter.
The pattern calls for 2 sets of size 1 snaps and an 18 mm bell. The snaps work as a safety feature making this scarf easy to break away from your critter in case their scarf gets caught on anything. (Just please always supervise your fur babies.)

If you prefer a printable pdf of the Holiday Snarf Scarf that includes a chart, a checklist to help keep track of your rows and printable gift tags for gifting your scarf, you can purchase through Ravelry (or add to your favorites or que) or you can purchase through my Etsy store.

This pattern is written for an intermediate knitter. However, an ambitious beginner could try this out, too.
This pattern has been tested and tech edited – thank you to all my lovely testers and to Kathie, my rock star tech editor!

Materials:
- Paintbox Simply DK 100% Acrylic (3.5 oz /100 g; 302 yd / 276 m) – 24 yd / 22 m in main color #102 (Cream) and 34 yd / 31 m in contrast color #115 (Red) OR color #126 (Green)
- Size US 7 / 4.5mm 30″ circular knitting needle
- 1 Stitch marker (optional)
- 1 – 0.7″ / 18 mm bell
- 2 sets of size 1 sew-on snaps
- Sewing thread and sewing needle
- Tapestry needle
- Scissors
Measures:
22″ x 7″ / 56 cm x 18 cm – Fits neck circumference of 14″ to 21″ / 35.5 cm to 53.5 cm
Difficulty Level:
Intermediate
Gauge:
20 sts x 24 rows in Stockinette Stitch = 4″ or 10 cm
Stitches & Terms Used
(Pattern is written in US terms):
CC: Contrast color.
K: Knit
Kfb: Knit front & back
K2tog: Knit two stitches together
MC: Main color
M1l (Make 1 knitwise left leaning): With left needle, pick up the horizontal strand between stitches from front to back, then knit into this new stitch through the back loop (1 stitch increased)
M1r (Make 1 knitwise right leaning): With left needle, pick up the horizontal strand between stitches from back to front, then knit into this stitch (1 stitch increased)
P: Purl
RS: Right side
Sl: Slip 1 stitch purlwise with yarn at back
Sl wyif: Slip 1 stitch purlwise with yarn in front
SM: Stitch marker
St(s): Stitch(es)
Stretchy bind-off method: K1, k2tog, return those 2 sts back to left needle, then repeat until all stitches are bound off
WS: Wrong Side
If you prefer a printable pdf of the Holiday Snarf Scarf that includes a chart, a checklist to help keep track of your rows and printable gift tags for gifting your scarf, you can purchase through Ravelry (or add to your favorites or que) or you can purchase through my Etsy store.
Notes:
- Do not cut yarn until instructed to do so; instead, carry up side of work.
- Be sure to slip stitch marker as you come to it – it will mark the center of the snarf scarf.
- Pattern is easily adaptable to any size critter. For a smaller critter, simply work to the circumference size of your critter’s neck ending on a Stockinette Transition section, then move to the finishing section. For a larger critter, repeat the final stockinette section until you obtain the neck circumference needed, then move to the finishing section.
- When working M1L or M1R in center of scarf, be sure to use the strands of yarn worked on previous row.
Directions for Holiday Snarf Scarf:
With MC, cast on 3
1 (RS): Using MC, kfb, k1, kfb. (5 sts)
2 (WS): k2, p1, k2.
3: (k1, m1r) × 2, (k1, m1l) × 2, k1. (9 sts)
4: k2, p5, k2.
5: (k1, m1r) × 2, k2, m1r, k1, m1l, k2, (m1l, k1) × 2. (15 sts)
6: k2, p11, k2.
7: (k1, m1r) × 2, k5, m1r, insert SM, k1, m1l, k5, (m1l, k1) × 2. (21 sts)
8: k2, p17, k2.
9: (k1, m1r) × 2, k8, m1r, k1, m1l, k8, (m1l, k1) × 2. (27 sts)
10: k2, p23, k2. Do not cut MC
Slip Stitch pattern 1
11: Using CC, (k1, m1r) × 2, k11, m1r, k1, m1l, k11, (m1l, k1) × 2. (33 sts)
12: Using CC, knit; Do not cut CC
13: Using MC, (k1, m1r) × 2, sl, (k2, sl × 2) × 3, k1, m1r, sl, m1l, k1, (sl × 2, k2) × 3, sl, (m1l, k1) × 2. (39 sts)
14: Using MC, k2, p2, sl wyif, (p2, sl wyif x 2) × 3, p2, sl wyif, (p2, sl wyif × 2) × 3, p2, sl wyif, p2, k2.
15: Using CC, (k1, m1r) × 2, k17, m1r, k1, m1l, k17, (m1l, k1) × 2. (45 sts)
16: Using CC, k2, p41, k2.
17: Using MC, (k1, m1r) × 2, k1, (sl × 2, k2) × 4, sl × 2, k1, m1r, s1, m1l, k1, (sl × 2, k2) × 4, sl × 2, (k1, m1l) × 2, k1. (51 sts)
18: Using MC, k2, p3, (sl wyif × 2, p2) × 5, sl wyif, (p2, sl wyif × 2) ×5, p3, k2.
19: Using CC, (k1, m1r) × 2, k23, m1r, k1, m1l, k23, (m1l, k1) × 2. (57 sts)
20: Using CC, knit.
Stockinette Transition 1
21: Using CC, (k1, m1r) × 2, k to m, m1r, k1, m1l, k to last 2 sts, (m1l, k1) × 2. (63 sts)
22: Using CC, k2, p to last 2 sts, k2. (If you are making this snarf scarf for a smaller critter, this is a good time to measure and see if it will fit at this point. If it does fit, then move to the “Finishing” section.)
Slip Stitch pattern 2
23: Using MC, (k1, m1r) × 2, k29, m1r, k1, m1l, k29, (m1l, k1) × 2. (69 sts)
24: Using MC, knit.
25: Using CC, (k1, m1r) × 2, k1, (sl × 2, k2) × 7, sl × 2, k1, m1r, sl, m1l, k1, (sl × 2, k2) × 7, sl × 2, (k1, m1l) × 2, k1. (75 sts)
26: Using CC, k2, p3, (sl wyif × 2, p2) × 8, sl wyif, (p2, sl wyif × 2) × 8, p3, k2.
27: Using MC, (k1, m1r) × 2, k35, m1r, k1, m1l, k35, (m1l, k1) × 2. (81 sts)
28: Using MC, k2, p77, k2.
29: Using CC, (k1, m1r) × 2, sl, (k2, sl × 2) × 9, k1, m1r, sl, m1l, k1, (sl × 2, k2) × 9, sl, (m1l, k1) × 2. (87 sts)
30: Using CC, k2, p2, sl wyif, p2, (sl wyif × 2, p2) × 9, sl wyif, p2, (sl wyif × 2, p2) × 9, sl wyif, p2, k2.
31: Using MC, (k1, m1r) × 2, k41, m1r, k1, m1l, k41, (m1l, k1) × 2. (93 sts)
32: Using MC, knit. Cut MC.
Stockinette Transition 2
33 – 36: Using CC, repeat Stockinette Transition1 rows 21 & 22 two times (105 sts) (If you are making this snarf scarf for a larger critter, repeat this section as many times as needed to reach desired circumference, then proceed to the “Finishing” section).
Finishing
37: Using CC, cast on 10 using knitted cast on method, k10, k2tog, (k1, m1r) × 2, k to m, m1r, k1, m1l, knit to last 2 sts, (m1l, k1) × 2, cast on 10 using knitted cast on method. (130 sts) – This adds approximately 2.75″ / 7 cm to each side.
38: Using CC, k 10, k2tog, k across. Cut CC.
39: Using MC, bind off using stretchy bind-off method or your bind-off method of choice.
- Place scarf around critter to determine snap placement, then sew on snaps.
- Using yarn and tapestry needle, sew bell to bottom center point of snarf scarf (you may want to block your item prior to this step).
- Give to your critter, take pictures and tag me at #handmadebystacyj and @handmadebystacyj
Wishing you a happy, snarfy kind of day with lots of yarn (and snacks)!
Stacy J
Subscribe on YouTube • Join me on Facebook • Follow on Instagram
Patterns on Ravelry • Inspiration on Pinterest
This pattern is copyright 2021 Handmade by Stacy J. Please do not duplicate or copy any portion of this pattern, as well as photographs. You are encouraged to share images of your final product and are allowed to sell final products; If you sell your final product, I just ask that you please purchase the ad-free pdf and credit Handmade by Stacy J as the designer. Thank you!