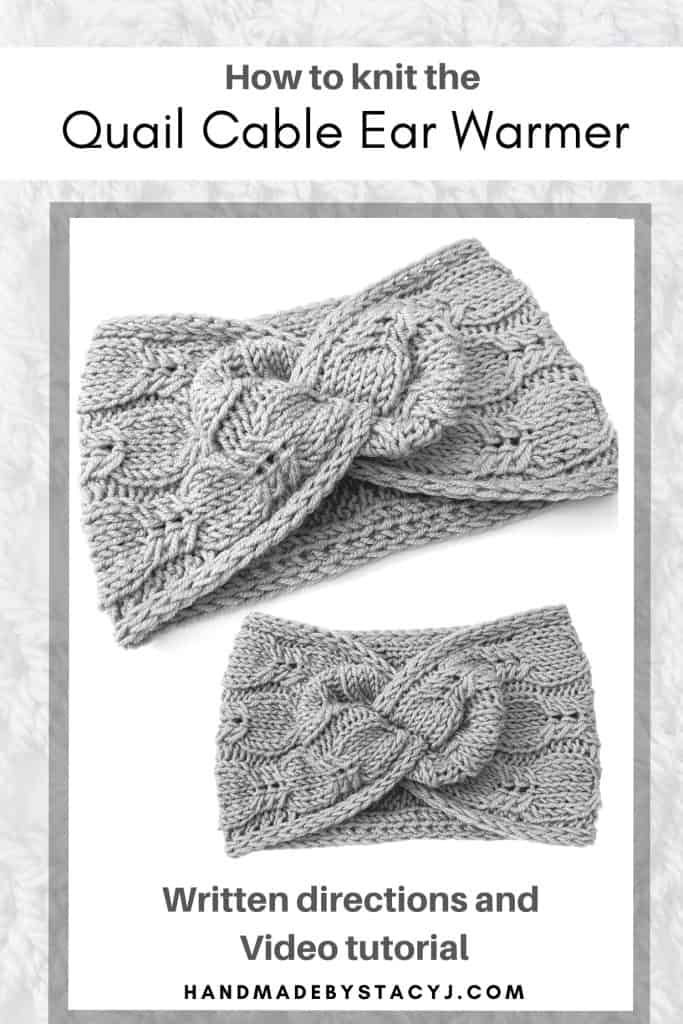
The Quail Cable Ear Warmer / Headband is a beautiful accessory to add to your cooler weather wardrobe. It’s large enough to cover your ears comfortably, but also has a wonderful stitch detail. The yarn used in this example is the King Cole Luxury Merino DK. It’s 100% Merino Superwash wool and is oh-so-amazing! It’s so soft, warm and lovely to work with.
The name “Quail” came from a knitting stitch book that I picked up. I’ve seen the stitch name referred to also as the “Folded Cable”, however that one was a little different of a stitch than this one is. But, I just love this stitch so much that it really called out to me to be an amazingly cozy ear warmer.
Disclosure: This post contains affiliate links. That means that I may receive compensation when you purchase through my links at no additional cost to you. I am a King Cole Brand Ambassador and this post is part of our ongoing collaboration.
Measures:
5.5″ / 14 cm tall x 20″ / 51 cm circumference
Gauge:
2 pattern repeats = 4″ / 10 cm
Materials needed:
- King Cole Luxury Merino dk (100% Merino Superwash; 153 yds / 140 m; 50g, dk / #3 weight yarn) – 100 yds / 92 m in color Pewter
- US size 6 / 4 mm knitting needles
- Cable needle
- Sharp tapestry needle
- Scissors
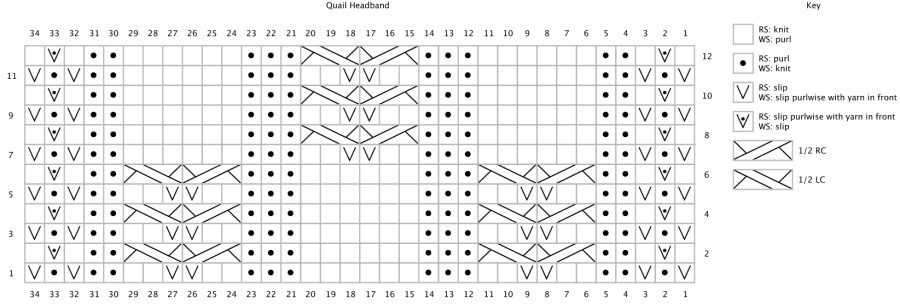
Stitches and abbreviations used:
K: Knit.
P: Purl.
Sl wyif: Slip 1 stitch purlwise with yarn in front.
1/2 LC : Slip next stitch to cable needle purlwise and place at front of work, k2, then k1 from cable needle.
1/2 RC : Slip next 2 stitches to cable needle purlwise and place at back of work, k1, then k2 from cable needle.
Directions for Quail Cable Ear Warmer / Headband
Before beginning the ear warmer / headband, measure the circumference of the head that it’s intended for and subtract 2″ / 5 cm – that will allow the headband to fit snug. This pattern is written to fit an Adult Medium size.
- Using Long-tail cast on method, cast on 32
- 1 (WS): Sl wyif, k1, sl wyif, K2, p2, sl wyif × 2, p2, k2, p6, k2, p2, sl wyif x 2, p2, k2, sl wyif, k1, sl wyif
- 2 (RS): K1, sl wyif, k1, p2, 1/2 RC, 1/2 LC, p2, k6, p2, 1/2 RC, 1/2 LC, p2, k1, sl wyif, k1
- 3 – 6: Repeat rows 1 – 2
- 7: Sl wyif, k1, sl wyif, k2, p6, k2, p2, sl wyif × 2, p2, k2, p6, k2, sl wyif, k1, sl wyif
- 8: K1, sl wyif, k1, p2, k6, p2, 1/2 RC, 1/2 LC, p2, k6, p2, k1, sl wyif, k1
- 9 – 12: Repeat rows 7 – 8
- Repeat rows 1-12 until piece measures 20″ / 50 cm or to desired length
- Bind off in pattern leaving a 36″ / 1 m tail for sewing
- I highly recommend blocking your piece prior to sewing so that the cable pattern will really show up. Be sure not to block it to be longer than the length that you want your ear warmer to be.