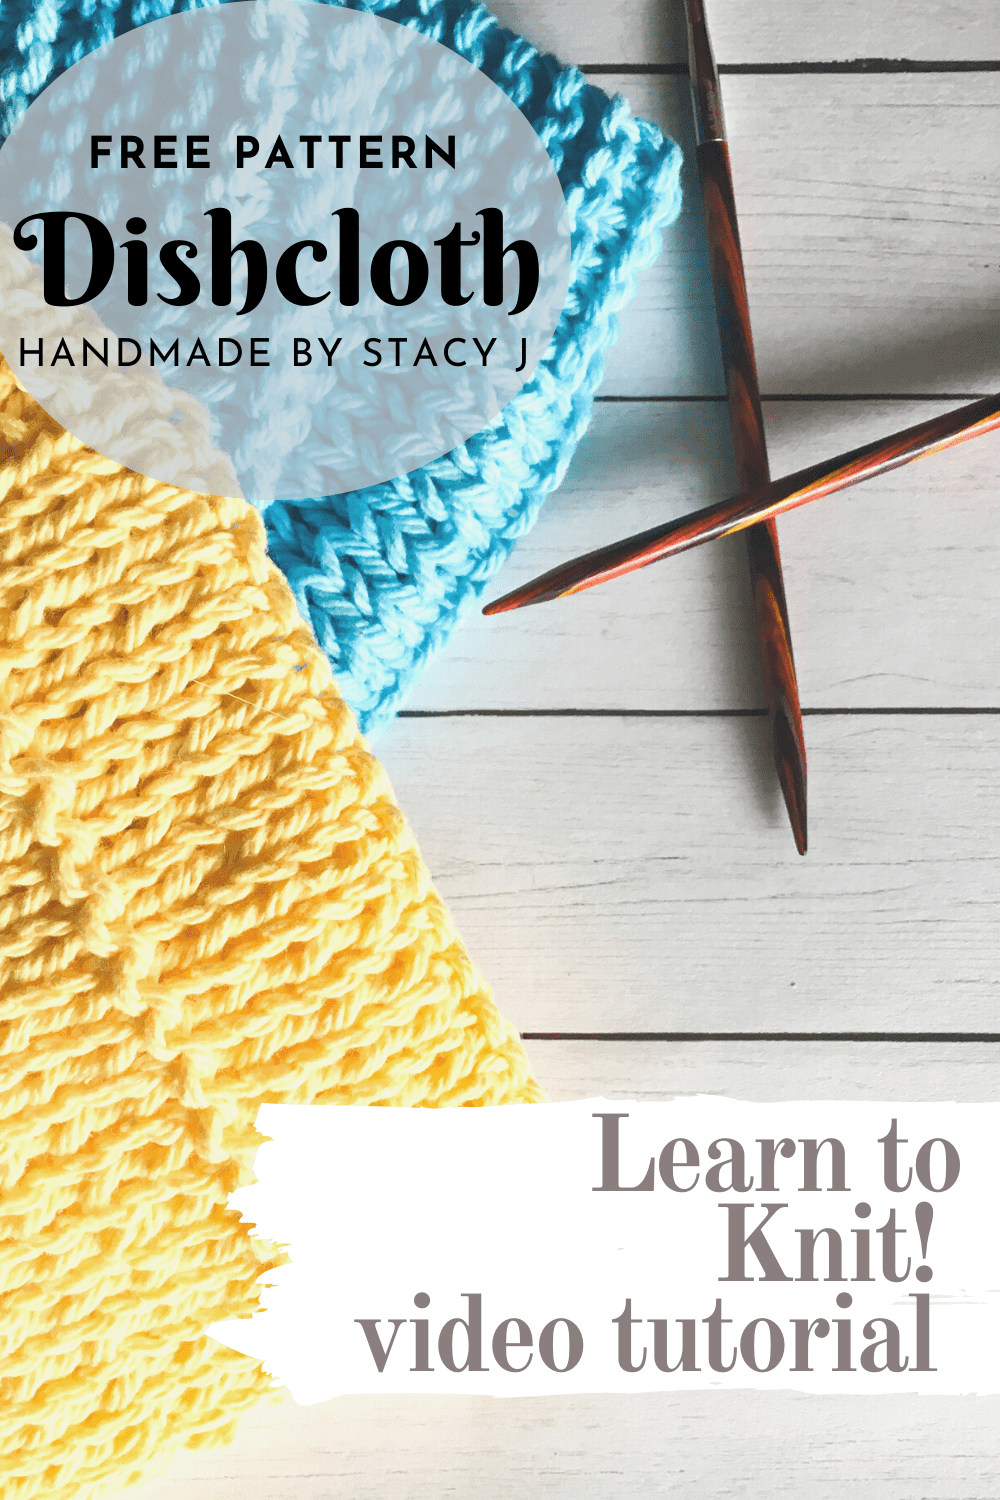
The written pattern for the Learn to Knit – Dishcloth can be used with the video tutorial on the “Handmade by Stacy J” YouTube channel: https://youtu.be/INhNJzggDj8. It‘s a beginner friendly knit pattern that only uses Knit and Purl. Enjoy!
At the bottom of this post you will find a chart and a pdf.
Disclosure: This post contains affiliate links. As an affiliate, when you purchase through my links, you allow the company to pay me a small commission without costing you a penny more, which allows me to continue making free content. Thank you for your support!
Difficulty level:
Easy / Beginner
Measures:
11” x 10” / Gauge isn’t critical
Stitches used:
Knit (k) and Purl (p)
Here’s a pin for your Pinterest board 🙂
Materials Needed:
Peaches & Cream (100% Cotton, Medium 4 weight) 85 yards
This pattern is not to be sold or copied in any way. The images, pattern and charts are copyrighted by Handmade by Stacy J and may not be duplicated. You are welcome to sell your makes, however I ask that you credit me as the designer. Also, you are responsible for providing your own photographs. Thank you!
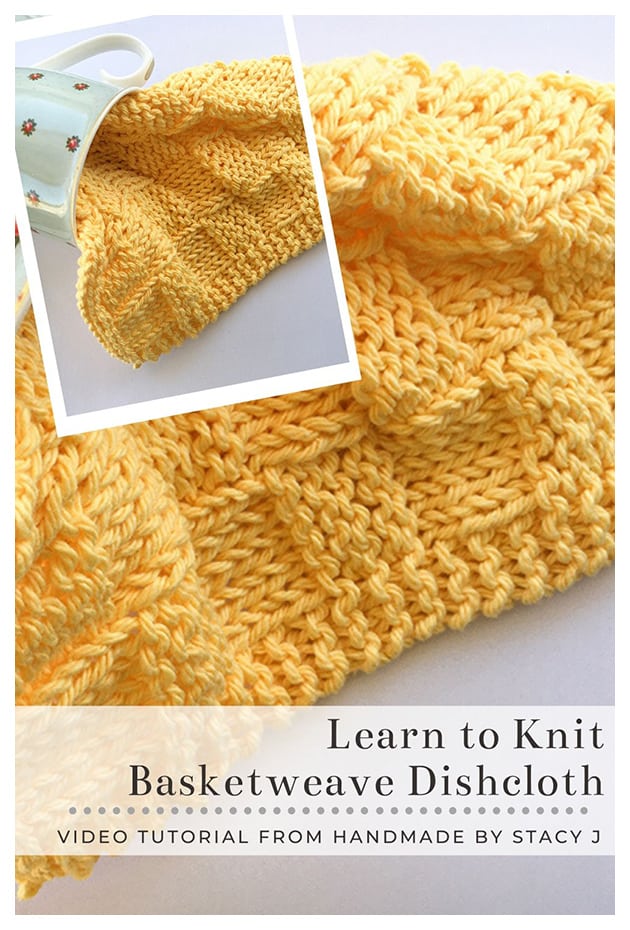
The written pattern for the Basketweave Dishcloth can be used with the video tutorial on the “Handmade by Stacy J” YouTube channel. This stitch is a modified basket weave that features large blocks and is a beginner friendly knit pattern that only uses Knit and Purl. Enjoy!
Tutorial available on YouTube at: https://youtu.be/eoONkIvoXgU At the bottom of this post, you will find a chart and checklist.
Difficulty level:
Easy / Beginner
Measures:
11” x 10” / Gauge isn’t critical
Stitches used:
Knit (k) & Purl (p)
Materials Needed:
Peaches & Cream yarn (100% Cotton, Medium 4 weight) 80 yards Size 7 (4.50 mm) Knitting Needles 2 stitch markers (optional for garter edge) Tapestry needle and scissors
Here’s a pin for your Pinterest board 🙂
Note: Pattern length can be adjusted by continuing to do more repeats. End with “Final Row” repeat when you come to desired length. To adjust the width, calculate the number of stitches in increments of 10 + 6.
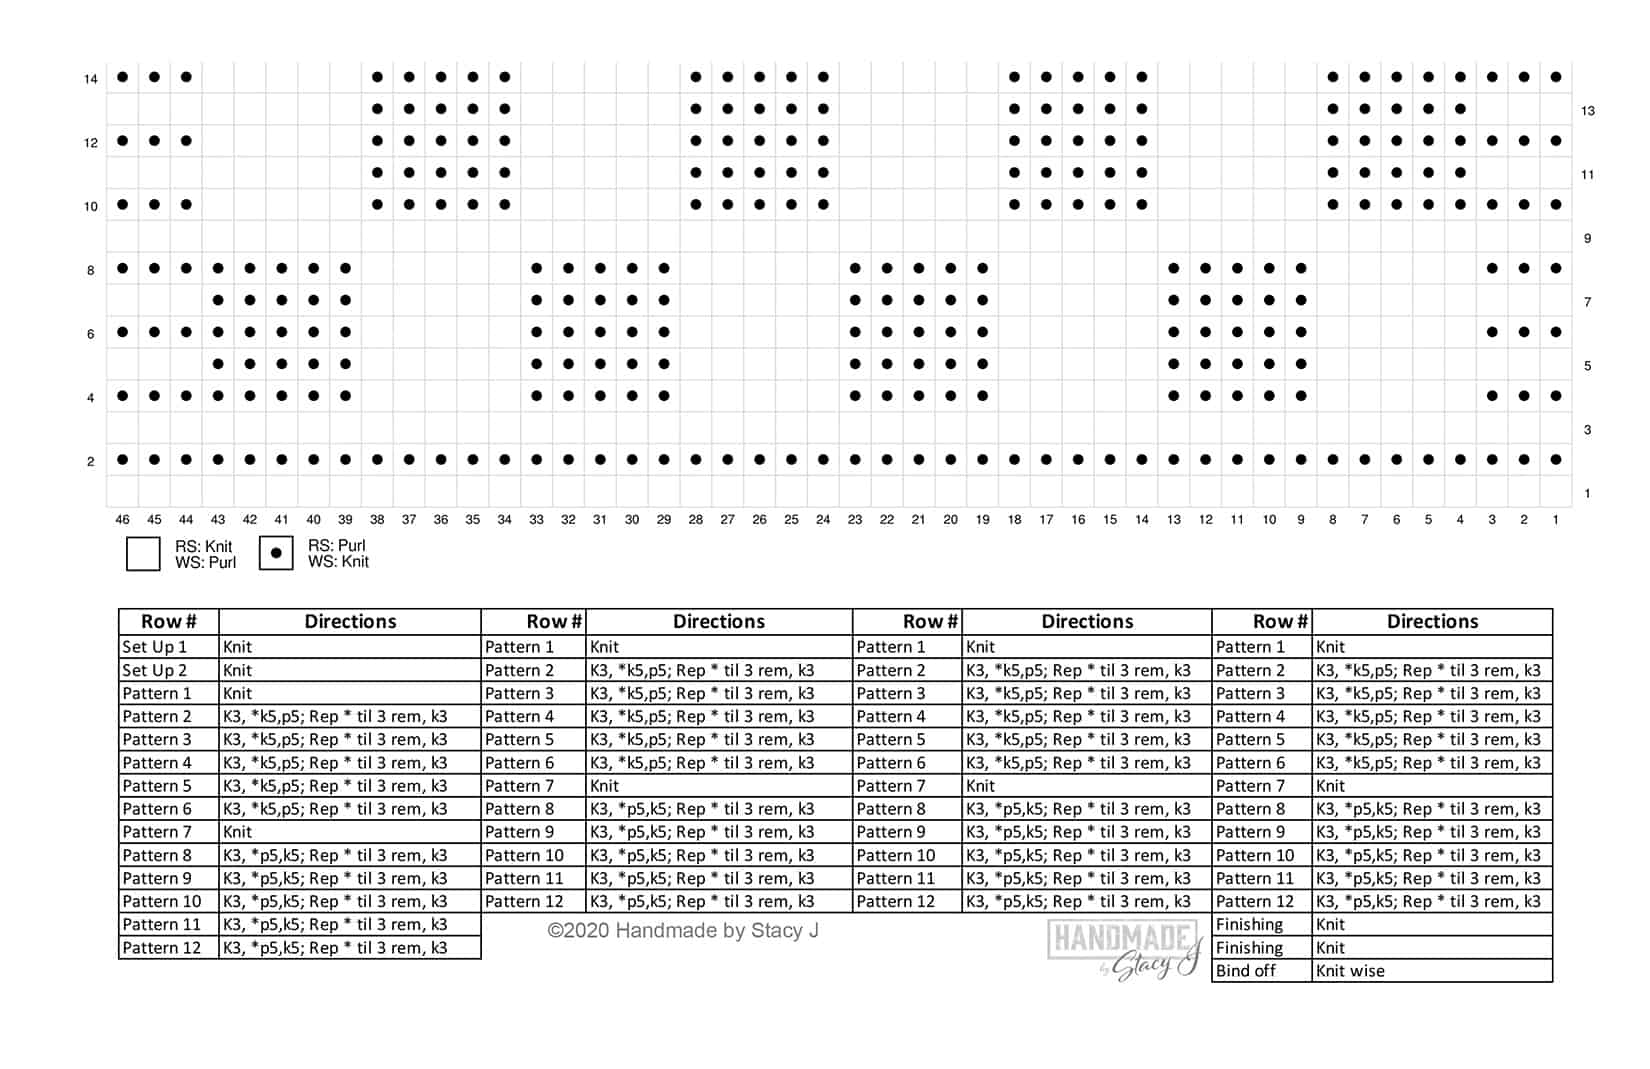
Directions for Basketweave Dishcloth:
Set up Rows
Cast on 46 K across for 2 rows
Pattern
Insert stitch markers after beginning k3 and before ending k3 on row 2. Slip the markers and then remove them when you start the final rows.
1: (RS) Knit
2 – 6: K3, *k5, p5; rep * to last 3 sts, k3
7: Knit
8-12: K3, *p5, k5; rep * to last 3 sts, k3
Rep rows 1-12 three more times
Final Rows
Knit across for 2 rows Bind off knit wise and weave in ends.
Below is the chart and a checklist to help you along with your Basketweave Dishcloth. 🙂
When you make your Basketweave dishcloth, please tag me social media @handmadebystacyj and #handmadebystacyj. I’d love to see them!
This pattern is not to be sold or copied in any way. The images, pattern and charts are copyrighted by Handmade by Stacy J and may not be duplicated. You may sell and gift your makes, however I ask that you credit me as the designer. Also, you are responsible for providing your own photographs. Thank you!
The Lace and Cable Panel is a gorgeous stitch worked with a background of reverse stockinette with lace framed by cables. The cables are a little different in the sense that the RS is knit in the back loop and the WS is purled in the back loop. The Lace and Cable Panel stitch pattern works in multiples of 21 over an 8 row repeat.
Below there is a chart for you, as well.
Disclosure: Most of my posts contain links for companies that I’m a proud affiliate for. That means that if you choose to purchase from that link, you allow the company to pay me a small commission without costing you a penny more. Thank you so much for your support!
To see a video tutorial of this stitch, click above this post or view it on YoutubeHERE.
Stitches and abbreviations used:
K: Knit
K2tog: Knit 2 together
K2tog tbl: Knit 2 together through the back loop
KB1: Knit through the back loop
P: Purl
PB1: Purl through the back loop
RS: Right side
Sk2po: Slip 1 stitches purl wise, knit the next 2 stitches together, pass the slipped stitch over the knit 2 together stitch just made
WS: Wrong side
Yo: yarn over
Here’s a pin for your Pinterest board 🙂
Special Stitches:
CB4F: Slip 2 stitches off left needle and place on cable needle, hold cable needle at front of work, knit the 2 stitches on left needle through the back loop, then knit the 2 stitches off the cable needle through the back loop.
CB4B: Slip 2 stitches off left needle and place on cable needle, hold cable needle at back of work, knit the 2 stitches on left needle through the back loop, then knit the 2 stitches off the cable needle through the back loop.
I hope you enjoyed learning this stitch as much as I did. When you make something with it, could you please tag me @handmadebystacyj or #handmadebystacyJ – I’d love to see what you create!
The Leafy Lace Crochet Stitch is inspired by a knit stitch that I did a tutorial for recently. While working on a collaboration with Kris from Krissy’s Over the Mountain Crochet, she had asked her viewers to pick a stitch from my YouTube channel and she would design a rectangular wrap using the viewers’ choice. (To see Kris’s video, click HEREand go to about the 5 minute mark)
Many people showed interest in the Leafy Lace Knit Stitch and Kris is a crocheter. So, I listened to the viewers and decided to adapt a crochet stitch from the knit stitch.
After about a week of trial and error, frogging and stitching…here it is – The Leafy Lace Crochet Stitch!
Disclosure: Many of my posts contain affiliate links. When you purchase from those links, you allow the companies to pay me a small commission without costing you any more. Those purchases allow me to continue making free content. Thank you for your support!
Stitch information
This stitch works in 17 + 2 (plus 2 for a base chain) over a 6 row repeat. It uses a combination of chain, double crochet and front / back post treble crochet. I’ve adapted the beginning and ending post trebles so that a gap isn’t formed in the back of the stitch. Even though it looks complicated, once you get the hang of it, it isn’t too bad at all. So, let’s give it a try!
I’m currently working on a design that uses this stitch. I’ll keep you updated when it goes live. Please be sure to sign up for my email list so that you know right away.
To see a video tutorial of this stitch, click on the link towards the top of this post or clickHERE. At the bottom of the post there is also a chart for your reference.
Stitches and abbreviations used:
Ch: Chain
Dc: Double crochet
Ea: Each
Rep: Repeat
RS: Right Side
Sk: Skip
Sp: Space
St(s): Stitch (es)
Tch: Turning Chain
WS: Wrong Side
Yo: Yarn over
Here’s a pin for your Pinterest board 🙂
Special stitches:
BPTR:
Back Post Treble Crochet – Yo 2 times, insert hook back to front around indicated stitch, draw up a loop (4 loops on hook), [yo, draw through 2] three times
BPTR3tog:
Back Post Treble 3 Together – Yo 2 times, insert hook back to front around first stitch, draw up a loop, [yo, draw through 2] two times (2 loops on hook), yo 2 times, insert hook back to front around next stitch, draw up a loop, [yo, draw through 2] two times (3 loops on hook), yo 2 times, insert hook back to front around next stitch, draw up a loop [yo, draw through 2] two times (4 loops on hook), yo, the draw through remaining 4 loops
FPTR3tog:
Front Post Treble 3 Together – Yo 2 times, insert hook front to back around first stitch, draw up a loop, [yo, draw through 2] two times (2 loops on hook), yo 2 times, insert hook front to back around next stitch, draw up a loop, [yo, draw through 2] two times (3 loops on hook), yo 2 times, insert hook front to back around next stitch, draw up a loop [yo, draw through 2] two times (4 loops on hook), yo, then draw through remaining 4 loops
FPTR:
Front Post Treble Crochet – Yo 2 times, insert hook front to back around indicated stitch, draw up a loop (4 loops on hook), [yo, draw through 2] three times
modBPTR:
Modified Back Post Treble Crochet – Yo 2 times, insert hook back to front around indicated stitch, draw up a loop (4 loops on hook), [yo, draw through 2] twice (2 loops on hook), yo, insert hook in stitch behind post just worked, draw up a loop (4 loops on hook), yo, draw through 2, yo, then draw through remaining 3 loops
modFPTR:
Modified Front Post Treble Crochet – Yo 2 times, insert hook front to back around indicated stitch, draw up a loop (4 loops on hook), [yo, draw through 2] twice, (2 loops on hook) yo, insert hook in stitch behind post just worked, draw up a loop (4 loops on hook), yo, draw through 2, yo, then draw through remaining 3 loops
Directions for Leafy Lace Crochet Stitch
Note: Ch-3 at beg of row counts as first dc
Work Foundation dc and skip to step 2 (only work step one is if the beginning ch method is your preferred method)
1: Chain in multiples of 17 + 2 (add 2 for base chain). Work 1 dc in fourth ch from hook (skipped chs count as first dc) and in ea ch across
2: Ch 3, turn; (RS): *1 dc in next st, 1 modFPTR in next st, 1 dc in ea of the next 3 sts, ch 2, sk 3, 3 dc in next st, ch 2, sk 3, 1 dc in ea of next 3 sts, 1 modFPTR in next st, 1 dc in next st; rep * ending with dc in top of tch
3: Ch 3, turn; (WS): *1 dc in next st, 1 modBPTR in next st, 1 dc in ea of next 2 sts, ch 2, sk 1 dc and ch-2 sp, 1 BPTR around first post of 3-dc cluster, [1 BPTR, 1 dc, 1 BPTR] in second st, 1 BPTR around third post of 3-dc cluster, ch 2, sk ch-2 sp and dc, 1 dc in ea of next 2 sts, 1 modBPTR in next st, 1 dc in next st; rep * ending with 1 dc in top of tch
4: Ch 3, turn; *1 dc in next st, 1 modFPTR in next st, 1 dc in next st, ch 2, sk 1 dc and ch-2 sp, 1 FPTR around ea of the next 2 posts, [1 FPTR, 1 dc, 1 FPTR] in next st, 1 FPTR around post of ea of the next 2 sts, ch 2, sk ch-2 sp and 1 dc, 1 dc in next st, 1 modFPTR in next st, 1 dc in next st; rep * ending with 1 dc in top of tch
5: Ch 3, turn; *1 dc in next st, 1 modBPTR in next st, 1 dc in next st and 1 dc in ch-2 sp, ch 2, 1 BPTR around ea of the next 2 posts, 1 BPTR3tog around next 3 posts, 1 BPTR around ea of next 2 posts, ch 2, 1 dc in ch-2 sp and 1 dc in next st, 1 modBPTR in next st, 1 dc in next st; rep * ending with dc in top of tch
6: Ch 3, turn; *1 dc in next st, 1 modFPTR in next st, 1 dc in ea of next 2 sts and ch-2 sp, ch 2, 1 FPTR in next st, 1 FPTR3tog around next 3 posts, 1 FPTR in next st, ch 2, 1 dc in ch-2 sp and in ea of next 2 dcs, 1 modFPTR in next st, 1 dc in next st; rep * across ending with 1 dc in top of tch
7: Ch 3, turn; *1 dc in next st, 1 modBPTR in next st, 1 dc in next 3 sts and 1 dc in ch-2 sp, ch 2, BPTR3tog around next 3 posts, ch 2, 1 dc in ch-2 sp and in ea of the next 3 sts, 1 modBPTR in next st, 1 dc in next st; rep * across ending with 1 dc in top of tch
Repeat rows 2 – 7 to desired length.
I hope you enjoyed learning this stitch as much as I did. When you make something with it, could you please tag me @handmadebystacyj or #handmadebystacy – I’d love to see what you create!
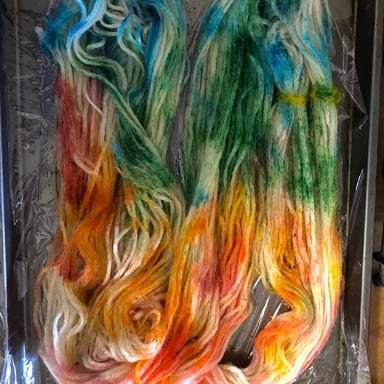
Have you ever heard of Steam-dying yarn? I’ve always been intrigued by the Indie yarn dyers and the absolutely gorgeous yarn that they create. So, when I was at my Knitting Guild meeting last month, just imagine how thrilled I was to see that the presentation for that month was on how to dye yarn using things that you have in your kitchen. Our presenter did a great job and I was enthralled with what I was learning. Then, it was time for the door prize…and, I WON! She gifted me 200g of bare worsted weight 100% wool, Easter egg dye tablets and instructions so that I could dye my own hank. (Insert happy dance here!).
My door prize!
Today I decided to give Steam-dying yarn a try. I had tried with Kool-Aid before and enjoyed the process, as well as liking the results. But, Easter egg tablets?? The directions said to microwave the yarn as it dyes. However, my microwave is one of those crazy industrial strength ones that can cook something that’s supposed to take 10 minutes in 3 minutes. So, I was told that I could try steaming the yarn instead. I followed the directions (except for the microwave part) and took pictures along the way so that I could share the results with you. So….here we go! (By the way, if you want to see the Kool-Aid dying experience, I filmed it and you can see it by clicking HERE
Step 1
I gathered 1 quart of water and added 2 tablespoons of white vinegar to the water. Then soaked the yarn in a bag with the water & vinegar solution for 20 minutes. This allows the yarn to open up and say, “Hello dye! Welcome to my wool!”
Step 2:
While the wool was soaking in the bag, I crushed up the little Easter egg dye tablets. I was told that the best way to do that is to remove the tablets from the little, plastic casing. Then to insert one tablet it there and to smash it. I did a gentle smash with a hammer (I love anything that involves hammers!) and then emptied the contents on a piece of aluminum foil. Then, repeated the process again until all tabs had been smashed.
BIG TIP: Wear gloves!
Step 3:
After the wool finished soaking and the tablets were all smashed up to a powder, I lined a baking sheet with plastic wrap, unrolled the hank and placed the yarn on the baking sheet.
Step 4:
I sprinkled the powder on the yarn. I didn’t do a specific order, except for keeping the yellowish / orange close to the reds and blues (that way it makes more of an orange or green blend). Then, I gently flipped the yarn over so that I could get both sides with the dye.
Wow – just look at those colors!
Step 5:
Now we’re off to the steam bath…
I used my steaming basket and kept the heat on low once the water was steaming. Then I rolled the yarn up in the plastic wrap, put the yarn in the steam basket and covered the pot for 2 minutes. After the 2 minutes was up, I flipped the yarn, covered the pot and gave it another 2 minutes of steam.
The yarn getting a little steam bath
Step 6
Let it rest for 5 minutes.
(Sorry, there really wasn’t any way to get a photo that looks flattering of this!)
Then put the wrapped wool back in the steam bath and repeated the process of 2 minutes with the steam, then flip and gave it another 2 minutes.
Yarn…just not a flattering picture of it!
Step 7:
The hardest step of all….wait…for 10-20 minutes as it rests and cools. (This is when I’d cue up the Tom Petty song “The waiting is the hardest part!”)
After the wool has cooled, then you can carefully open the plastic wrap. Just be sure that you’re still wearing gloves, as this step can be a little messy.
I had a wire rack on top of my baking sheet to help with the potential messiness and it worked wonderfully.
Impatiently waiting….
Step 8:
Admire the colors. Do all of your oooh’s and ahhhh’s as you amaze yourself with what you created. I especially love the blues and greens of this!
Step 9:
Rinse your wool very gently with cool water and a couple drops of dish soap. Unfortunately, I think I did something wrong. When I washed it, the majority of the color went with the water down the drain (insert the not-so-happy dance here). However, I’m kind of liking the pastel tones that I’m getting from this. This will be hung to dry and re-rolled back into a hank.
Step 10:
Admire the final, dried hank and dream up what you’d like to make with it. I’m thinking I may add it to some other yarn to make a hat or complement another color for a scarf or a cowl. What do you think? What would you make with it?
My finished yarn
All in all, this was a great experience and I’ll definitely be dyeing more yarn in the future. I’ve heard that the acid dyes do a wonderful job. Since I used to make soap, that process doesn’t seem too intimidating. When I do it, I’ll let you know!
Learn how to knit the Diagonal Openwork knit stitch. This is a fairly simple stitch that involves a combination of knits, purls, increases and decreases to create an interesting diagonal design. This Diagonal Openwork knit stitch pattern works in multiples of 4 + 2 over an 8 row repeat.
Scroll to the bottom of the post to see the chart for this stitch.
Disclosure: Most of my posts contain affiliate links. That means that if you choose to purchase from that link, you allow the company to pay me a small commission without costing you a penny more. Thank you so much for your support!
Stitches and abbreviations used:
Written using US terms
K: Knit
K2tog: Knit 2 together
P: Purl
RS: Right side
Skpo: Slip 1 stitch purl wise, knit the next stitch, pass slipped stitch over knit stitch just made
Sk2po: Slip 1 stitch purl wise, knit the next 2 stitches together, pass the slipped stitch over the knit 2 together stitch just made
St(s): Stitch (es)
WS: Wrong side
Yo: yarn over
Here’s a pin for your Pinterest board 🙂
Stitch pattern for Diagonal Openwork Knit Stitch:
1 (RS): *K1, yo, sk2po, yo: rep * to last 2 sts, k2
2 and all WS rows: Purl
3: K2, *yo, sk2po, yo, k1; rep * to end
5: K2tog, yo, k1, yo, *sk2po, yo, k1, yo; rep * to last 3 sts, skpo, k1
7: K1, k2tog, yo, k1, yo, *sk2po, yo, k1, yo; rep * to last 2 sts, skpo
8: Purl
Rep these 8 rows to desired length
I hope you enjoyed learning this stitch as much as I did. When you make something with it, could you please tag me @handmadebystacyj or #handmadebystacyJ – I’d love to see what you create!
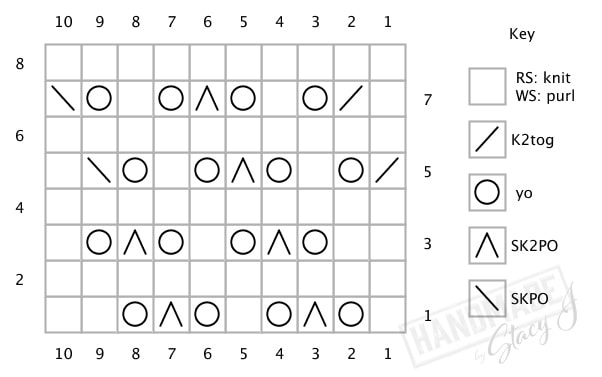
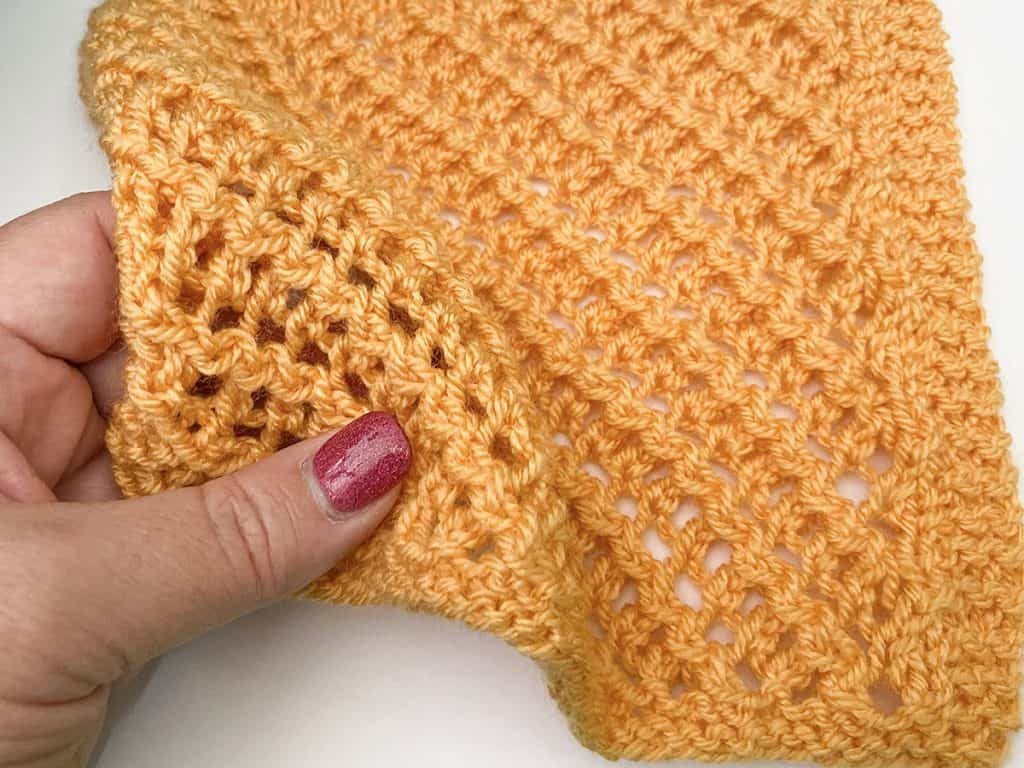
Learn how to knit the Diagonal Openwork knit stitch by making this block. This is a fairly simple stitch that involves a combination of knits, purls, increases and decreases to create an interesting diagonal design. This Diagonal Openwork knit stitch pattern works in multiples of 4 + 2 over an 8 row repeat.
This block can be used to add to your washcloth collection or to add to a project that uses squares to make a blanket.
Right below is a video tutorial that walks you through how to create this stitch. If you scroll to the bottom of the post, you’ll see the chart for this stitch.
Disclosure: This post contains affiliate links. That means that if you choose to purchase from that link, you allow the company to pay me a small commission. This doesn’t cost you a penny more and allows me to continue making free content. Thank you so much for your support!
Skpo: Slip 1 stitch purl wise, knit the next stitch, pass slipped stitch over knit stitch just made
Sk2po: Slip 1 stitch purl wise, knit the next 2 stitches together, pass the slipped stitch over the knit 2 together stitch just made
St(s): Stitch (es)
WS: Wrong side
Yo: yarn over
Pattern for Diagonal Openwork Block:
Using long tail cast on method, cast on 36
Knit 3 rows
On row 1, insert stitch markers after the first k3 and before the last k3 (this helps to keep track of where your border is)
(RS): K3, *K1, yo, sk2po, yo: rep * to last 5 sts, k5
(WS) and all WS rows: K3, p30, k3
K5, *yo, sk2po, yo, k1; rep * to last 3 sts, k3
K3, p30, k3
K3, K2tog, yo, k1, yo, *sk2po, yo, k1, yo; rep * to last 6 sts, skpo, k4
K3, p30, k3
K4, k2tog, yo, k1, yo, *sk2po, yo, k1, yo; rep * to last 5 sts, skpo, k3
K3, p30, k3
Rep rows 1-8 to 7” or desired length ending on WS row
WS: Knit
Knit 2 rows
Bind off knit wise
Please remember to tag me on your makes @handmadebystacyj and #handmadebystacyj – I’d love to see them!
Stacy J
Patterns created by Handmade by Stacy J are not to be sold or copied in any way. The images, pattern and charts are copyrighted by Handmade by Stacy J and may not be duplicated. You are welcome to sell your makes. However, I ask that you credit me as the designer and you are responsible for providing your own photographs. Thank you!
The Fantasia stitch was my very first YouTube crochet tutorial that I put out to the world a few years ago. However, I just looked at it again and realized that the written directions, as well as the video needed an overhaul…desperately! (If you’d like to check out the original Fantasia stitch video, here’s the link)
This week I’ve reworked the stitch. I made some small changes to the stitch pattern. Then re-filmed the video and updated the verbiage on the pattern (it’s so much easier to read now!). There’s even better step-by-step photos.
Disclosure: This post contains affiliate links. As an affiliate, when you purchase through my links, you allow the company to pay me a small commission. This doesn’t cost you any more, and allows me to continue making free content. Thank you for your support!
About the Fantasia stitch
This stitch works in chain multiples of 12 + 5 over a 4 row repeat. It uses a combination of chain, single crochet and treble crochet. Even though it looks complicated, once you get the hang of it, it isn’t too bad at all. So, let’s give it a try!
To see a video tutorial of this stitch, scroll to the top of this post or clickHERE.
Need a new hook? Want a super beautiful hook? Check out Furls!
Stitches and abbreviations used:
Ch: Chain
Lp (s): Loop (s)
Rep: Repeat
RS: Right side
Sc: Single crochet
Sk: Skip
St (s): Stitch (es)
WS: Wrong side
Yo: Yarn over
Here’s a pin for your Pinterest board
Special stitches:
FPTR3tog – Front post treble crochet 3 together: *Yarn over two times and insert hook from front to back around post from previous row, draw up a lp, [yo, draw through 2 lps] 2 times; rep * 2 more times around the next 2 posts, 4 loops should be on your hook, yo and draw through all 4 lps
FPTR6tog – Front post treble crochet 6 together: *Yarn over two times and insert hook from front to back around post from previous row, draw up a lp, [yo, draw through 2 lps] 2 times; rep * 5 more times around the next 5 posts, 7 loops should be on your hook, yo and draw through all 7 lps
Directions for the Fantasia Stitch
Chain in multiples of 12 + 5 (for this example I chained 41)
1: In 5th ch from hook (counts as first tr), work 3 tr, ch 1; sk 5 ch, 1 sc in next ch, ch 1, *sk 5 ch, in next ch work [3 tr, ch 3, 3 tr], sk 5 ch, 1 sc in next ch, ch 1; Rep * across ending with 4 tr in last ch
2: (Note: When working around the tr posts, be careful not to confuse the ch-5 from the previous row for a tr post) Ch 1, turn; Sc in first st, ch 5, *work FPTR6tog, ch 5, sc in ch-3 sp from previous row, ch 5; rep * across ending with sc in top of 4th ch of previous row’s turning ch
3: Ch 1, turn; Sc in first st, ch 1, *work [3 tr, ch 3, 3 tr] in st that joins FPTR6tog from previous row, ch 1, 1 sc in sc from previous row, ch 1; rep * across ending with sc in last sc
4: Ch 4, turn; work FPTR3tog around posts below, ch 5, *sc in ch-3 sp, ch 5, FPTR6tog, ch 5; rep * across ending with 1 sc in last ch-3 sp, ch 5, FPTR3tog on last 3 tr from previous row, ch 4, sc in last sc
5: Ch 4, turn; 3 tr in first sc, ch 1, sk (ch-4, FPTR3tog & ch-5 sp), *sc in sc from previous row, ch 1, work [3 tr, ch 3, 3 tr] in st that joins FPTR6tog; rep * across ending with 4 tr in third ch of turning ch
Repeat rows 2 – 5 to desired length ending on a row 2 or row 4 repeat.
I hope you enjoyed learning this stitch as much as I did. When you make something with it, could you please tag me @handmadebystacyj or #handmadebystacyj – I’d love to see what you create!
The Leafy Lace knitting stitch is a beautiful lace stitch. Although it does take some concentration while working the rows, it’s worth the effort when you complete it. After a couple repeats, it’s not too hard to get the hang of it. This stitch pattern works in multiples of 10 + 1 over a 16 row repeat.
Below there is a chart for you, as well.
To see a video tutorial of this stitch,click the box below or view on YouTube by clicking HERE.
Stitches and abbreviations used:
K: Knit
K2tog: Knit 2 together
KB1: Knit through the back loop
P: Purl
P2tog: Purl 2 together
PB1: Purl through the back loop
Rep: Repeat
RS: Right side
Sk2po: Slip 1 stitch purl wise, knit the next 2 stitches together, pass the slipped stitch over the knit 2 together stitch just made
WS: Wrong side
Yo: yarn over
Here’s a pin for your Pinterest board 🙂
Stitch pattern for Leafy Lace Stitch:
Written using US terms
1 (RS): K1, *p9, KB1; rep * to end
2 (WS): P1, *k9, p1; rep * to end
3: As row 1
4: As row 2
5: K1, *p2, p2tog, yo, KB1, yo, p2tog, p2, KB1; rep * to end
6: P1, *k4, PB1, k4, p1; rep * to end
7: K1, *p1, p2tog, yo, [KB1] 3x, yo, p2tog, p1, KB1; rep * to end
8: P1, *k3, [PB1] 3x, k3, p1; rep * to end
9: K1, *p2tog, yo, [KB1] 5x, yo, p2tog, KB1; rep * to end
10: P1, *k2, [PB1] 5x, k2, p1; rep * to end
11: K1, *p1, yo, [KB1] 2x, sk2po, [KB1] 2x, yo, p1, KB1; rep * to end
12: As row 10
13: K1, *p2, yo, KB1, sk2po, KB1, yo, p2, KB1; rep * to end
14: As row 8
15: K1, *p3, yo, sk2po, yo, p3, KB1; rep * to end
16: As row 6
Rep these 16 rows to desired length
Note: To end with an even edge of top and bottom, work rows 1-3 once more and bind off on WS in pattern of row 4
I hope you enjoyed learning this stitch as much as I did. When you make something with it, could you please tag me @handmadebystacyj or #handmadebystacyJ – I’d love to see what you create!
The Zig zag rib knitting stitch is a fairly simple stitch that uses a combination of knits and purls. It offers a little less stretch in comparison to the standard k2, p2 ribbing, but offers so much texture! The back is flat, while the front offers a great zig zag detail. The Zig zag rib stitch pattern works in multiples of 3 + 1 over a 2 row repeat.
One follower asked me if this stitch works in the round. Unfortunately, I tried and tried and just couldn’t get it to work. If you’re able to do so, please let me know!
Disclosure: Most of my posts contain affiliate links. If you choose to purchase from that link, you allow the company to pay me a small commission. This doesn’t cost you a penny more and allows me to continue making free content. Thank you so much for your support!
Written using US terms
Stitches and abbreviations used:
K: Knit
P: Purl
Rep: Repeat
RS: Right side
St(s): Stitch (es)
WS: Wrong side
Here’s a pin for your Pinterest board 🙂
Stitch pattern for Zig zag rib stitch:
To see a video tutorial of this stitch, scroll to the top of this post or click HERE.
1 (RS): P1, *knit into back loop of second stitch (leaving stitch on left needle), knit into front of first stitch, then drop them both from the needle at the same time, P1; rep * to end
2 (WS): K1, *Purl into second stitch (leaving stitch on left needle), purl into first stitch, then drop them both from the needle at the same time, K1; rep * to end
Rep these 2 rows to desired length
I hope you enjoyed learning this stitch as much as I did. When you make something with it, could you please tag me @handmadebystacyj or #handmadebystacyJ – I’d love to see what you create!