The Baby Steps Baby Blanket is quick, easy and fun to knit. The border frame is worked with the blanket as you make it. The frame around the body consists of a larger garter edge, then a smaller stockinette frame, then a small 2 stitch reverse stockinette frame that frames the body.
The stitches used are a combination of knit, purl, purl 3 together and yarn overs that create an interesting fabric. The needles are a little larger than the yarn band recommends, therefore giving the blanket a lovely drape. This blanket uses just under 4 skeins of yarn and works up fairly quickly, making it the perfect gift for the little one in your life.
It’s easy to adjust the size of the blanket, as the body is worked in stitch multiples of 14 over an 8 row repeat.
Disclosure: This post contains affiliate links. That means that I may receive compensation when you purchase through my links at no additional cost to you. Thank you for your support!
The Tiled Infinity Scarf is a beautiful, squishy knit infinity scarf pattern that has a great texture with an i-cord edge. With only knits and purls over an 8 – row repeat, this is an easy project to take with you or for social knitting. The Tiled Infinity Scarf is worked flat, then seamed when you finish the pattern, so you can adjust the length to your liking. To make the scarf wider or thinner, add or subtract the cast on stitches in increments of 6.
This pattern is an Easy project and has been tested – thank you to all my lovely testers!
Disclosure: The yarn for this project was provided to me by King Cole. I am a King Cole Brand Ambassador and this post is part of our ongoing collaboration. Thank you for your support!
The “No Purls About It” is the perfect project to take with you as you travel. It’s worked over a 4-row repeat and only uses knits (no purls!) and is reversible. The extra wraps of yarn during the knits on one of the rows offer a beautiful and simple lace design.
“No purls about it” uses only one hank of yarn and you can choose to work until you’re almost out of yarn or until you reach your desired length. This pattern is easily adaptable to be wider or more narrow simply by adding or subtracting in increments of six.
The yarn that I chose to use is Knit Picks “Muse” fingering weight yarn. You can use any fingering weight yarn that you like. However, I chose this specific yarn because it’s soft, not slippery and has a tiny bit of “stickiness” to it. The yarn rarely split and the color is tonal.
The “Muse” yarn offers pretty generous yardage, therefore allowing a nice, long scarf using only one hank of yarn.
This pattern is an Easy project and has been tested – thank you to all my lovely testers!
The Little Frills shawlette design came to me as I was watching a movie and I saw a ruffley-type scarf. When I saw that, I knew that I needed to create a free knitting pattern with ruffles! When King Cole Yarns reached out to me about their 2023 Make-Along, I knew that this was the perfect time to design this baby!
About the yarn
The King Cole “Finesse” yarn called to me to be worn against the skin. The yarn is a wonderful cotton and silk blend that’s a DK / #3 lightweight yarn. Each skein holds approximately 131 yards / 120 metres and is 77% cotton, 23% silk and 100% scrumptiousness!
As I worked with this particular yarn, I was in awe of the softness. It glided through my fingers and there weren’t any knots! It took the Russian Join very well as I added the next skein to the project and I love all the color options. This yarn is to be hand washed in cool water and laid flat to dry. I highly recommend this yarn, not only for this project, but for any project that calls for a dk / #3 lightweight yarn that will be worn next to your skin.
The Little Frills Shawlette uses size US 9 / 5.5 mm knitting needles and uses just under 3 skeins of the main color (Blush) and 2 skeins of the contrast color (Ice).
Disclosure: This post contains affiliate links. As an affiliate, when you purchase through my links, you allow the company to pay me a small commission without costing you a penny more, which allows me to continue making free content. The yarn for this pattern was provided to me from King Cole – I am a King Cole Brand Ambassador and this post is part of our ongoing collaboration. Thank you for your support!
To see the video tutorial, please click on the image above.
About the Little Frills Shawlette
This shawlette begins with casting on 81 stitches. Then, on each right side row for the first panel, you’ll work gradual increases. Then, as you progress, you’ll begin doing large increases that nearly double your stitch count. The rows work quickly, as they are only using knits, purls and yarn overs. The yarn over rows are also accented with a garter stitch border; so that’s 2 rows with each yarn over where you won’t be purling!
When having this pattern tested, I did an oops that included one extra repeat of the final increase rows. I corrected the pattern, but my testers loved it so much that they kept that extra increase (If you’d like to see their makes, please check out their Ravelry projects). That extra increase added so much ruffley goodness, but also added quite a bit of time needed to work the bind off. The bind off used is the “Picot” bind off and it requires casting on 2 stitches and then binding off 4. It takes some time, but is so worth it in the end. If you choose to add that extra increase section, you’ll need approximately 220 yards / 202 metres more of your contrast color.
If you prefer a printable pdf that includes a checklist to help keep track of your rows and printable gift tags for gifting your shawlette, you can purchase through Ravelry (or add to your favorites or que) or through my Etsy store.
Please note that due to this being a digital download, all sales are final and no refunds will be given. Thank you for your support!
Here’s a pin to add to your Pinterest board
Materials needed:
King Cole “Finesse” Cotton Silk DK (77% Cotton, 23% Silk; 131 yds / 120 m; 50g; #3 Light / DK weight) yarn in colors:
Blush (MC): 315 yds / 288 m
Ice (CC): 167 yds / 153 m (if you choose to do an extra repeat of the final panel, you’ll need approximately 387 yds / 354 m of your CC)
1 locking stitch marker or scrap piece of yarn (optional)
Tapestry needle
Scissors
Measures: 60” / 152.4 cm long at widest point x 10” / 25.4 cm deep
Gauge: 15 sts x 18 rows = 4” / 10 cm in Stockinette Stitch – Gauge isn’t critical in this project, but will affect yarn usage
Pattern Difficulty level: Easy
The terms are written using US terminology and I’ve created a video with time stamps to help you along.
If you prefer a printable pdf that includes a checklist to help keep track of your rows and printable gift tags for gifting your shawlette, you can purchase through Ravelry (or add to your favorites or que) or purchase directly through me and save 10% (Valid for US residents only)!
Please note that due to this being a digital download, all sales are final and no refunds will be given. Thank you for your support!
Stitches & Terms Used
(Pattern is written in US terms):
Cable cast on: Insert right needle between the first and second stitch on left needle, draw up a loop and place on left needle (1 stitch casted on)
CC: Contrast color
K: Knit
K2tog: Knit two stitches together
Kfb: Knit into the front and back of the same stitch
MC: Main color
P: Purl
Rep: Repeat
Rs: Right side
Sl: Slip
St(s): Stitch(es)
Ws: Wrong side
Wyib: With yarn in back
Wyif: With yarn in front
Notes:
To avoid weaving in multiple yarn tails, I recommend working the Russian join as you join a new skein of yarn. To see a video tutorial of this technique, please visit: https://youtu.be/iU9rszpZzoQ
Use a locking stitch marker or scrap piece of yarn to mark the right side of your work.
When slipping stitches while working on the RS, yarn is always held at the back of your work.
Row 1: Sl, k1, kfb, knit to last 3 sts, kfb, sl, p1 (83 sts)
Row 2: Sl wyib, p to last 2 sts, sl wyif, p1
Row 3: As row 1 (85 sts)
Row 4 (WS): Sl wyib,p1, k to last 2 sts, sl wyif, p1
Row 5: Sl, k1, kfb, *k2tog, yo; rep * to last 4 sts, k1, kfb, sl, p1 (87 sts)
Row 6: As row 4
Rows 7 – 10: Rep rows 1 – 2 (91 sts)
Row 11: As row 1 (93 sts)
Row 12: As row 4
Row 13: As row 5 (95 sts)
Row 14: As row 4
Row 15: As row 1 (97 sts)
Row 16: As row 2
Second Panel
Row 1: Sl, k1, kfb, k across to last 3 sts, kfb, sl, p1 (99 sts)
Row 2 (WS): Sl wyib, p last 2 sts, sl wyif, p1
Row 3: As row 1 (101 sts)
Row 4: Sl wyib, p1, k to last 2 sts, sl wyif, p1
Row 5: (In this row, we nearly double our st count) Sl, k1, *k1, yo; rep * to last 3 sts, k1, sl, p1 (198 sts)
Row 6: As row 4
Row 7: Sl, k across to last 2 sts, sl, p1
Row 8: Sl wyib, p to last 2 sts, sl wyif, p1
Row 9: As row 7
Row 10: As row 8
Row 11: As row 7
Row 12: As row 4
Row 13: Sl, k1, *k2tog, yo; rep * to last 3 sts, k1, sl, p1
Row 14: As row 4
Rows 15 – 18: Repeat rows 7 – 8
Row 19: As row 7
Rep rows 4-18 once more (392 sts)
Final Panel
Switch to CC
(If you’d like extra ruffly goodness, like my testers did, repeat this section one more time and plan on using approximately 220 more yards / 202 metres of your CC)
Row 1: Sl, k across to last 2 sts, sl, p1
Row 2 (WS): Sl wyib, k last 2 sts, sl wyif, p1
Row 3: (In this row, we nearly double our st count) Sl, k1, *k1, yo; rep * to last 3 sts, k1, sl, p1 (780 sts)
Row 4: As row 4 of Panel 2
Picot Bind off
Cast on 2 sts using cable cast on method (2 sts increased)
Bind off four stitches knit-wise (to get four bind-off sts, you will have to knit a total of 5 sts and pulled a total of 4 sts over on the right needle, the 5th st will be left on the right needle
Place that last st back on the left needle
Repeat until you are out of sts to bind off
If you’d like to check out some more knitting patterns, please click on the images below. You’ll be directed to the free knitting pattern on the website for each of them.
I do hope you’ve enjoyed this free knitting pattern for the Little Frills Shawlette! When you’re all done, please take pictures and tag me on social media. @handmadebystacyj or #handmadebystacyj so that I can see your beautiful shawlette 🙂
This Little Frills Shawlette free knitting pattern is copyright 2023 Handmade by Stacy J. Please do not duplicate or copy any portion of this pattern, as well as photographs. You are encouraged to share images of your final product and are allowed to sell final products; I just ask that if you sell your final product, please purchase the ad-free pdf, provide your own photographs and that you please credit Handmade by Stacy J as the designer. Thank you for your support!
The Cobblestone infinity scarf was inspired as I designed the crocheted “Birthday Sorbet” baby blanket for Mary Maxim. When they shipped me the yarn, they surprised me with a couple of skeins of the Mary Maxim “Purely Soft” yarn and it just screamed to me to be an infinity scarf…so, the Cobblestone Infinity Scarf was born!
When I shared the design with Mary Maxim, they liked it so much that they created a kit from it! If you’d like to check out the kit, please visit: https://shrsl.com/3zdp9and check out the “Related Kits” section.
About the yarn
The Mary Maxim “Purely Soft” yarn has a squishiness that is simply uncomparable to any other yarn I’ve ever worked with. Have you ever walked down the yarn aisle and just couldn’t stop squishing one particular yarn?? Yep…this is like that! It’s so soft and light!
Each skein has approximately 147 yards / 135 metres and is 70% Premium Acrylic & 30% Polyamide. The skein is 5.3 oz / 150 grams and is a #5 / Bulky weight yarn.
The Cobblestone Infinity Scarf uses size US 10.5 / 6.5 mm knitting needles and uses 2 skeins of the Purely Soft yarn.
Disclosure: This post contains affiliate links. As an affiliate, when you purchase through my links, you allow the company to pay me a small commission without costing you a penny more, which allows me to continue making free content. Thank you for your support!
About the Cobblestone Infinity Scarf
The Cobblestone Infinity Scarf is a quick and easy project to work up as a last-minute gift or as a little something to keep yourself warm that uses bulky yarn and large knitting needles, so that it comes together quickly. The Mary Maxim “Purely Soft” yarn used for this scarf is really unique and, I think, is what makes this scarf stand out. It’s very soft and has a gorgeous halo that really adds amazing texture. This pattern is easily adjusted to make larger or smaller, as the stitch pattern is worked in multiples of 2 with a 4 row repeat. To get the same striping effect, there is a color placement chart that shows the color and which row to repeat.
If you prefer a printable pdf that includes a checklist to help keep track of your rows and printable gift tags for gifting your infinity scarf, you can purchase through through my Etsy store or Ravelry (or add to your favorites).
If you’d like to purchase the kit from Mary Maxim that includes a printed pattern and the yarn, please visit: http://shrsl.com/42g6fand check out the “Related Kits”.
Please note that due to this being a digital download, all sales are final and no refunds will be given. Thank you for your support!
Here’s a pin to add to your Pinterest board
Materials needed:
Mary Maxim “Purely Soft” yarn (5.3 oz / 150 g; 147 yd / 135 m; Bulky / #5 weight; 70% Acrylic / 30% Polyamide) or any other #5 / Bulky weight yarn in colors:
1 locking stitch marker or scrap piece of yarn (optional)
Tapestry needle
Scissors
Measures: 8” x 62” / 20 cm x 157 cm circumference
Gauge: 15 sts x 18 rows = 13 st x 16 rows = 4” x 4” / 10 cm x 10 cm in stockinette stitch – Gauge isn’t critical in this project, but will affect yarn usage
Pattern Difficulty level: Easy
The terms are written using US terminology and I’ve created a video with time stamps to help you along.
If you prefer a printable pdf that includes a checklist to help keep track of your rows and printable gift tags for gifting your infinity scarf, you can purchase through my Etsy store or Ravelry (or add to your favorites or que).
If you’d like to purchase the kit from Mary Maxim that includes a printed pattern and the yarn, please visit: http://shrsl.com/42g6fand check out the “Related kits”
Please note that due to this being a digital download, all sales are final and no refunds will be given. Thank you for your support!
Stitches & Terms Used
(Pattern is written in US terms):
Bind off
BOR: Beginning of round
German twist cast on
K: Knit
Kfb: Knit front and back
P2tog: Purl 2 together
Rnd: Round
Notes:
This infinity scarf is easily adjustable to any size, as the stitch pattern works in multiples of 2 with a 4 row repeat; please beware that your yarn quantity will vary if you adapt the pattern to a larger or smaller size.
Use included color chart to determine color placement for stripes
When working the stripes, do not cut your yarn; instead, carry it up the side
Using color A and the German twist cast on method, cast on 194; join in the round being careful not to twist your stitches and use a stitch marker to indicate the BOR.
Set up Rnd: Knit
Round 1: Knit
Round 2: P2tog around (this will decrease the stitch count by half)
Round 3: Kfb in each stitch (this will increase the stitch count to the original cast on amount)
Round 4: Knit
Repeat rounds 1-4 using the chart to determine color placement for the stripes.
Bind off knit wise.
Weave in your ends and enjoy!
I do hope you’ve enjoyed this free knitting pattern! When you’re all done, please take pictures and tag me on social media. @handmadebystacyj or #handmadebystacyj so that I can see your beautiful infinity scarf 🙂
This Cobblestone Infinity Scarf free knitting pattern is copyright 2023 Handmade by Stacy J. Please do not duplicate or copy any portion of this pattern, as well as photographs. You are encouraged to share images of your final product and are allowed to sell final products; I just ask that if you sell your final product, please purchase the ad-free pdf, provide your own photographs and that you please credit Handmade by Stacy J as the designer. Thank you for your support!
When Iearned this specific cable stitch, not only did I fall in love with it, it spoke to me to the be the Low Tide Throw. The texture, the simplicity, all of it called to me to be a large throw that you could cuddle up in on a chilly evening. With the help of King Cole Yarns, that vision became a reality for this blanket and is now a free knitting pattern.
The name “Low Tide” came to me as I looked at the texture. It reminded me of a time when I was walking barefoot at Bunbeg Beach in County Donegal, Ireland during our 2019 family vacation. My oldest son and I had taken the day to leave our shoes in the car, do some fishing, explore the ship wreck, do some walking and barefoot hiking. Before we knew it, we had walked miles barefoot on the beach. The tide was low and the sand glimmered with the shallow water with the sunlight highlighting the textures that this stitch offers. It’s one of my favorite memories of that trip. Whenever I think of my “Happy place,” this memory is always what comes to the forefront of my mind.
About the yarn
The King Cole Big Value Super Chunky “Stormy” yarn called to me to be a big, cuddly, cabled blanket. It’s 100% Premium Acrylic with a beautiful marling effect. It’s nice & soft, and comes in an 88 yds / 81 m skein – I used just under 18 skeins for this project.
The Low Tide Throw uses size US 15 / 10 mm knitting needles and works over an 8 row repeat.
Disclosure: This post contains affiliate links. As an affiliate, when you purchase through my links, you allow the company to pay me a small commission without costing you a penny more, which allows me to continue making free content. The yarn for this pattern was provided to me from King Cole – I am a King Cole Brand Ambassador and this post is part of our ongoing collaboration. Thank you for your support!
About the blanket
The Low Tide Throw works over an 8 row repeat and the stitches are worked in increments of 12. The framing is worked as you work the blanket. That means that there isn’t any stitches to pick up or adding to the blanket once the body is completed.
The blanket is sized for a 50″ x 60″ and the terms are written using US terminology. I’ve created a video to help with your blanket.
If you prefer a printable pdf that includes a chart, a checklist to help keep track of your rows and printable gift tags for gifting your blanket, you can purchase through Ravelry (or add to your favorites or que) or you can purchase directly through my Etsy store.
Please note that due to this being a digital download, all sales are final and no refunds will be given. Thank you for your support!
Here’s a pin to add to your Pinterest board
Materials needed:
King Cole Big Value Super Chunky “Stormy” (100% Premium Acrylic; 3.5 oz / 100g; 88 yd / 81 m) – 1600 yds / 1463 m in color #4106 / Thunder (To find your local King Cole stockist click HERE or visit LoveCrafts to purchase online) or any other Super Chunky / #6 Acrylic yarn
Gauge: 9 sts x 12 rows = 4” x 4” / 10 cm x 10 cm in stockinette stitch – Gauge isn’t critical in this project, but will affect yarn usage
Pattern Difficulty level: Easy-ish
If you prefer a printable pdf that includes a chart, a checklist to help keep track of your rows and printable gift tags for gifting your blanket, you can purchase through Ravelry (or add to your favorites or que) or you can purchase directly through my Etsy store!
Please note that due to this being a digital download, all sales are final and no refunds will be given. Thank you for your support!
Stitches & Terms Used
(Pattern is written in US terms):
Bind off in pattern
K: Knit
K2tog: Knit two stitches together
Kfb: Knit into the front and back of the same stitch
Long Tail cast on
P: Purl
Pm: Place marker
Rep: Repeat
Rs: Right side
Sm: Stitch marker
St(s): Stitch(es)
Ws: Wrong side
X: Times (3x = 3 times)
Special Stitches Used:
C6B: Cable 6 Back – Slip next 3 sts onto cable needle and hold at back, knit next 3 stitches from left needle, then knit 3 stitches from cable needle
C6F: Cable 6 Front – Slip next 3 sts onto cable needle and hold at front, knit next 3 stitches from left needle, then knit 3 stitches from cable needle
Notes:
To avoid weaving in multiple yarn tails, I recommend working the Russian join as you join a new skein of yarn. To see a video tutorial of this technique, please visit: https://youtu.be/iU9rszpZzoQ
This stitch pattern is worked in multiples of 12. If you’d like to adjust the size of your blanket, be sure to adjust the “set up” row to increase evenly to 12 stitches. Then be sure to adjust the “decrease” row, as well.
WS): (P2, k2) across, ending with p2 and removing markers as you come to them
Work rows 1 – 2 of the beginning Ribbing section five times
Bind off in pattern, weave in the ends and enjoy!
When you’re all done, please take pictures and tag me on social media. @handmadebystacyj or #handmadebystacyj so that I can see your beautiful blanket 🙂
This Low Tide Throw free knitting pattern is copyright 2023 Handmade by Stacy J. Please do not duplicate or copy any portion of this pattern, as well as photographs. You are encouraged to share images of your final product and are allowed to sell final products; I just ask that if you sell your final product, please purchase the ad-free pdf, provide your own photographs and that you please credit Handmade by Stacy J as the designer. Thank you for your support!
The Cables & Lace Dishcloth came to be when I was learning some Japanese knitting stitches. This particular stitch really called out to me. This wonderful stitch requires some concentration, but is not nearly as difficult as it looks.
The yarn used is Cottonsoft DK from King Cole. It’s a lovely 100% cotton yarn that is a light #3 / DK weight yarn. It is wonderful to work with & you can make a couple dishcloths with only one skein!
I’d like to extend a huge “Thank you” to my wonderful testers that helped me to finalize this pattern. To see their beautiful dishcloths, check out their projects linked in Ravelry.
Disclosure: This post contains affiliate links. That means that I may receive compensation when you purchase through my links at no additional cost to you. I am a King Cole Brand Ambassador and this post is part of our ongoing collaboration.
Here’s a pin for your Pinterest board 🙂
Measures:
9” x 9” / 22.9 cm x 22.9 cm
Gauge:
20 sts x 24 rows of stockinette stitch = 4” / 10 cm (Gauge isn’t critical in this project but will affect yarn usage)
Difficulty Level: Intermediate
To see a video tutorial on how to knit the Cables & Lace Dishcloth, please click on the video link below.
If you prefer a printable pdf that includes a chart, a checklist to help keep track of your rows, printable gift tags and printable dishcloth wrappers for gifting your dishcloth, you can purchase through Ravelry (or add to your favorites or que) or you can purchase directly through my Etsy store.
Please note that due to this being a digital download, all sales are final and no refunds will be given. Thank you for your support!
Materials needed:
King Cole Cottonsoft DK (100% Cotton; 229 yds / 210 m; 100g; #3 / DK weight) – 64 yds in color “Pale Blue” (To find your local stockist, click HERE; or you can purchase online through LoveCrafts at this affiliate link)
Next row (In this row the cables will be worked in a different order):
K3, (P2, C4B, C4F, p2, C4F, C4B,) x 2, p2, k3
Finishing rows:
Knit for 3 rows
Bind off knit-wise
If you prefer a printable pdf that includes a chart, a checklist to help keep track of your rows, printable gift tags and printable dishcloth wrappers for gifting your dishcloth, you can purchase through Ravelry (or add to your favorites or que) or you can purchase directly through my Etsy store.
Please note that due to this being a digital download, all sales are final and no refunds will be given. Thank you for your support!
This pattern is copyright 2023 Handmade by Stacy J. Please do not duplicate or copy any portion of this pattern, as well as photographs. You are encouraged to share images of your final product and are allowed to sell final products; I just ask that if you sell your final product, please purchase the ad-free pdf, provide your own photographs and that you please credit Handmade by Stacy J as the designer. Thank you for your support!
The Linked in Lace Wrap was inspired by a stitch that I came across while perusing the web a couple of years ago. The stitch was in another language, so I had to do my best to translate it. Although I don’t speak Russian, I do speak knitting!
When I started swatching, I noticed how the pattern itself was absolutely gorgeous, and the stitch pattern also gave a lovely rippled edge. The more I played with the stitch, the more it called out to be a beautiful, lace wrap.
For many years I worked as a professional wedding photographer. As I continued working this wrap, I kept envisioning a bride or the bridesmaids, even one of the mothers, wearing this wrap. It’s elegant, delicate and lacy, yet adds warmth when you feel a breeze and need shoulder coverage.
About the yarn
The yarn used is Mulberry Soft from King Cole. It is, by far, the softest yarn I’ve ever worked with! It contains 70% baby alpaca and 30% mulberry silk. The hanks come In 50g and I used 6 hanks to make this wrap. When choosing your supplies, natural fibers will work really well to open up the lace and let the wrap bloom when it’s blocked.
I’d like to extend a huge “Thank you” to my wonderful testers that helped me to finalize this pattern. To see their pieces (which are gorgeous!), check out the projects in Ravelry.
Disclosure: This post contains affiliate links. As an affiliate, when you purchase through my links, you allow the company to pay me a small commission without costing you a penny more, which allows me to continue making free content. The yarn for this pattern was provided to me from King Cole – I am a King Cole Brand Ambassador and this post is part of our ongoing collaboration. Thank you for your support!
About the wrap
The wrap is sized for 84” x 15” / 216 cm x 38 cm blocked without fringe and the terms are written using US terminology. I’ve created a video to help with your wrap.
If you prefer and ad free pdf that includes a chart, checklist, larger font and gift tags for gifting, you can purchase off of Ravelry (or add it to your favorites or que), or you can purchase directly from my Etsy store.
Due to this being a digital download, no refunds will be issued. Thank you!
US Size 9 / 5.5 mm 24” / 61 cm circular knitting needle
2 Stitch markers (optional)
Scissors
Tapestry needle
Crochet hook or tool of choice to help with fringe
Measures: 84” x 15” / 216 cm x 38 cm blocked without fringe
Gauge: 2 pattern repeats = 5” / 12.7 cm
Pattern Difficulty level: Intermediate
If you prefer and ad free pdf that includes a chart, checklist, larger font and gift tags for gifting, you can purchase off of Ravelry (or add it to your favorites or que), or you can purchase directly from my Etsy store.
Due to this being a digital download, no refunds will be issued. Thank you!
Stitches & Terms Used
(Pattern is written in US terms):
German twist cast on
K: Knit
K2tog: Knit 2 stitches together
P: Purl
P2tog : Purl 2 together
Rep: Repeat
RS: Right side
Sl1, k2tog, psso : Slip next stitch purl-wise with yarn in back, knit 2 together, then pass slipped stitch over.
Sl wyif: Slip 1 stitch purl-wise with yarn in front
Ssk: Slip knit-wise, slip knit-wise, place 2 slipped sts back to left needle, knit 2 together through the back loop
Ssp: Slip knit-wise, slip knit-wise, place 2 slipped sts back to left needle, purl 2 together through the back loop
St (s): Stitch (es)
WS: Wrong side
Yo: Yarn over
X: Times (example: 2x = 2 times)
Notes:
To keep track of pattern repeats easily, insert a stitch marker in between each repeat on row 1 and then slip markers as you come to them with each subsequent row
To avoid weaving in ends, I highly recommend using the Russian Join technique to join a new hank of yarn
The chart below shows only the lace section of the wrap
Blocking is extremely important to open up the lace work of this wrap. It will grow considerably when you block.
This free knitting pattern is copyright 2022 Handmade by Stacy J. Please do not duplicate or copy any portion of this pattern, as well as photographs. You are encouraged to share images of your final product and are allowed to sell final products; I just ask that if you sell your final product, please purchase the ad-free pdf, provide your own photographs and that you please credit Handmade by Stacy J as the designer. Thank you for your support!
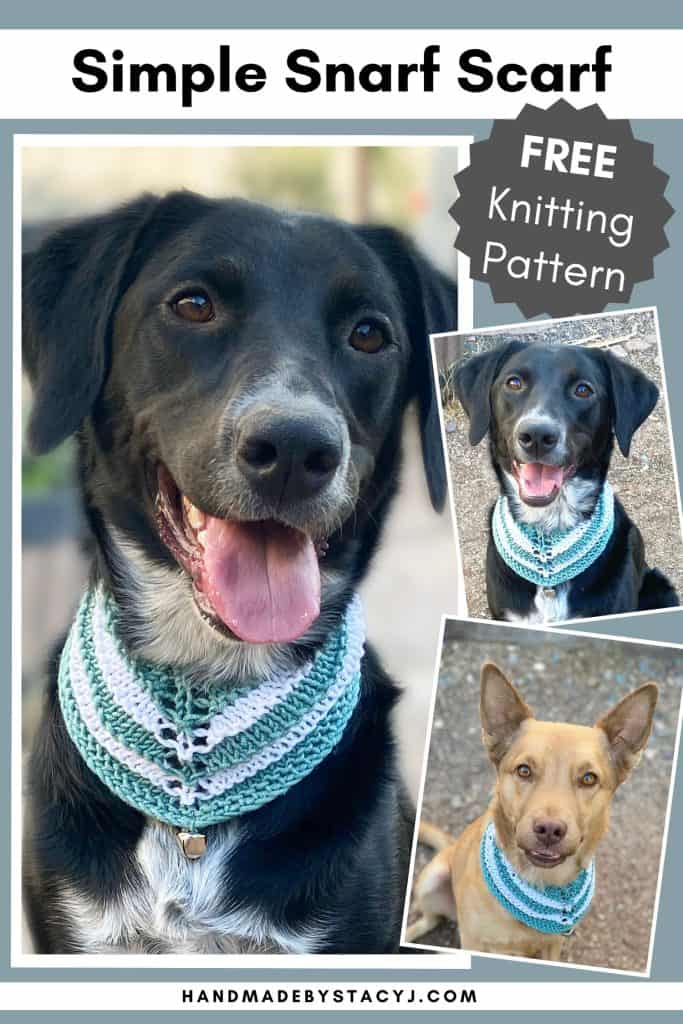
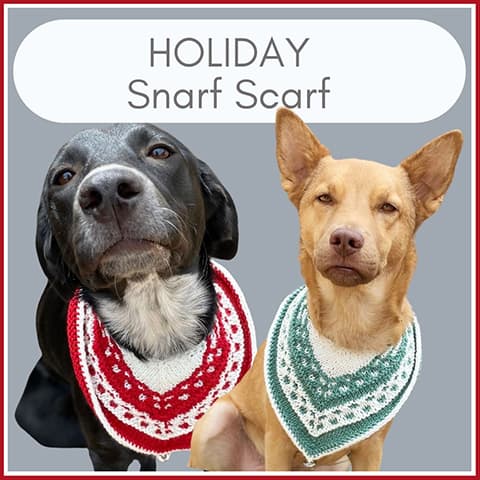
Today I am so excited to share with you the Simple Snarf Scarf – FREE knitting pattern! This pattern is an easier to knit version of the Holiday Snarf Scarf that I designed in 2021.
The Simple Snarf Scarf is a dog scarf that was inspired by our latest addition to our family: Moxxi! We adopted her in 2021 and she makes the funniest sound when she gets a treat. It sounds like a big “SNARF!” Since we hadn’t had a little girl dog for ages, we decided that she needed a little wardrobe – hence, the Snarf Scarf was born!
For this photo shoot, she actually chose to cooperate (a little!). Since she’s still a pup, her tendency is to eat the scarf, rather than model it – I was able to bribe her with some treats, making it possible to get a couple pictures of her. And, her big brother Bucket is the model for one of the pictures. 🙂
Here’s a pin for you Pinterest board 🙂
Disclosure: This post contains affiliate links. As an affiliate, when you purchase through my links, you allow the company to pay me a small commission without costing you a penny more, which allows me to continue making free content. The yarn for this pattern was provided to me from King Cole – I am a King Cole Brand Ambassador and this post is part of our ongoing collaboration. Thank you for your support!
About the Simple Snarf Scarf
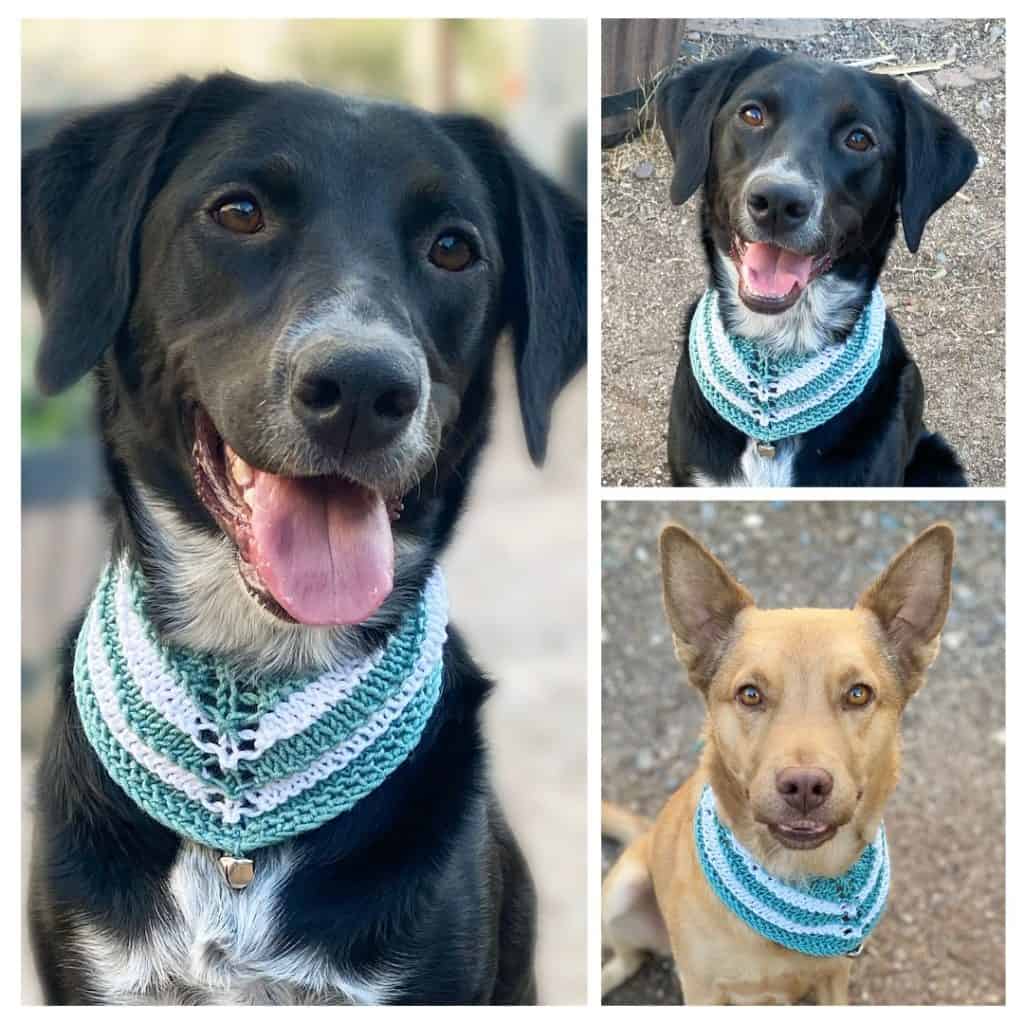
The Snarf Scarf is triangular in shape and uses very little yarn; therefore it would be a great stash diving project. It uses DK weight yarn with only one color at a time, works up in just a couple hours and is completely customizable to the size of your critter. Bucket and Moxxi are both medium size dogs and the scarf fits them as the pattern is written. However, if you have a very large dog, you just continue repeating until it’s the right size; or, if you have a smaller critter, you can stop the repeats when the size is right.
If you prefer an ad free pdf that includes a larger font and gift tags for gifting, you can click here to purchase off of Ravelryor to add it to your favorites or que – or, if you prefer you purchase through my Etsy store.
About the yarn
The yarn used is from King Cole’s “Cherished Baby Double Knitting” yarn. It’s a dream to work with, is super soft and has approximately 262 yards in each skein. So, you can make lots of snarf scarves with just a couple skeins!
This pattern is an EASY project. Therefore, a beginner could try this out, too. This pattern has been tested – thank you to all my lovely testers!
If you prefer an ad free pdf that includes a larger font and gift tags for gifting, you can click here to purchase off of Ravelryor to add it to your favorites or que – or, if you prefer you can purchase through my Etsy store.
Materials:
King Cole Cherished baby double knitting (100% Low-Pilling Acrylic; 262 yds / 240 m; 100g; #3 / dk weight) yarn in colors: Color A (Laurel): 24 yds / 22 m and Color B (White): 36 yds / 33 m (To find your local store that stocks King Cole yarns, here is the stockist finder link; Or, if you need to shop online, here is LoveCrafts link)
US 7 / 4.5 mm 24” / 60 cm circular knitting needle
1 Stitch marker
1 0.7″ / 18 mm bell (or tassel, if that’s your preference)
Tapestry needle
Scissors
Measuring tape
Measures:
25” x 6” / 63.5 cm x 15.25 cm (To fit critter with 16” – 18” / 40.6 – 45.7 cm neck)
Customizable to fit any critter
Difficulty Level:
Easy
Gauge:
16 sts x 20 rows = 4” / 10 cm in stockinette stitch
Stitches & Abbreviations Used
(Pattern is written in US terms):
C/O: Cast on
K: Knit
K2tog: Knit two stitches together
P: Purl
Pm: Place marker
Rep: Repeat
RS: Right side
Sm: Slip marker
St (s): Stitch (es)
Stretchy bind-off method: K1, k2tog, return those 2 sts back to left needle, repeat until all stitches are bound off
WS: Wrong side
X: Times (example: 2x = 2 times)
Yo: Yarn over
Cable c/o: Cable cast on (Insert right hand needle tip between the two stitches on the left hand needle from front to back, wrap yarn around needle and draw through, leaving the stitch on the right hand needle, draw the yarn out, making a long loop, then place onto the left hand needle and slightly tighten the loop on the needle; repeat these steps for the desired amount of stitches)
Notes:
Do not cut yarn until directed to do so; Instead, carry it up the side of your project
This stitch pattern works up quickly, as there is a 6 stitch increase on the right side of the pattern with every right side row (except for the finishing rows)
Cable cast on method is used for creating the ties of the snarf scarf; But, feel free to use any other cast on method you prefer
To view the tutorial on how to knit the Simple Snarf Scarf, please click on the video link directly above or visit my YouTube channel at: https://youtu.be/PL667cnNhG0
Directions for Simple Snarf Scarf:
To determine the width of the scarf, simply measure your critter’s neck circumference and subtract 2” / 5 cm – that will be the approximate width that you’ll work up to before creating the tie straps
7: (K1, yo) 2x, k to marker, yo, sm, k1, yo, k to last 2 sts, (yo, k1) 2x (21 sts)
8: Knit across (do not cut yarn)
Color B:
9 (RS): As row 7
10 (WS): As row 2
11: As row 7
12: As row 8 (do not cut yarn)
Color A:
13 (RS): As row 7
14 (WS): As row 2
15: As row 7
16: As row 8 (do not cut yarn)
Continue repeating rows 9-16 to desired width of snarf scarf ending with completion of row 11 or 15; cut the yarn that you are no longer working with.
Straps
Using cable cast on method, c/o 20 sts (this creates approximately 4” / 10cm for tying on one side; you may add or subtract in increments of 5 (5 sts = 1” / 2.5 cm) to shorten or lengthen your tie)
Next row (WS): K20 (or however many sts you chose to cast on), k2tog 2x, knit across to last 4 sts removing marker as you come to it, k2tog 2x
Next row (RS): Using cable cast on, c/o 20 sts, knit to the gap that shows where the cast on started, k2tog to close the gap, k across
Bind off on WS using stretchy bind off method
Weave in your ends, secure a bell or tassel to the pointy tip of the scarf.
Give to your critter, take pictures and tag me at #handmadebystacyj and @handmadebystacyj
If you’d like another project, check out the original Holiday Snarf Scarf
Wishing you a happy, snarfy kind of day with lots of yarn (and snacks)!
This pattern is copyright 2022 Handmade by Stacy J. Please do not duplicate or copy any portion of this pattern, as well as photographs. You are encouraged to share images of your final product and are allowed to sell final products; If you sell your final product, I just ask that you please purchase the ad-free pdf and credit Handmade by Stacy J as the designer. Thank you!
The Tiny Gems Baby Blanket is a free knitting pattern that was inspired by a dishcloth that I designed in 2020. It uses the Seersucker or Padded Diamonds stitch that adds a beautiful texture. It’s framed on the inside with a stockinette panel and the outside is worked with garter stitch. It’s all worked in one piece, so the borders are worked at the same time as the body of the blanket.
If you’d like to check out the free knitting pattern for the dishcloth that inspired this blanket, here’s the link.
About the yarn
As I was picking out the colors, the King Cole “Little Treasures Double Knitting” yarn in the color “Jem” really called out to me. It has hints of greens, yellows, cream and a touch of pinks / purples. It’s a fairly neutral color for babies and is oh-so-soft. It works up like a dream and there were very few knots. I used just under 4 skeins for this project.
The blanket uses size US 8 / 5 mm knitting needles and works over an 8 row repeat.
Disclosure: The Tiny Gems Blanket post contains affiliate links. As an affiliate, when you purchase through my links, you allow the company to pay me a small commission without costing you a penny more, which allows me to continue making free content. The yarn for this pattern was provided to me from King Cole – I am a King Cole Brand Ambassador and this post is part of our ongoing collaboration. Thank you for your support!
About the blanket
The Tiny Gems Baby Blanket works over an 8 row repeat and the stitches are worked in increments of 4. Therefore, you can adjust the size as you like. One of my testers even turned the blanket into a doll blanket for one of her granddaughters! The framing is worked as you work the blanket, so there’s no picking up stitches or adding to the blanket once the body is completed.
The blanket is sized for a 42″ x 42″ and the terms are written using US terminology. I’ve created a video to help with your blanket
If you prefer and ad free pdf that includes a chart, checklist, larger font and gift tags for gifting your blanket, you can click here to purchase off of Ravelry (or add it to your favorites or que), or you can purchase through my Etsy store.
Here’s a pin to add to your Pinterest board 🙂
Materials needed:
King Cole Little Treasures Double Knitting (60% Anti-Pilling Acrylic, 40% Polyamide; 3.5 oz / 100g; 349 yd / 320 m) – 1200 yds / 1097 m in color #4780 / Jem (To find your local King Cole stockist click HERE or visit LoveCrafts to purchase online)
Gauge: 16 sts x 24 rows = 4” x 4” / 10 cm x 10 cm in stockinette stitch
Pattern Difficulty level: Easy
If you prefer and ad free pdf that includes a chart, checklist, larger font and gift tags for gifting your blanket, you can click here to purchase off of Ravelry (or add it to your favorites or que), or you can purchase through my Etsy store.
Stitches & Terms Used
(Pattern is written in US terms):
Bind off
Garter Stitch: Knit each row
K: Knit
Long Tail cast on
P: Purl
Pm: Place marker
Rep: Repeat
Rm: Remove marker
Rs: Right side
Sm: Stitch marker
St (s): Stitch (es)
WS: Wrong side
Notes:
To make blanket larger or smaller, add or subtract in increments of 4
Some of my testers needed to do 3 more repeats of the body to meet the measurement
Work garter st for 26 rows and remove markers as you come to them.
Bind off loosely, knit wise
Weave in any ends, then block and enjoy.
When you’re all done, please take pictures and tag me on social media @handmadebystacyj or #handmadebystacyj so that I can see your beautiful blanket 🙂
This free knitting pattern is copyright 2022 Handmade by Stacy J. Please do not duplicate or copy any portion of this pattern, as well as photographs. You are encouraged to share images of your final product and are allowed to sell final products; I just ask that if you sell your final product, please purchase the ad-free pdf, provide your own photographs and that you please credit Handmade by Stacy J as the designer. Thank you for your support!