The Tiled Infinity Scarf is a beautiful, squishy knit infinity scarf pattern that has a great texture with an i-cord edge. With only knits and purls over an 8 – row repeat, this is an easy project to take with you or for social knitting. The Tiled Infinity Scarf is worked flat, then seamed when you finish the pattern, so you can adjust the length to your liking. To make the scarf wider or thinner, add or subtract the cast on stitches in increments of 6.
This pattern is an Easy project and has been tested – thank you to all my lovely testers!
Disclosure: The yarn for this project was provided to me by King Cole. I am a King Cole Brand Ambassador and this post is part of our ongoing collaboration. Thank you for your support!
The “No Purls About It” is the perfect project to take with you as you travel. It’s worked over a 4-row repeat and only uses knits (no purls!) and is reversible. The extra wraps of yarn during the knits on one of the rows offer a beautiful and simple lace design.
“No purls about it” uses only one hank of yarn and you can choose to work until you’re almost out of yarn or until you reach your desired length. This pattern is easily adaptable to be wider or more narrow simply by adding or subtracting in increments of six.
The yarn that I chose to use is Knit Picks “Muse” fingering weight yarn. You can use any fingering weight yarn that you like. However, I chose this specific yarn because it’s soft, not slippery and has a tiny bit of “stickiness” to it. The yarn rarely split and the color is tonal.
The “Muse” yarn offers pretty generous yardage, therefore allowing a nice, long scarf using only one hank of yarn.
This pattern is an Easy project and has been tested – thank you to all my lovely testers!
The Cobblestone infinity scarf was inspired as I designed the crocheted “Birthday Sorbet” baby blanket for Mary Maxim. When they shipped me the yarn, they surprised me with a couple of skeins of the Mary Maxim “Purely Soft” yarn and it just screamed to me to be an infinity scarf…so, the Cobblestone Infinity Scarf was born!
When I shared the design with Mary Maxim, they liked it so much that they created a kit from it! If you’d like to check out the kit, please visit: https://shrsl.com/3zdp9and check out the “Related Kits” section.
About the yarn
The Mary Maxim “Purely Soft” yarn has a squishiness that is simply uncomparable to any other yarn I’ve ever worked with. Have you ever walked down the yarn aisle and just couldn’t stop squishing one particular yarn?? Yep…this is like that! It’s so soft and light!
Each skein has approximately 147 yards / 135 metres and is 70% Premium Acrylic & 30% Polyamide. The skein is 5.3 oz / 150 grams and is a #5 / Bulky weight yarn.
The Cobblestone Infinity Scarf uses size US 10.5 / 6.5 mm knitting needles and uses 2 skeins of the Purely Soft yarn.
Disclosure: This post contains affiliate links. As an affiliate, when you purchase through my links, you allow the company to pay me a small commission without costing you a penny more, which allows me to continue making free content. Thank you for your support!
About the Cobblestone Infinity Scarf
The Cobblestone Infinity Scarf is a quick and easy project to work up as a last-minute gift or as a little something to keep yourself warm that uses bulky yarn and large knitting needles, so that it comes together quickly. The Mary Maxim “Purely Soft” yarn used for this scarf is really unique and, I think, is what makes this scarf stand out. It’s very soft and has a gorgeous halo that really adds amazing texture. This pattern is easily adjusted to make larger or smaller, as the stitch pattern is worked in multiples of 2 with a 4 row repeat. To get the same striping effect, there is a color placement chart that shows the color and which row to repeat.
If you prefer a printable pdf that includes a checklist to help keep track of your rows and printable gift tags for gifting your infinity scarf, you can purchase through through my Etsy store or Ravelry (or add to your favorites).
If you’d like to purchase the kit from Mary Maxim that includes a printed pattern and the yarn, please visit: http://shrsl.com/42g6fand check out the “Related Kits”.
Please note that due to this being a digital download, all sales are final and no refunds will be given. Thank you for your support!
Here’s a pin to add to your Pinterest board
Materials needed:
Mary Maxim “Purely Soft” yarn (5.3 oz / 150 g; 147 yd / 135 m; Bulky / #5 weight; 70% Acrylic / 30% Polyamide) or any other #5 / Bulky weight yarn in colors:
1 locking stitch marker or scrap piece of yarn (optional)
Tapestry needle
Scissors
Measures: 8” x 62” / 20 cm x 157 cm circumference
Gauge: 15 sts x 18 rows = 13 st x 16 rows = 4” x 4” / 10 cm x 10 cm in stockinette stitch – Gauge isn’t critical in this project, but will affect yarn usage
Pattern Difficulty level: Easy
The terms are written using US terminology and I’ve created a video with time stamps to help you along.
If you prefer a printable pdf that includes a checklist to help keep track of your rows and printable gift tags for gifting your infinity scarf, you can purchase through my Etsy store or Ravelry (or add to your favorites or que).
If you’d like to purchase the kit from Mary Maxim that includes a printed pattern and the yarn, please visit: http://shrsl.com/42g6fand check out the “Related kits”
Please note that due to this being a digital download, all sales are final and no refunds will be given. Thank you for your support!
Stitches & Terms Used
(Pattern is written in US terms):
Bind off
BOR: Beginning of round
German twist cast on
K: Knit
Kfb: Knit front and back
P2tog: Purl 2 together
Rnd: Round
Notes:
This infinity scarf is easily adjustable to any size, as the stitch pattern works in multiples of 2 with a 4 row repeat; please beware that your yarn quantity will vary if you adapt the pattern to a larger or smaller size.
Use included color chart to determine color placement for stripes
When working the stripes, do not cut your yarn; instead, carry it up the side
Using color A and the German twist cast on method, cast on 194; join in the round being careful not to twist your stitches and use a stitch marker to indicate the BOR.
Set up Rnd: Knit
Round 1: Knit
Round 2: P2tog around (this will decrease the stitch count by half)
Round 3: Kfb in each stitch (this will increase the stitch count to the original cast on amount)
Round 4: Knit
Repeat rounds 1-4 using the chart to determine color placement for the stripes.
Bind off knit wise.
Weave in your ends and enjoy!
I do hope you’ve enjoyed this free knitting pattern! When you’re all done, please take pictures and tag me on social media. @handmadebystacyj or #handmadebystacyj so that I can see your beautiful infinity scarf 🙂
This Cobblestone Infinity Scarf free knitting pattern is copyright 2023 Handmade by Stacy J. Please do not duplicate or copy any portion of this pattern, as well as photographs. You are encouraged to share images of your final product and are allowed to sell final products; I just ask that if you sell your final product, please purchase the ad-free pdf, provide your own photographs and that you please credit Handmade by Stacy J as the designer. Thank you for your support!
The Linked in Lace Wrap was inspired by a stitch that I came across while perusing the web a couple of years ago. The stitch was in another language, so I had to do my best to translate it. Although I don’t speak Russian, I do speak knitting!
When I started swatching, I noticed how the pattern itself was absolutely gorgeous, and the stitch pattern also gave a lovely rippled edge. The more I played with the stitch, the more it called out to be a beautiful, lace wrap.
For many years I worked as a professional wedding photographer. As I continued working this wrap, I kept envisioning a bride or the bridesmaids, even one of the mothers, wearing this wrap. It’s elegant, delicate and lacy, yet adds warmth when you feel a breeze and need shoulder coverage.
About the yarn
The yarn used is Mulberry Soft from King Cole. It is, by far, the softest yarn I’ve ever worked with! It contains 70% baby alpaca and 30% mulberry silk. The hanks come In 50g and I used 6 hanks to make this wrap. When choosing your supplies, natural fibers will work really well to open up the lace and let the wrap bloom when it’s blocked.
I’d like to extend a huge “Thank you” to my wonderful testers that helped me to finalize this pattern. To see their pieces (which are gorgeous!), check out the projects in Ravelry.
Disclosure: This post contains affiliate links. As an affiliate, when you purchase through my links, you allow the company to pay me a small commission without costing you a penny more, which allows me to continue making free content. The yarn for this pattern was provided to me from King Cole – I am a King Cole Brand Ambassador and this post is part of our ongoing collaboration. Thank you for your support!
About the wrap
The wrap is sized for 84” x 15” / 216 cm x 38 cm blocked without fringe and the terms are written using US terminology. I’ve created a video to help with your wrap.
If you prefer and ad free pdf that includes a chart, checklist, larger font and gift tags for gifting, you can purchase off of Ravelry (or add it to your favorites or que), or you can purchase directly from my Etsy store.
Due to this being a digital download, no refunds will be issued. Thank you!
US Size 9 / 5.5 mm 24” / 61 cm circular knitting needle
2 Stitch markers (optional)
Scissors
Tapestry needle
Crochet hook or tool of choice to help with fringe
Measures: 84” x 15” / 216 cm x 38 cm blocked without fringe
Gauge: 2 pattern repeats = 5” / 12.7 cm
Pattern Difficulty level: Intermediate
If you prefer and ad free pdf that includes a chart, checklist, larger font and gift tags for gifting, you can purchase off of Ravelry (or add it to your favorites or que), or you can purchase directly from my Etsy store.
Due to this being a digital download, no refunds will be issued. Thank you!
Stitches & Terms Used
(Pattern is written in US terms):
German twist cast on
K: Knit
K2tog: Knit 2 stitches together
P: Purl
P2tog : Purl 2 together
Rep: Repeat
RS: Right side
Sl1, k2tog, psso : Slip next stitch purl-wise with yarn in back, knit 2 together, then pass slipped stitch over.
Sl wyif: Slip 1 stitch purl-wise with yarn in front
Ssk: Slip knit-wise, slip knit-wise, place 2 slipped sts back to left needle, knit 2 together through the back loop
Ssp: Slip knit-wise, slip knit-wise, place 2 slipped sts back to left needle, purl 2 together through the back loop
St (s): Stitch (es)
WS: Wrong side
Yo: Yarn over
X: Times (example: 2x = 2 times)
Notes:
To keep track of pattern repeats easily, insert a stitch marker in between each repeat on row 1 and then slip markers as you come to them with each subsequent row
To avoid weaving in ends, I highly recommend using the Russian Join technique to join a new hank of yarn
The chart below shows only the lace section of the wrap
Blocking is extremely important to open up the lace work of this wrap. It will grow considerably when you block.
This free knitting pattern is copyright 2022 Handmade by Stacy J. Please do not duplicate or copy any portion of this pattern, as well as photographs. You are encouraged to share images of your final product and are allowed to sell final products; I just ask that if you sell your final product, please purchase the ad-free pdf, provide your own photographs and that you please credit Handmade by Stacy J as the designer. Thank you for your support!
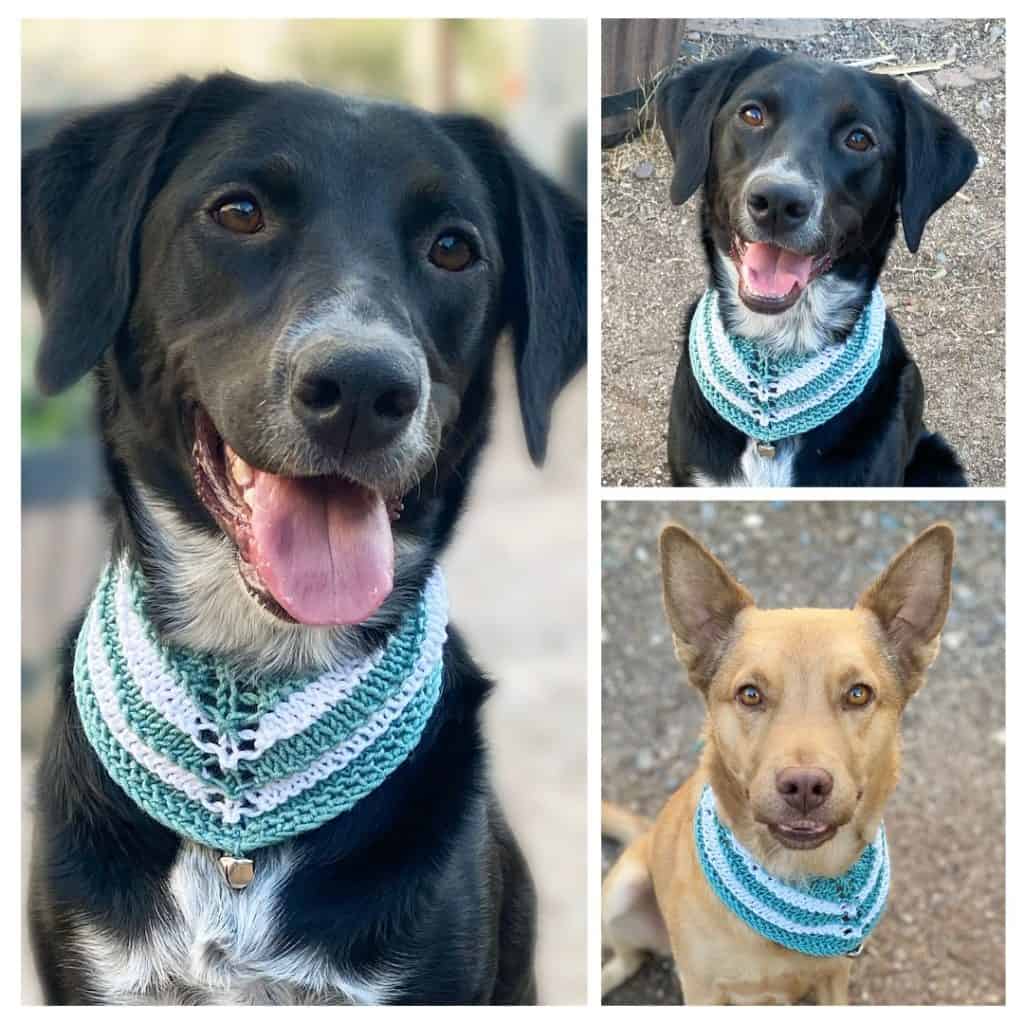
Today I am so excited to share with you the Holiday Snarf Scarf! The Holiday Snarf Scarf? What’s that, you might be asking yourself…
The Holiday Snarf Scarf is a dog scarf that was inspired by our latest addition to our family: Moxxi! She makes the funniest sound when she gets a treat and it sounds like a big “SNARF!” Since we hadn’t had a little girl dog for ages, I decided that she needed a little wardrobe – hence, the Snarf Scarf was born!
Disclosure: This post contains affiliate links. As an affiliate, when you purchase through my links, you allow the company to pay me a small commission without costing you a penny more, which allows me to continue making free content. Thank you for your support!
About the Holiday Snarf Scarf
The Snarf Scarf is triangular in shape and uses very little yarn, so it would be a great stash diving project. It uses DK weight yarn with only one color at a time, works up in just a couple hours and is completely customizable to the size of your critter. Bucket and Moxxi are both medium size dogs and the scarf fits them as the pattern is written. However, if you have a very large dog, there is a section where you would just repeat until it’s the right size and there’s a place marked where to stop if you have a smaller critter.
The pattern calls for 2 sets of size 1 snaps and an 18 mm bell. The snaps work as a safety feature making this scarf easy to break away from your critter in case their scarf gets caught on anything. (Just please always supervise your fur babies.)
If you prefer a printable pdf of the Holiday Snarf Scarf that includes a chart, a checklist to help keep track of your rows and printable gift tags for gifting your scarf, you can purchase through Ravelry (or add to your favorites or que) or you can purchase through my Etsy store.
This pattern is written for an intermediate knitter. However, an ambitious beginner could try this out, too.
This pattern has been tested and tech edited – thank you to all my lovely testers and to Kathie, my rock star tech editor!
22″ x 7″ / 56 cm x 18 cm – Fits neck circumference of 14″ to 21″ / 35.5 cm to 53.5 cm
Difficulty Level:
Intermediate
Gauge:
20 sts x 24 rows in Stockinette Stitch = 4″ or 10 cm
Stitches & Terms Used
(Pattern is written in US terms):
CC: Contrast color.
K: Knit
Kfb: Knit front & back
K2tog: Knit two stitches together
MC: Main color
M1l (Make 1 knitwise left leaning): With left needle, pick up the horizontal strand between stitches from front to back, then knit into this new stitch through the back loop (1 stitch increased)
M1r (Make 1 knitwise right leaning): With left needle, pick up the horizontal strand between stitches from back to front, then knit into this stitch (1 stitch increased)
P: Purl
RS: Right side
Sl: Slip 1 stitch purlwise with yarn at back
Sl wyif: Slip 1 stitch purlwise with yarn in front
SM: Stitch marker
St(s): Stitch(es)
Stretchy bind-off method: K1, k2tog, return those 2 sts back to left needle, then repeat until all stitches are bound off
WS: Wrong Side
If you prefer a printable pdf of the Holiday Snarf Scarf that includes a chart, a checklist to help keep track of your rows and printable gift tags for gifting your scarf, you can purchase through Ravelry (or add to your favorites or que) or you can purchase through my Etsy store.
Notes:
Do not cut yarn until instructed to do so; instead, carry up side of work.
Be sure to slip stitch marker as you come to it – it will mark the center of the snarf scarf.
Pattern is easily adaptable to any size critter. For a smaller critter, simply work to the circumference size of your critter’s neck ending on a Stockinette Transition section, then move to the finishing section. For a larger critter, repeat the final stockinette section until you obtain the neck circumference needed, then move to the finishing section.
When working M1L or M1R in center of scarf, be sure to use the strands of yarn worked on previous row.
If you would like to check out the Simple Snarf Scarf, please click on the image above.
21: Using CC, (k1, m1r) × 2, k to m, m1r, k1, m1l, k to last 2 sts, (m1l, k1) × 2. (63 sts)
22: Using CC, k2, p to last 2 sts, k2. (If you are making this snarf scarf for a smaller critter, this is a good time to measure and see if it will fit at this point. If it does fit, then move to the “Finishing” section.)
33 – 36: Using CC, repeat Stockinette Transition1 rows 21 & 22 two times (105 sts) (If you are making this snarf scarf for a larger critter, repeat this section as many times as needed to reach desired circumference, then proceed to the “Finishing” section).
Finishing
37: Using CC, cast on 10 using knitted cast on method, k10, k2tog, (k1, m1r) × 2, k to m, m1r, k1, m1l, knit to last 2 sts, (m1l, k1) × 2, cast on 10 using knitted cast on method. (130 sts) – This adds approximately 2.75″ / 7 cm to each side.
38: Using CC, k 10, k2tog, k across. Cut CC.
39: Using MC, bind off using stretchy bind-off method or your bind-off method of choice.
Place scarf around critter to determine snap placement, then sew on snaps.
Using yarn and tapestry needle, sew bell to bottom center point of snarf scarf (you may want to block your item prior to this step).
Give to your critter, take pictures and tag me at #handmadebystacyj and @handmadebystacyj
Wishing you a happy, snarfy kind of day with lots of yarn (and snacks)!
This pattern is copyright 2021 Handmade by Stacy J. Please do not duplicate or copy any portion of this pattern, as well as photographs. You are encouraged to share images of your final product and are allowed to sell final products; If you sell your final product, I just ask that you please purchase the ad-free pdf and credit Handmade by Stacy J as the designer. Thank you!
The Light & Lacy Cascading Waves Cowlette is perfect for when the weather is turning a little warmer, but you’d still like a little something to help take the chill off. It’s light, it’s lacy, it’s beautiful, AND it only uses one hank of yarn! You can adapt it to be a long infinity scarf, however the yarn quantities will increase.
It’s very simple to adapt for a larger size, but be aware that your yarn quantity will vary. I do recommend the yarn that I used, or something similar in a heavier fingering weight. I did another sample in a light fingering weight and it came out a couple inches smaller. However, casting on another 24 stitches should do the trick to make the circumference closer to the pattern size.
There is a video that I created on YouTube that is specific to this stitch technique for you (you can click on the box below or click here to see it on YouTube). The German Twist Cast On works really well for this stitch, however you’re welcome to use preferred method; I just recommend that it’s a little stretchy.
Disclosure: This post contains affiliate links. As an affiliate, when you purchase through my links, you allow the company to pay me a small commission without costing you a penny more, which allows me to continue making free content. Thank you for your support!
If you prefer a printable pdf that includes a chart and a checklist to help keep track of your rounds, you can purchase through Ravelry (or add to your favorites or que) or you can purchase through LoveCrafts.
8 stitch markers (Make sure that one is different so that you can use it to mark the beginning of the round)
Tapestry needle & Scissors
Here’s a pin for your Pinterest board 🙂
Notes:
The recommended yarn is a slightly heavier fingering weight (almost like a sport weight); if you choose to use lighter yarn, you may want to cast on an additional 24 stitches for one more pattern repeat to make it closer to the indicated circumference.
To adjust the circumference width, add or subtract in multiples of 24 sts; to adjust height, add or subtract rows in increments of 12.
Place a stitch marker between each repeat of 24 sts on Round 1 to allow for easier tracking of repeats between the *.
Click here for the video tutorial for the Cascading Waves Knit Stitch in the Round, scroll to the top portion of this post or visit: https://youtu.be/xcXDPf0umLU
Stitches Used:
K: Knit
P: Purl
K2tog: Knit 2 stitches together
Psso: Pass slipped stitch over
Sl1, k2tog, psso: Slip next stitch, knit 2 together, then pass slipped stitch over.
Sl wyif: Slip 1 stitch purlwise with yarn in front
Ssk: Slip, slip, knit
Yo: Yarn over
If you prefer a printable pdf that includes a chart and a checklist to help keep track of your rounds, you can purchase through Ravelry (or add to your favorites or que) or you can purchase through LoveCrafts.
Directions for the Light & Lacy Cascading Waves Cowlette
Set up:
Cast on 192 using the German Twist Cast on; join in the round taking care not to twist your stitches & place a unique or different colored stitch marker to designate beginning of the round
The Valentine’s Knit Cowl was my first design as I was learning how to knit in the round. It’s a very simple cowl to make and only uses one skein of yarn. It works up very quickly and the hearts really jump out.
At the bottom of this post you will find a chart and a pdf.
Disclosure: This post contains affiliate links. As an affiliate, when you purchase through my links, you allow the company to pay me a small commission without costing you a penny more, which allows me to continue making free content. Thank you for your support!
Difficulty level:
Easy / Beginner
Measures:
30” x 13.5”
Gauge:
20 sts across x 25 rows in stockinette stitch; Hearts measure 3.5” x 3”
Can be made larger or smaller by adding or subtracting in increments of 27. However, adjusting will throw off your purl accent row stitch placements and will need to be adjusted.
Stitch count is the same throughout project – 135 sts
Stitch marker indicating where the join is remains in the project throughout; do not remove this marker until binding off.
Directions for the Valentine’s Knit Cowl:
Cast on 135; Join in the round careful not to twist stitches. Use stitch marker to indicate beginning of the round.
When you choose to make your cowl, please tag me on your makes @handmadebystacyj and #handmadebystacyj – I’d love to see it!
This pattern is not to be sold or copied in any way. The images, pattern and charts are copyrighted by Handmade by Stacy J and may not be duplicated. You are welcome to sell your makes, however I ask that you credit me as the designer. Also, you are responsible for providing your own photographs. Thank you!
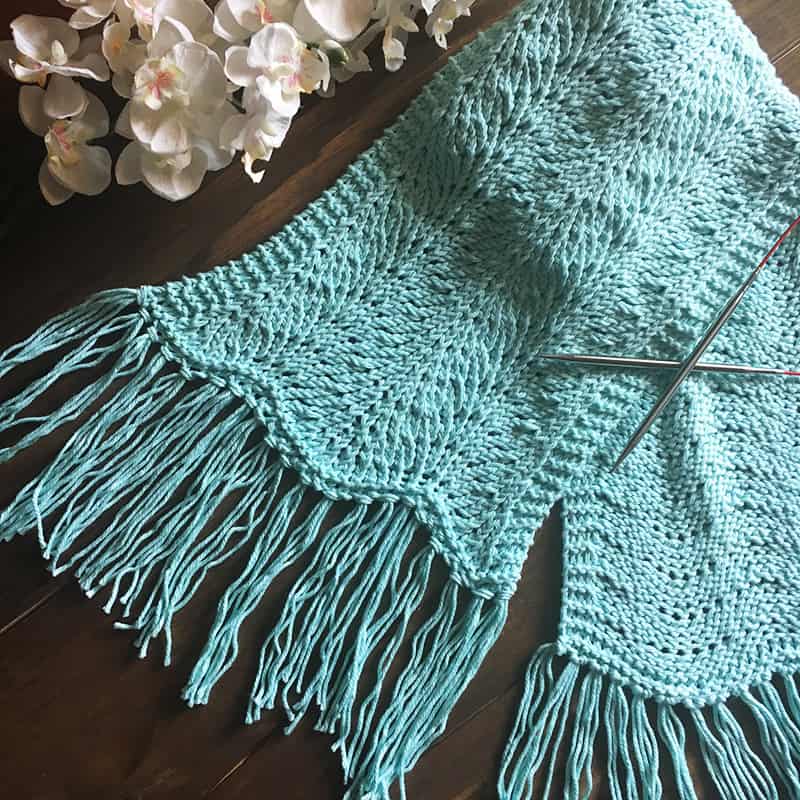
The Coastal Breeze Knitted Scarf was inspired from the Old Shale stitch. When I saw this stitch for the first time, it immediately spoke to me and I knew right away that this had to be a scarf that I could wear to the beach. I didn’t want anything too long or too heavy, so the Coastal Breeze Knitted Scarf was born. I chose to use cotton yarn because I love the weight and the drape, as well as how the stitches open up after blocking.
This is a beginning friendly pattern that only looks complicated. It has a 4 row repeat and can be adjusted to be made thicker by adding in increments of 18 stitches. To help you keep track of rows more easily, I’m attaching a checklist guide for you (I use these for every pattern that I work on). Enjoy!!
Disclosure: This post contains affiliate links. As an affiliate, when you purchase through my links, you allow the company to pay me a small commission without costing you a penny more, which allows me to continue making free content. Thank you for your support!
This pattern is copyright 2019 Handmade by Stacy J. Please do not duplicate or copy any portion of this pattern, as well as photographs. You are encouraged to share images of your final product and are allowed to sell final products; If you sell your final product, I just ask that you please purchase the ad-free pdf and credit Handmade by Stacy J as the designer. Thank you!