The Fudge Swirl Cable might be exactly what you’re looking for If you’ve ever wanted to learn how to knit cables. It looks complex, but it’s actually a fairly simple cable stitch. It uses ribbing to create an interesting fabric and is worked over a panel of 18 stitches. The panel is worked over a background of reverse stockinette and uses a 8 Stitch Left Purl Cross stitch. The Fudge Swirl Cable creates a dense fabric that would be a lovely stitch pattern to use for a sweater, hat, scarf or a blanket.
To help you along with learning this stitch, there is a chart below for reference, a video link is also at the top of this post to help you with the 8 stitch Left Purl Cross (8-st LPC).
Disclosure: This post contains affiliate links for companies that I am proudly affiliated with. If you choose to shop with them by clicking on my link, you allow the company to pay me a small commission. This doesn’t cost you any more and allows me to continue providing free content. Thank you for your support!
Here’s a pin for your Pinterest board 🙂
Materials needed
(listed below is what I used to create the sample of the stitch pattern)
Paintbox Yarns Simply DK yarn in color Light Grey (#104), approximately 45 yds
8-st LPC: 8 Stitch Left Purl Cross – slip next 3 sts from left hand needle to cable needle, hold to front, k3 and p2 from left hand needle, then k3 from cable needle
WS: Wrong side
X: Times (example: 3x = 3 times)
Notes:
I find it easier to follow the pattern by inserting stitch markers between panels. By doing this, the markers help me to not get confused and see where the background of reverse stockinette section begins and ends, as well as where the cable panel is.
To help minimize the gap of the cable, I give a light tug on the stitch afterward to close it up a bit
Directions:
This stitch is worked over a panel of 18 stitches with a background of reverse stockinette stitch. For the example, I cast on 38 for a 10 stitch background of reverse stockinette stitch on each side of the panel.
Directions are for the cable panel only.
To see how to do the 8-st LPC, click here or scroll to the top of this post.
Row 1 (RS): [K3, p2] 3x, k3
Row 2 and all WS rows: P3, [k2, p3] 3x
Row 3: As row 1
Row 5: K3, p2, 8-st LPC, p2, k3
Row 7: 8-st LPC, p2, 8-st LPC
Row 9: As row 5
Row 11: As row 7
Row 13: As row 5
Row 15: As row 7
Row 17: As row 5
Rows 19, 21, 23, 25 & 27: As row 1
Row 28: As row 2
Continue repeating rows 1-28 of the stitch pattern until you get to your desired length. For consistency, I bound off after completing row 19 and then bound off on WS as pattern.
I hope you enjoyed learning this stitch as much as I did and I hope that you will tag me on social media @handmadebystacyj when posting. I’d love to see your makes!
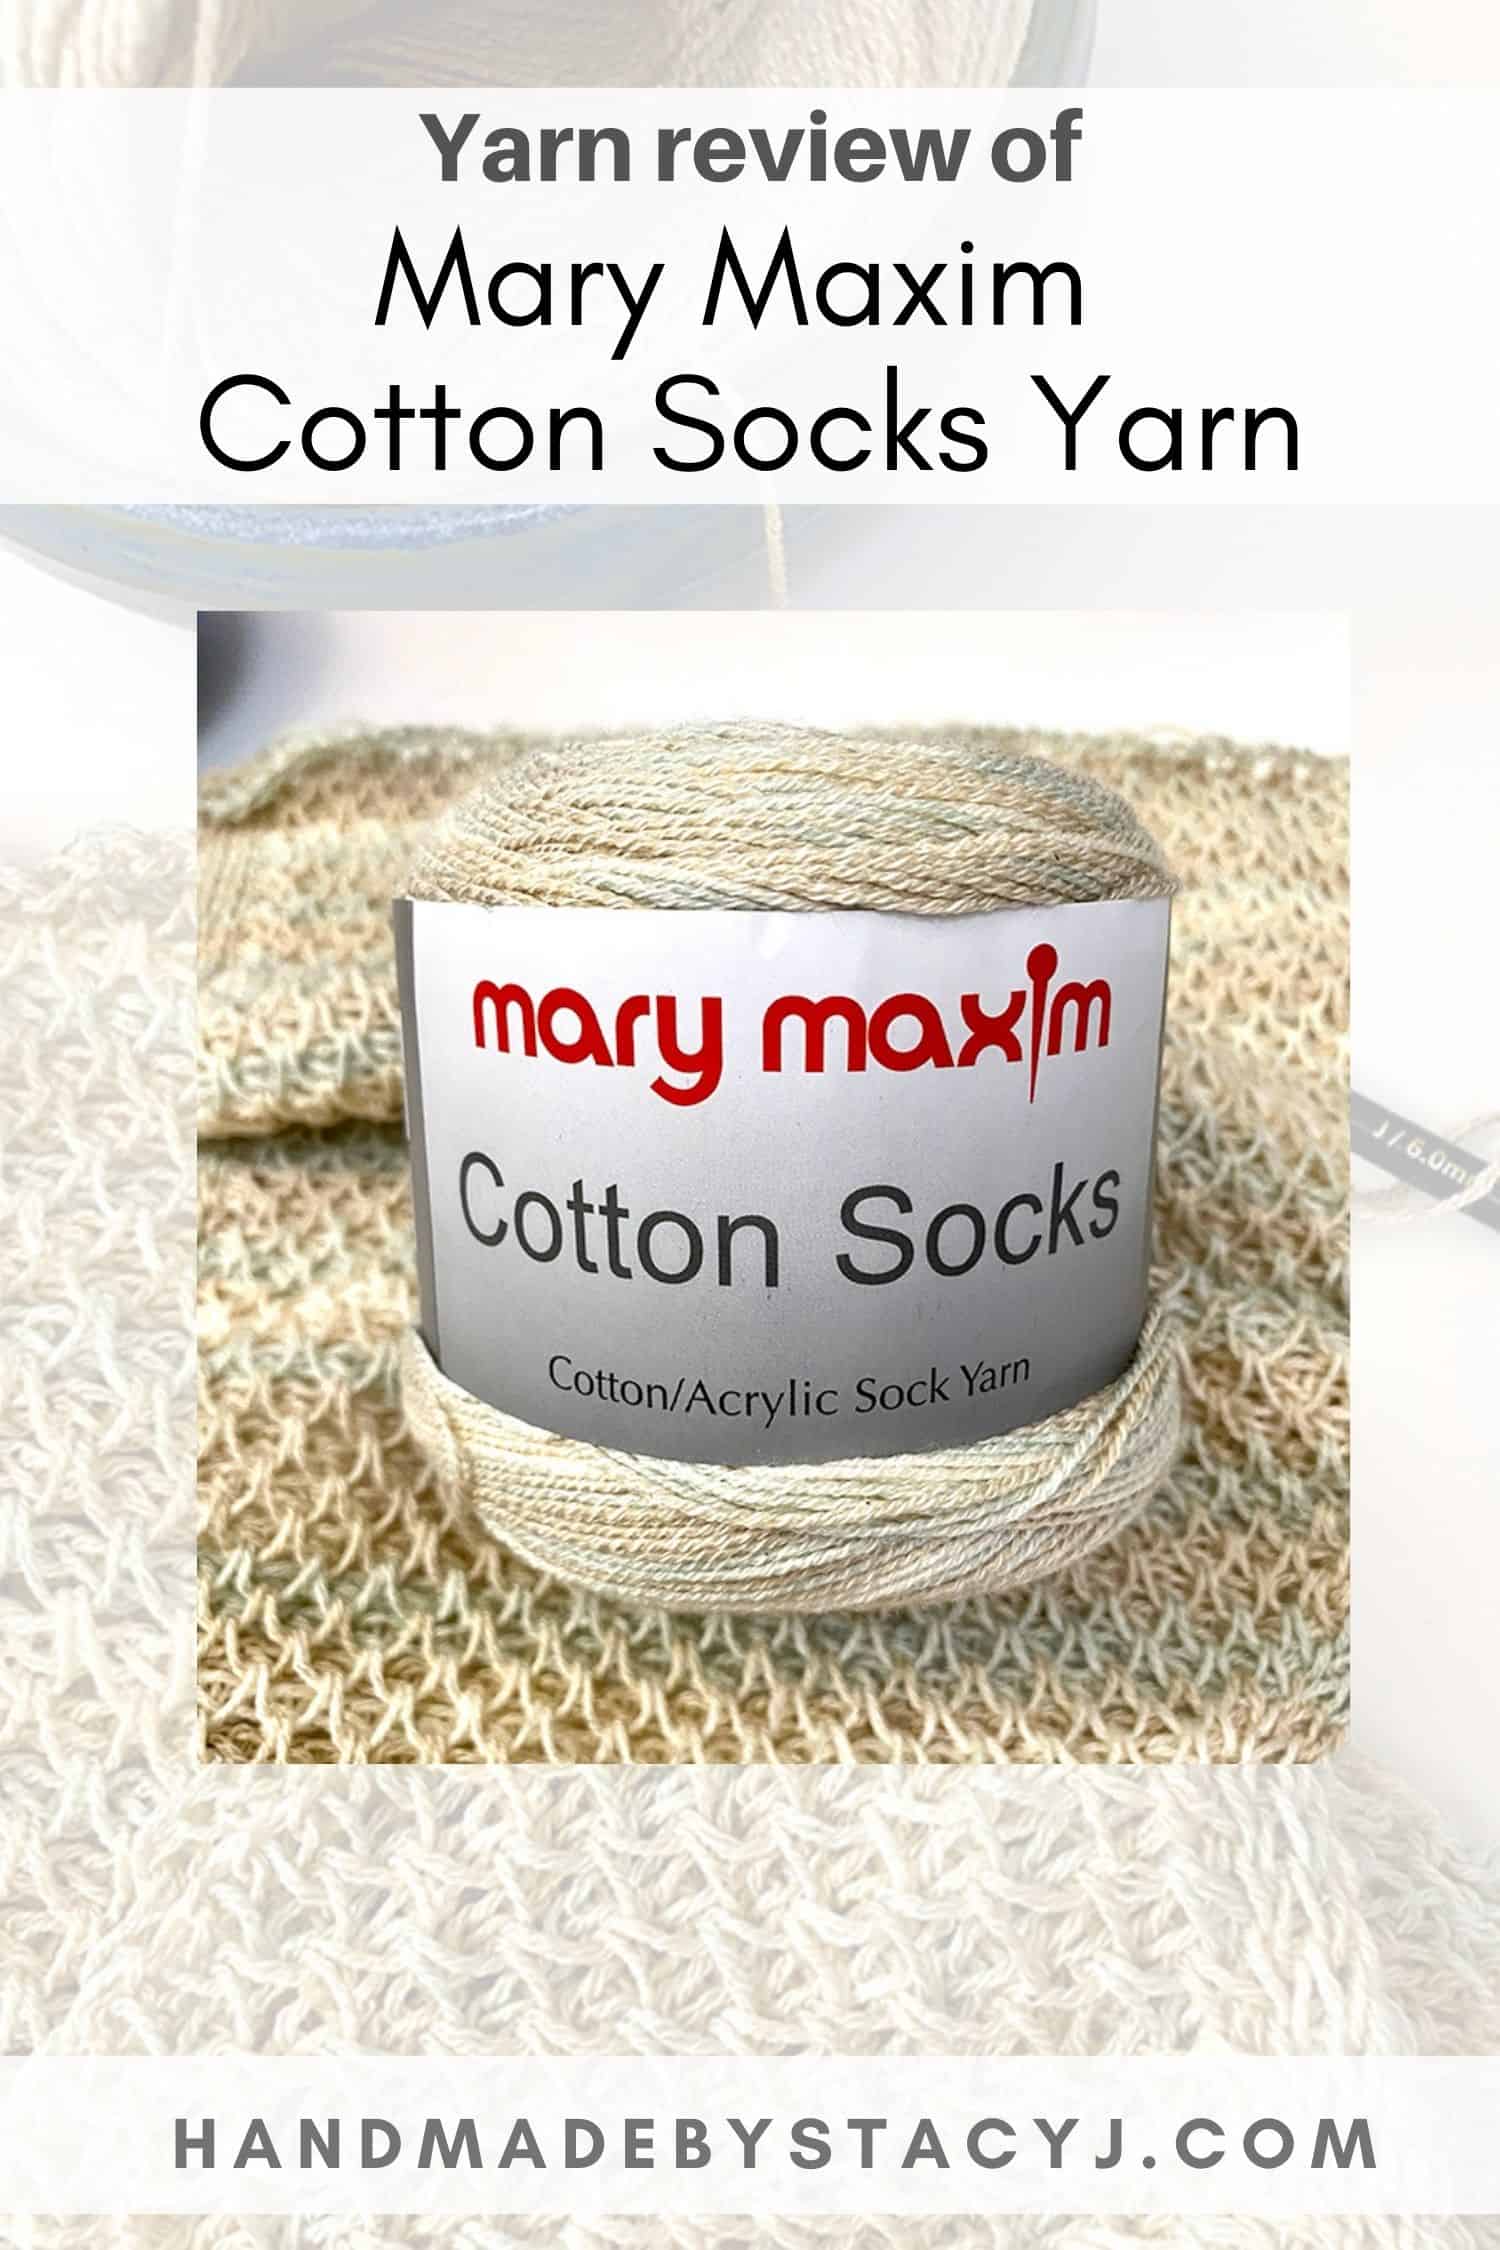
Disclosure: For the yarn review of Cotton Socks yarn by Mary Maxim I was not provided the yarn as a gift. I decided to review it on my own, therefore writing a totally honest review. Also, below are affiliate links; I am an affiliate with those companies and highly recommend them. As an affiliate, when you purchase from those links, you allow the companies to pay me a small commission without costing you a penny more, which allows me to continue making free content. Thank you for your support!
If you’re looking for your next favorite hook, click HEREto check out Furls!
Let’s talk about the yarn!
Like a lot of crafters out there, I enjoy a monthly subscription of the crafty-kind. So, I recently began a monthly Sock subscription with Mary Maxim.
I recently received two balls of Cotton Socks yarn and it called to me to make a Tunisian shawl instead. My first impression is that it’s so soft and squishy. Plus, I was very happy when I saw that the ball contained a whopping 470 yards! And, it’s machine washable!! That’s a big win – win!
Yarn Details:
Mary Maxim Cotton Socks
56% Cotton, 35% Acrylic, 9% Polyamide
3.5 oz / 100 g; 470 yds / 430 m
#1 Superfine weight
Gauge: 30 sts x 42 rows on US 2 / 2.75 mm = 4″ x 4″ or 10 cm x 10 cm
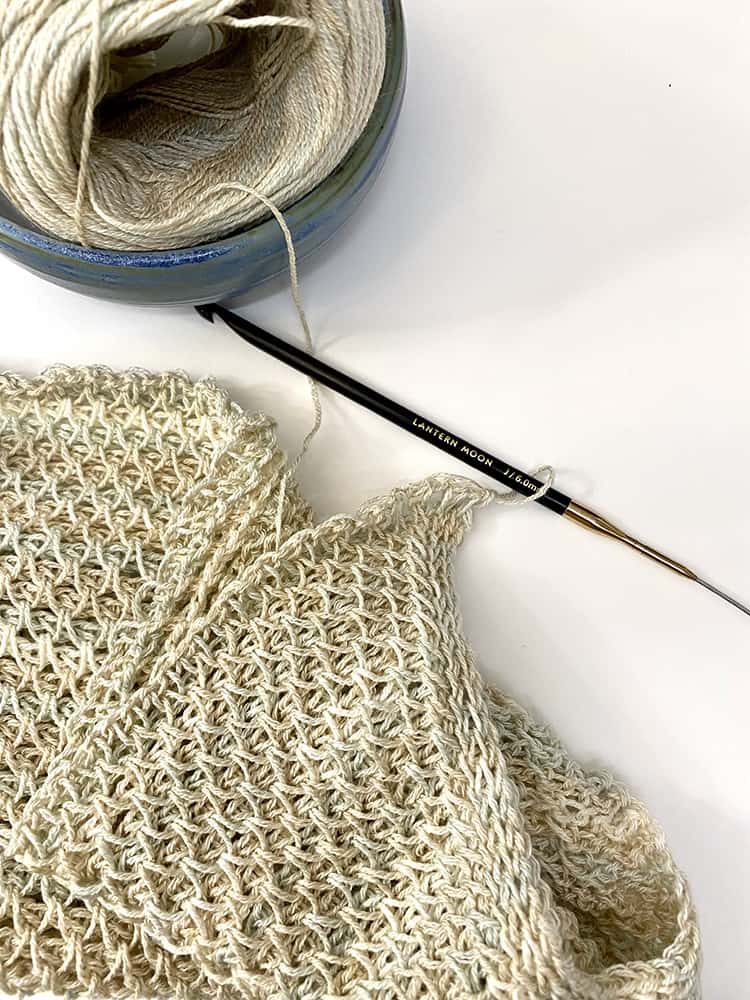
There’s a center pull that the company starts off for you, making the yarn easy to start from the center. And, there wasn’t a lot of tangling either. I came across a knot in one of the balls that I received, which is acceptable and falls within industry standards.
The cotton blend is a good alternative to wool if you’d like to make a gift for someone that might be allergic. The drape of the fabric created with this yarn is absolutely scrumptious. For the shawl that I’m designing, I used a J hook / 6 mm and it played so nicely together.
The colors!
The color I used is called “Naturally.” This color has hints of cream, light brown, whites and light teal blues. It’s super soft to the touch and doesn’t split hardly at all. Plus, Mary Maxim offers Cotton Socks yarn in four different colors:
Earthy: Blues, browns, whites and pinks
Naturally: Cream, tan, blues and whites
Rosy: Light and dark pink, grey and white
Winey: Light and dark bergundy, purple and white
Cotton Socks yarn retails on the Mary Maxim website for $6.99 US dollars (as of July 12, 2022). It has 30 online reviews and a 4.6 star rating. If you’d like to get your hands on some of this lovely yarn, please click HERE for my affiliate link.
Would I recommend?
Although this yarn is marketed as sock yarn, this is absolutely lovely to work with for shawls. I may even try knitting or crocheting a top. Would I recommend it? Absolutely, YES!
I hope you enjoyed learning about this yarn as much as I did. When you make something with it, could you please tag me @handmadebystacyj or #handmadebystacyJ? I’d love to see what you create!
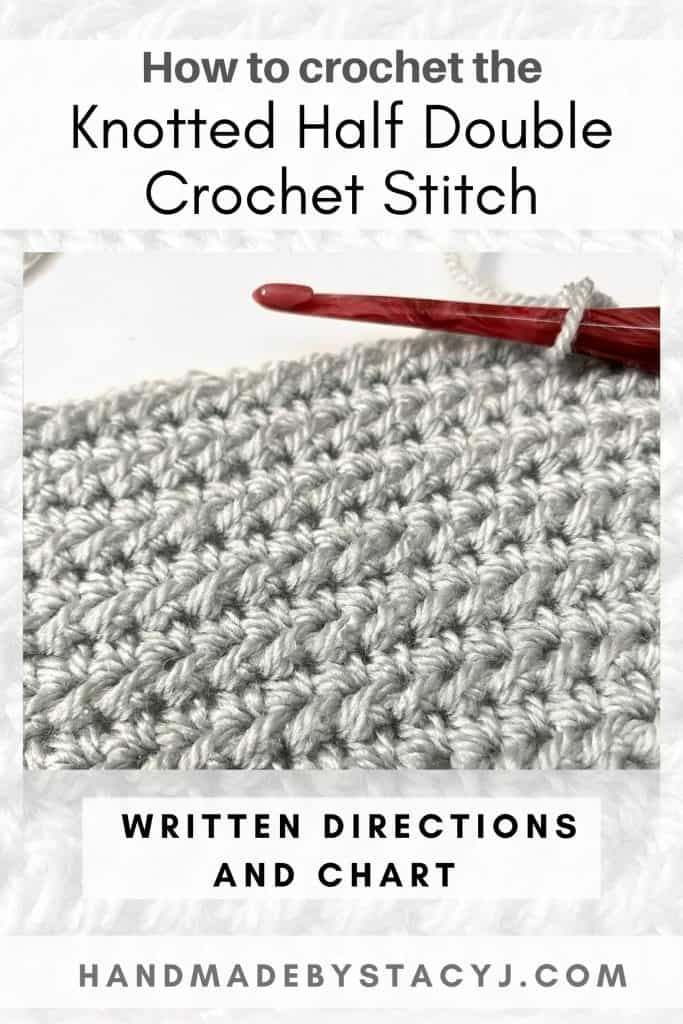
The Knotted Half Double Crochet Stitch is a fun and amazingly simple stitch to master. It’s a combination of single crochet and a half double crochet with a twist and works up over a 2 row repeat. This is a fun stitch to add to your stitching knowledge and would be wonderful for a blanket, scarf or a hat!
Disclosure: This post contains affiliate links. As an affiliate, when you purchase through my links, you allow the company to pay me a small commission without costing you a penny more, which allows me to continue making free content. Thank you for your support!
Here’s a pin for your Pinterest board 🙂
If you’re looking for your next favorite hook, click HEREto check out Furls!
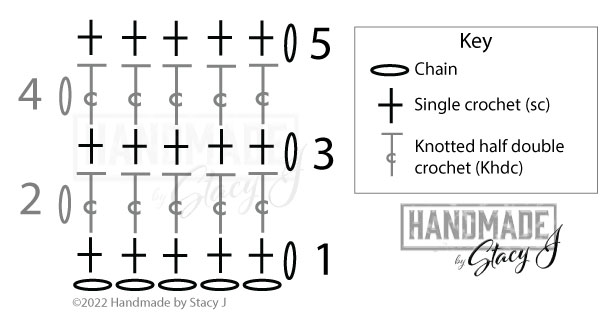
To see a video tutorial of the Knotted Half Double Crochet stitch, scroll to the top of this post or clickHERE. At the bottom of the post there is also a chart for your reference.
Stitches and abbreviations used:
Pattern is written in US terms
Ch(s): Chain(s)
Ea: Each
RS: Right Side
Sc: Single crochet
St(s): Stitch (es)
WS: Wrong Side
Yo: Yarn over
Special stitches:
KHdc: Knotted Half double crochet – YO once, insert hook in indicated stitch, YO and draw up a loop pulling the yarn through all loops on the hook (At the bottom of this post is a video demonstrating this stitch)
Directions for the Knotted Half Double Crochet stitch
Note: Ch-1 at beg of row does not count as a stitch
Chain in any multiple of chs + 1 ch
1 (RS): Work 1 sc in second ch from hook and in ea ch across
2: Ch 1, turn; (WS): work 1 KHdc in first st and in ea st across
3: Ch 1, turn; 1 sc in first st and in ea st across
Repeat rows 2-3 to desired length.
If you’d like to even out the pull of the side stitches, try adding a border to your final piece and block your work.
I hope you enjoyed learning this stitch as much as I did. When you make something with it, could you please tag me @handmadebystacyj or #handmadebystacyj – I’d love to see what you create!
Sometimes you just need a hat template when working on a hat. This is designed to help you out when you’re working on a top-down hat and need to measure the circumference.
The sizes outlined on the hat template are for the most common sizes. This template can be used for babie’s sizes up to adult sizes.
When printing out the file, be sure to print at 100% (in printer settings, do not click the button that says “Fit to page”), otherwise the measurements will be off by about 5%. To confirm that you printed at 100%, there is a small 1″ / 2.54 cm box at the bottom corner for you to measure.
As you make your hat, when you come to the end of a round, lay it on top of your print out to check the measurements. When you reach the desired size, you’re ready to move on to the body.
The Four-section Cable is a simple cable stitch that uses ribbing to create an interesting fabric. It’s worked over a panel of 7 stitches and has a background of reverse stockinette. It uses a Twist 7 Back Rib stitch that creates a dense fabric that would be a lovely stitch pattern to use for a sweater, hat, scarf or a blanket.
There is a chart below for reference, as well as a video tutorial.
Disclosure: This post contains affiliate links for companies that I am proudly affiliated with. If you choose to shop with them by clicking on my link, you allow the company to pay me a small commission without costing you a penny more, which allows me to continue providing free content. Thank you for your support!
Materials needed
Listed below is what I used to create the sample of the stitch pattern
T7B rib: Twist 7 Back Rib – slip next 4 sts from left hand needle to cable needle, hold to back, k1, p1, k1 from left hand needle, [p1, k1] two times from cable needle
X: times (Example: 3x – 3 times)
Notes:
I find it easier to insert stitch markers between panels, so as not to get confused to where the background of reverse stockinette section is
To help minimize the gap of the cable, I give a light tug on the stitch afterward to close it up a bit
Here’s a pin for your Pinterest board 🙂
Directions for the Four-section cable panel:
Worked over a panel of 7 stitches with a background of reverse stockinette stitch; the directions below are for the panel only.
1 (RS): K1, [p1, k1] 3x
2: PB1, [k1, PB1] 3x
3: T7B rib
4: As row 2
Repeat rows 1-2 three more times
Repeat rows 1-10 to desired length (for consistency, I bound off after completing row 4), then bind off as pattern
I hope you enjoyed learning this stitch as much as I did. Please tag me @handmadebystacyj when posting on social media – I’d love to see your makes!
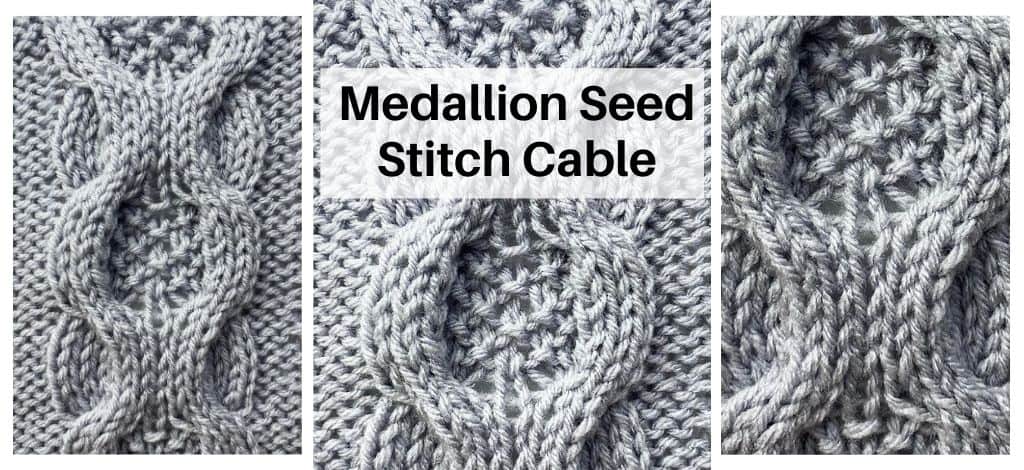
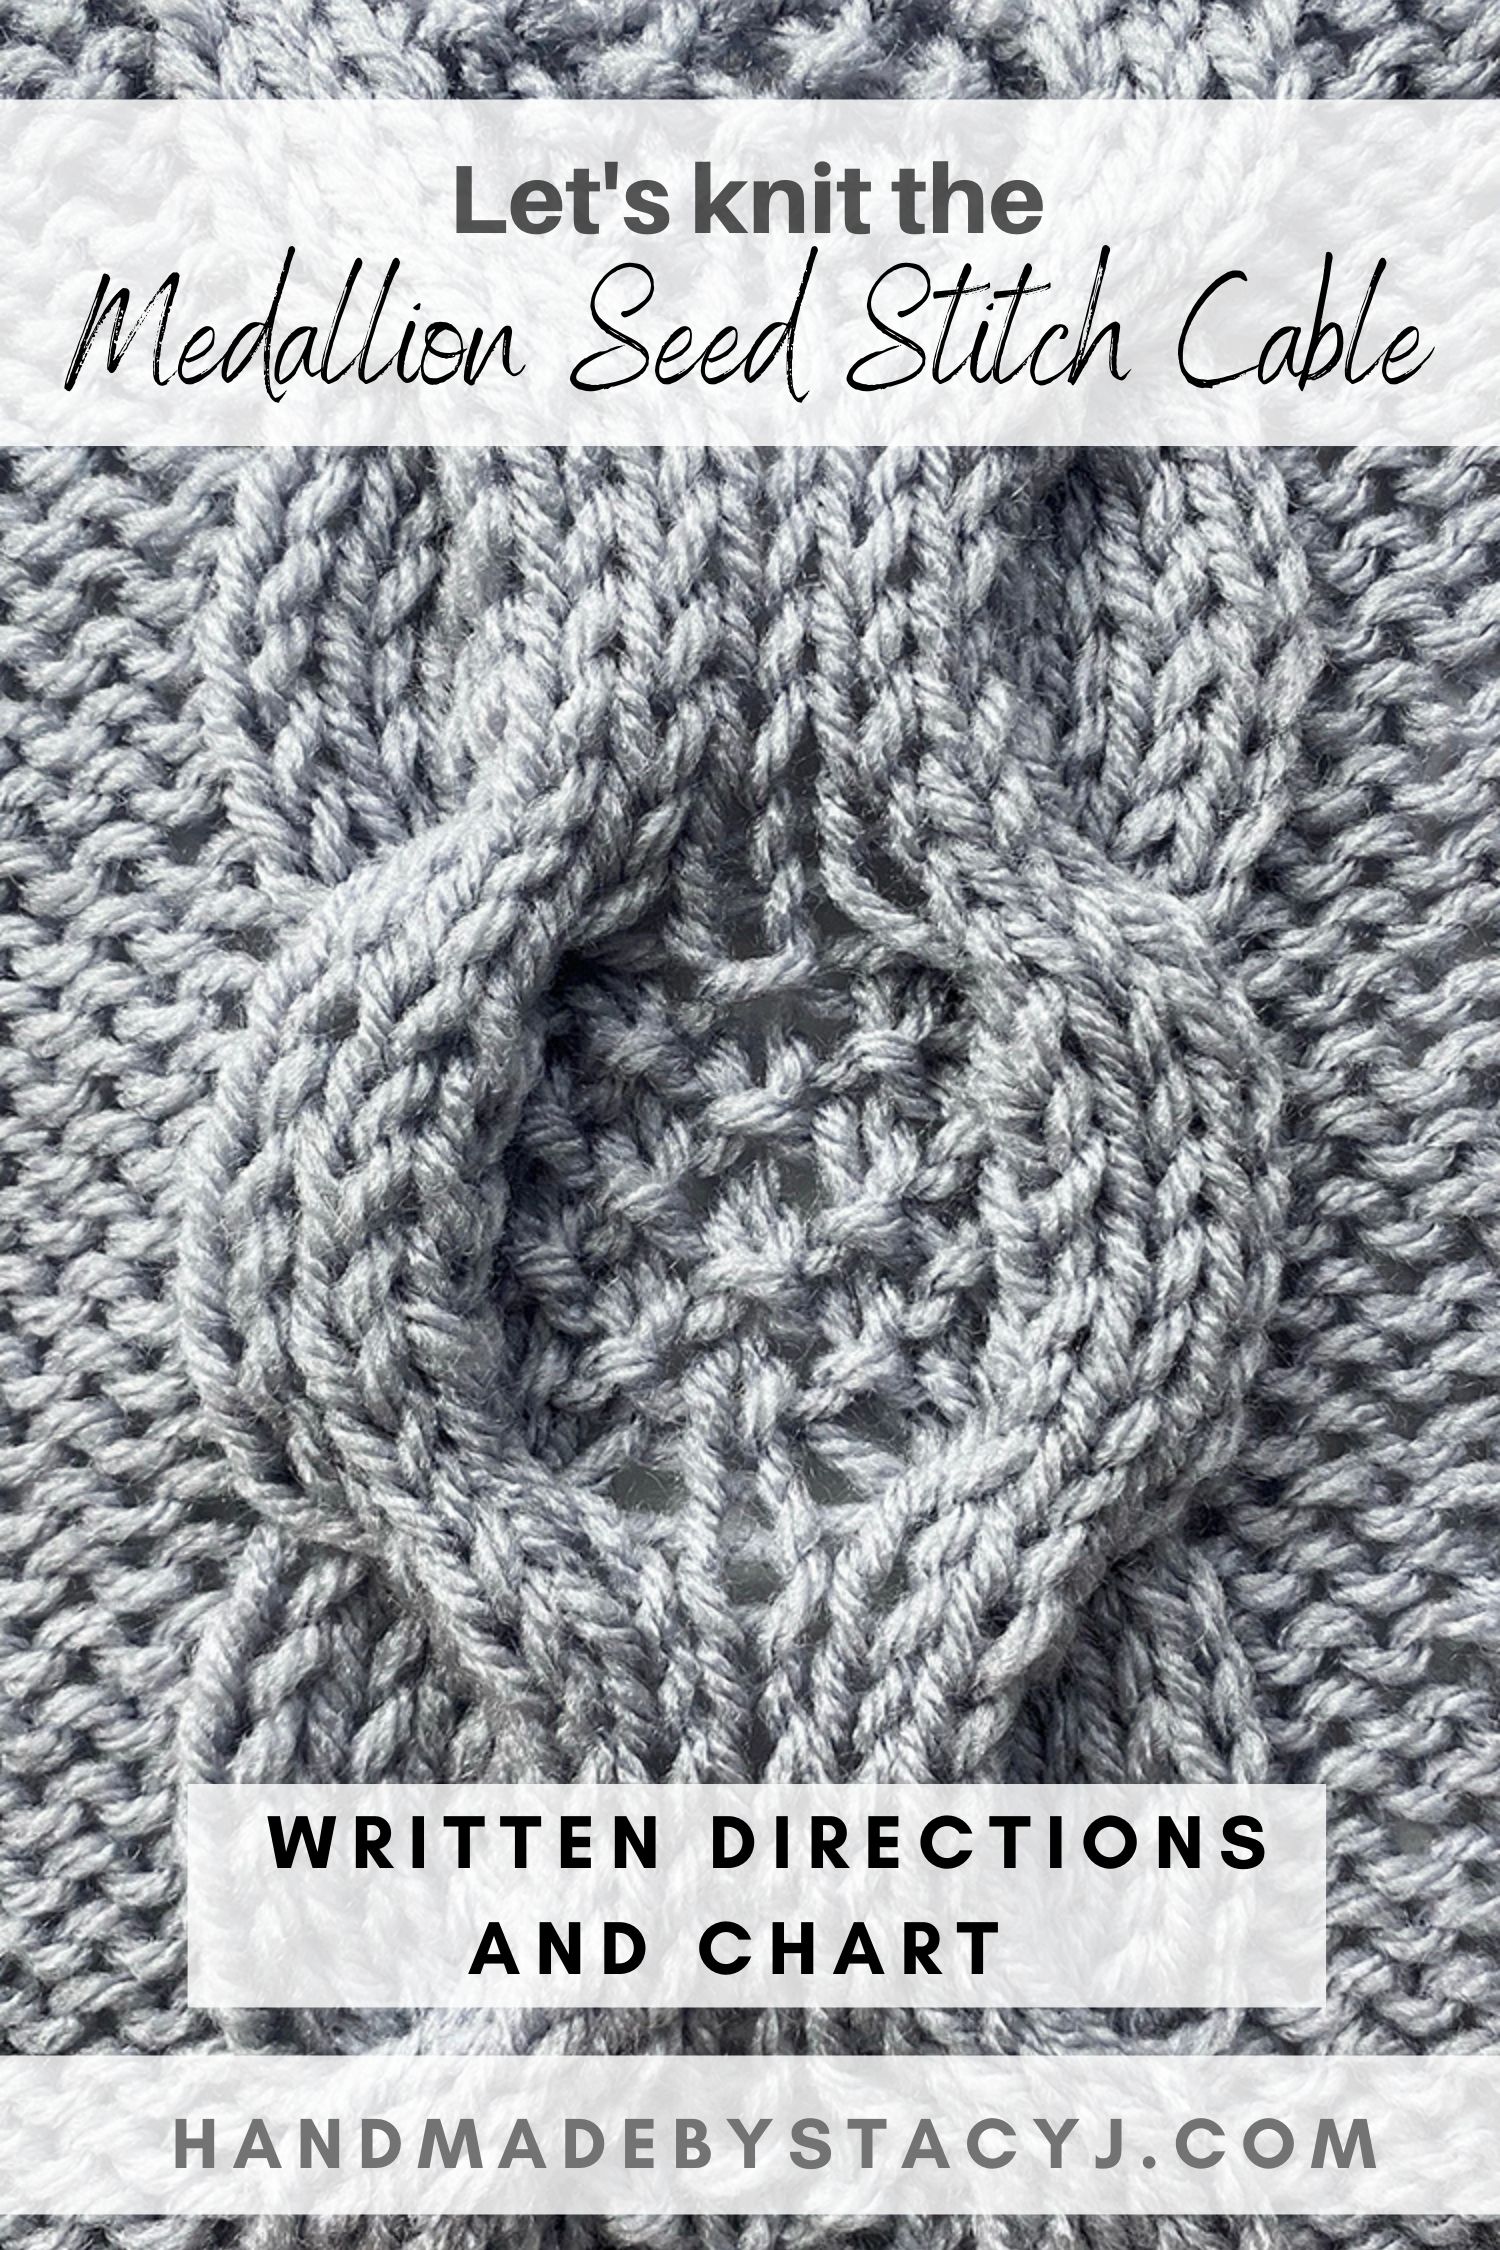
The Medallion Seed Stitch Cable is worked on a panel of 13 stitches with a background of reverse stockinette over 16 rows. The cables have a lovely stockinette that frame a seed stich insert. It creates a dense fabric that would be a lovely stitch pattern to use for a sweater, hat, scarf or a blanket.
There is a chart below for reference
Disclosure: This post contains affiliate links for companies that I am proudly affiliated with. If you choose to shop with them by clicking on my link, you allow the company to pay me a small commission without costing you a penny more, which allows me to continue providing free content. Thank you for your support!
Here’s a pin for your Pinterest board 🙂
Materials needed
Listed below is what I used to create the sample of the stitch pattern
This written pattern for the Paislee Baby Blanket can be used with the video tutorial on the “Handmade by Stacy J” YouTube channel. It‘s a beginner friendly crochet pattern that makes a beautiful baby blanket. There is also a checklist attached to the pattern to help keep track of rows; And, you can access that by scrolling to the bottom of this page. Enjoy!
Difficulty level:
Easy
Stitches & Abbreviations Used:
Pattern is written in US Terms
Beg: Beginning
Bphdc: Back post half double crochet
Ch: Chain
Dc: Double Crochet
Hdc: Half Double Crochet
MC: Main Color
Rep: Repeat
Sc: Single Crochet
Sk: Skip
Sl St: Slip Stitch
St (s): Stitch (es)
Here’s a pin for your Pinterest board
Disclosure: If you choose to purchase your yarn through my affiliate links, please know that you will be allowing the companies to pay me a small commission without costing you a penny more. This allows me to continue creating free content. Thank you for your support!!
To adjust size, work in multiples of 3 + 2 and add 1 for the base chain
Ch 189 with Main Color and G+ (4.5 mm) hook
1. (RS) Skip 2 ch (counts as 1 sc), *work [1 sc, ch 1, 1 dc] into next ch, skip 2 ch; rep from * ending 1 sc into last ch, turn. 62 clusters
2. (WS) Ch 2, skip 1st sc and next dc, *work [1 sc, ch 1, 1 dc] into next ch sp, skip sc and dc; rep from * ending with [1 sc, ch 1, 1 dc] into last ch sp, skip next sc, 1 hdc into top of last sc in row 1, turn. 62 clusters
3. (RS) Ch 2, skip 1st hdc and next dc, *work [1 sc, ch 1, 1 dc] into next ch sp, skip sc and dc; rep from * ending with [1 sc, ch 1, 1 dc] into last ch sp, skip next sc, 1 hdc into top of last hdc in previous row, turn. 62 clusters
4. Rep row three 97 more times or until work measures 28”; Do not fasten off, turn.
Border:
Use H (5.00 mm) hook / Right side is always facing (Do not turn)
1. With right side facing and Main color yarn, ch 1 (does not count as sc), make [1 sc, ch 2, 1 sc] in same corner, *work 1 sc in each st across, in corner [1 sc, ch 2, 1 sc], rep * around omitting [1 sc, ch 2, 1 sc] in first corner that has already been worked; then join with sl st to top of first sc; Do not turn.
2. Sl st in corner sp, ch 3 (counts as hdc and ch 1), 1 hdc in same corner sp, *work 1 hdc in each st across, in corner work [1 hdc, ch 1, 1 hdc], rep * around and then join with sl st to 2nd ch, fasten off and weave in ends. Do not turn.
3. With Accent Yarn #3 (Blue), join with standing sc in any corner, ch 2, 1 sc in same corner, *work 1 bphdc around each post across, in corner work [1 sc, ch 2, 1 sc], rep * around and then join with sl st to top of first sc, do NOT fasten off; Do not turn.
4. Continuing with Blue yarn, Sl st in corner sp, ch 3 (counts as hdc and ch 1), 1 hdc in same corner sp, *work 1 hdc in each st across, in corner work [1 hdc, ch 1, 1 hdc], rep * around and then join with sl st to 2nd ch, fasten off and weave in ends. Do not turn.
5. With Accent Yarn #1 (Flannel Gray), join with standing sc in any corner, ch 2, 1 sc in same corner, *work 1 bphdc around each post across, in corner work [1 sc, ch 2, 1 sc], rep * around and then join with sl st to top of first sc, do NOT fasten off; Do not turn.
6. Continuing with Gray yarn, Sl st in corner sp, ch 3 (counts as hdc and ch 1), 1 hdc in same corner sp, *work 1 hdc in each st across, in corner work [1 hdc, ch 1, 1 hdc], rep * around and then join with sl st to 2nd ch, fasten off and weave in ends. Do not turn.
7. With Accent Yarn #2 (Mint Charm Green), join with standing sc in any corner, ch 2, 1 sc in same corner, *work 1 bphdc around each post across, in corner work [1 sc, ch 2, 1 sc], rep * around and then join with sl st to top of first sc, do NOT fasten off; Do not turn.
8. Continuing with Green yarn, Sl st in corner sp, ch 3 (counts as hdc and ch 1), 1 hdc in same corner sp, *work 1 hdc in each st across, in corner work [1 hdc, ch 1, 1 hdc], rep * around and then join with sl st to 2nd ch, fasten off and weave in ends. Do not turn.
9. With Main Color yarn, join with standing sc in any corner, ch 2, 1 sc in same corner, *work 1 bphdc around each post across, in corner work [1 sc, ch 2, 1 sc], rep * around and then join with sl st to top of first sc, do NOT fasten off; Do not turn.
10. Continuing with Main Color yarn, Sl st in corner ch sp, ch 3 (counts as dc and ch 1), 1 sc in same corner sp, sk 1 st, *work [1sc, ch 1, 1 dc] in next st, sk 1 st; Rep * around, working [1 sc, ch 1, 2 dc, ch 1, 1 sc] in corner ch spaces; in last corner sp, end with [1 sc, ch 1, 1 dc] and join with sl st to 2nd ch; fasten off and weave in ends.
If you prefer a pdf with a checklist, please feel free to download and print the link below.
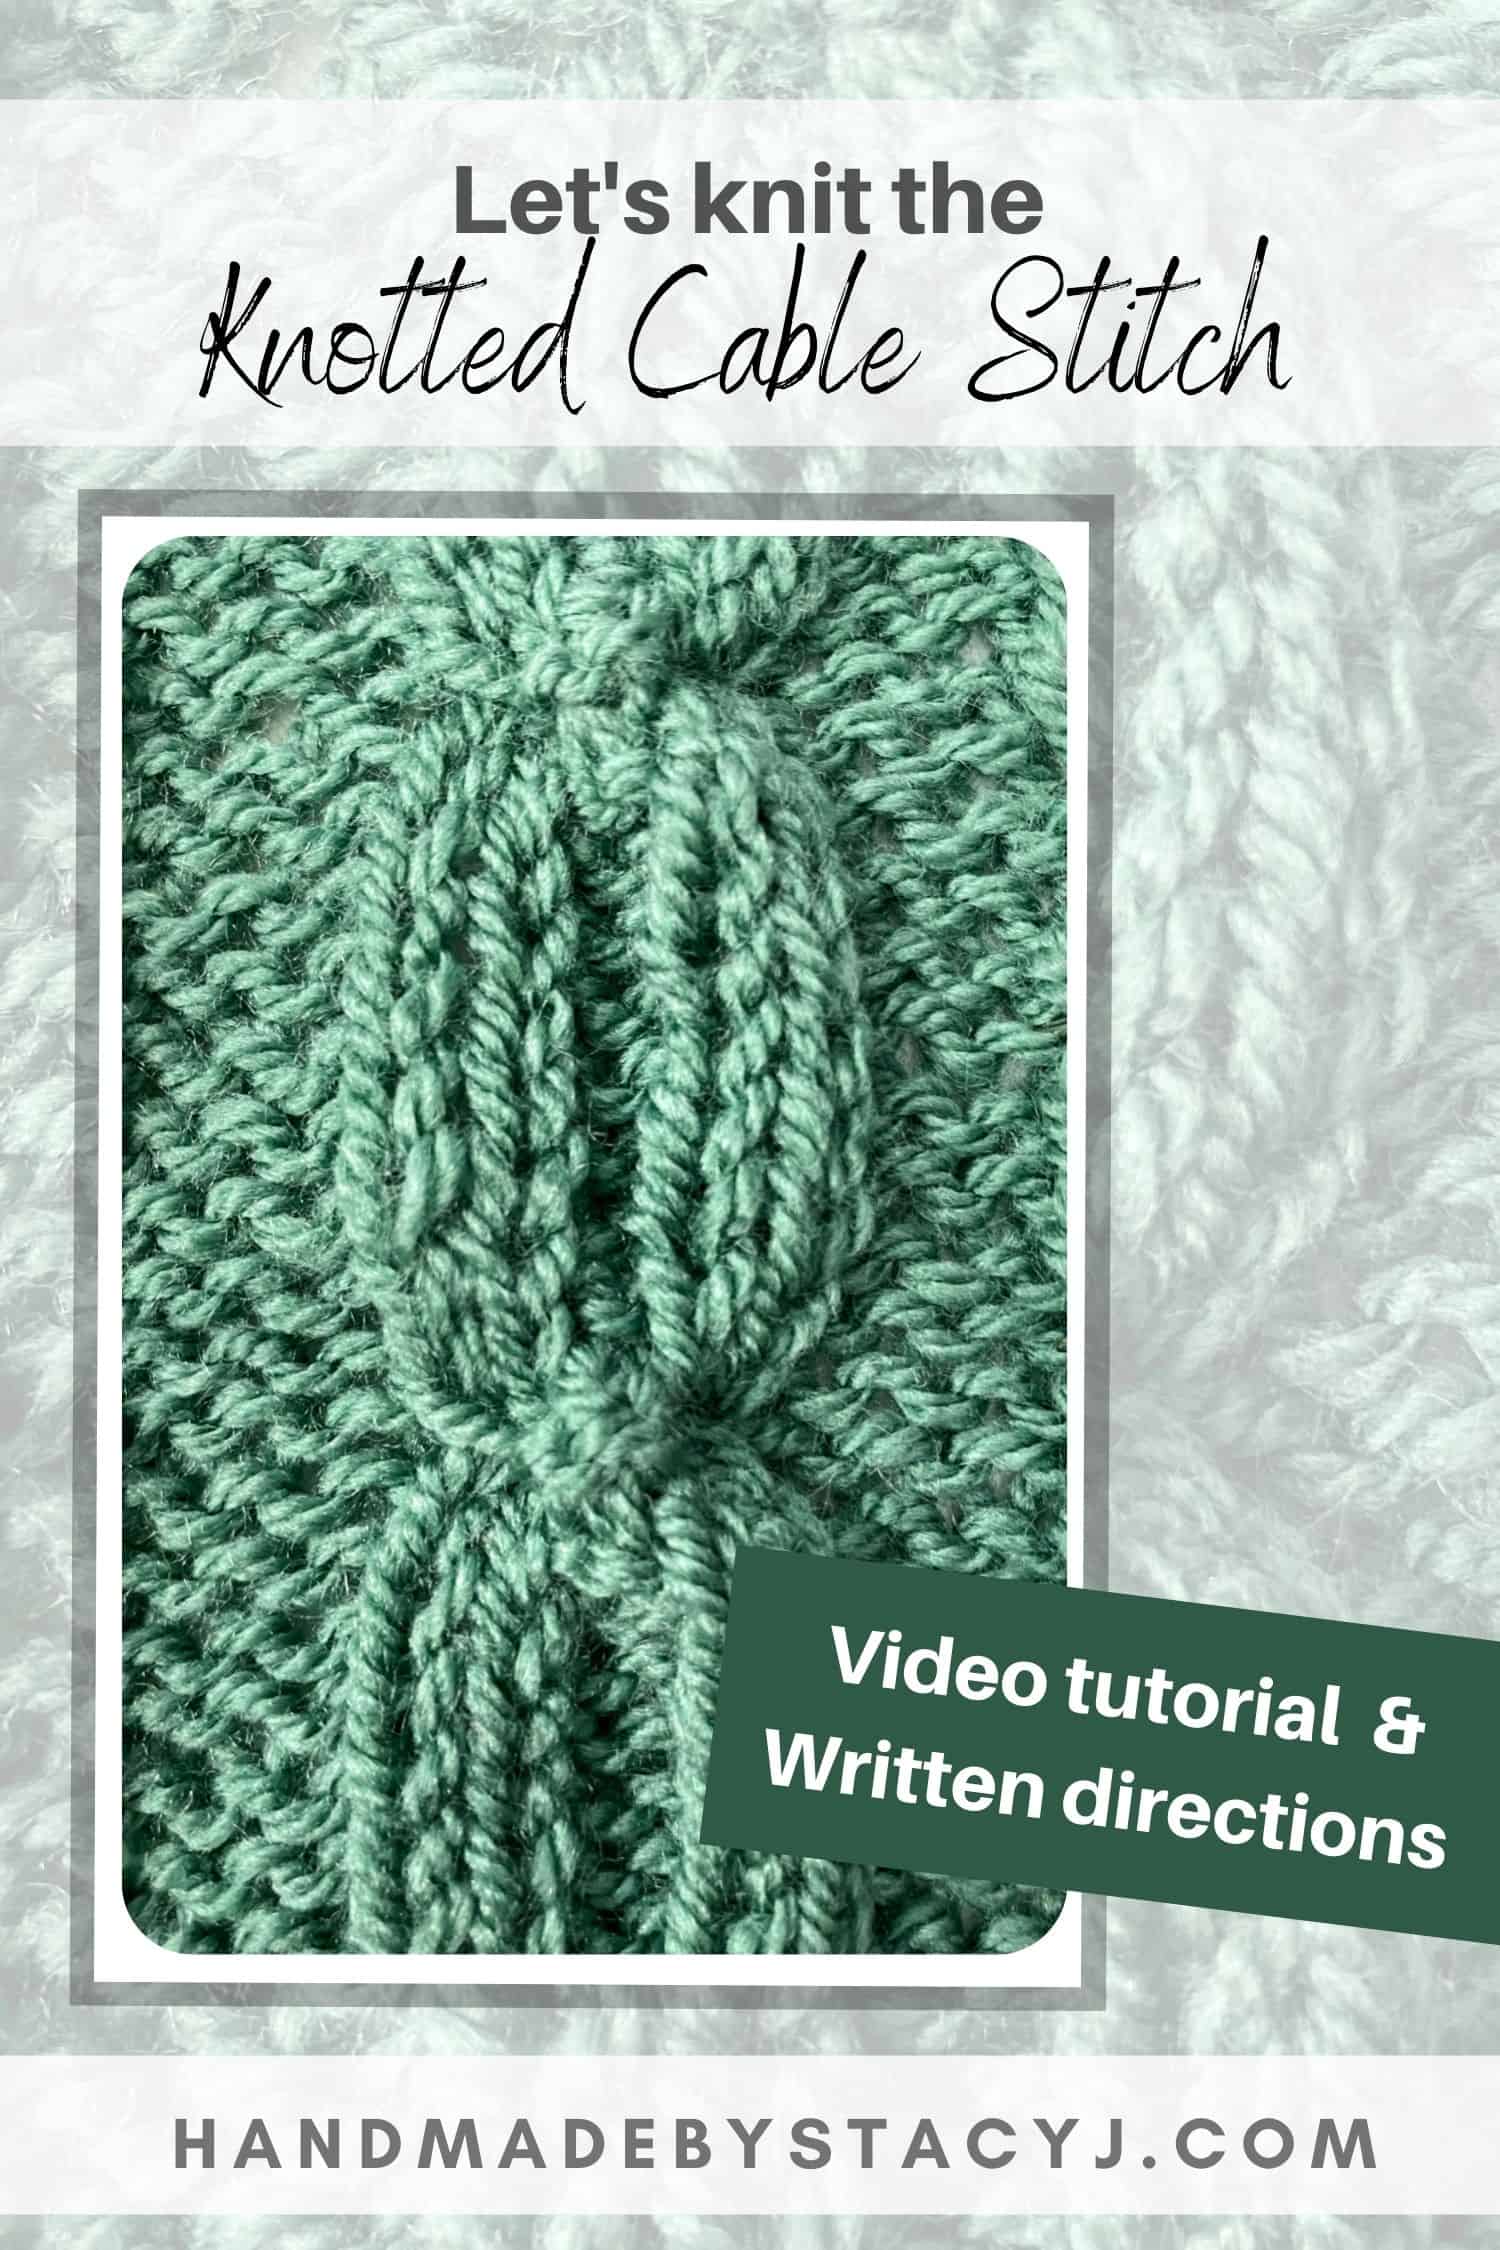
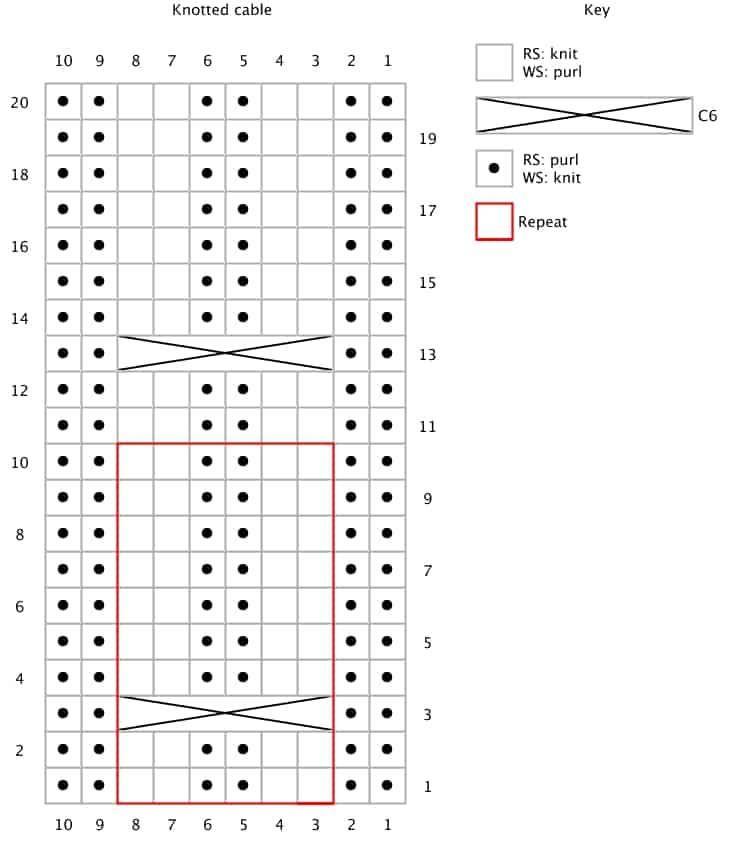
The Knotted Cable Stitch is such a fun stitch. It’s worked with a background of reverse stockinette with the cable working over 6 stitches. The knot in the middle of the cable is created by doing a Cross 6 or C6 stitch, and then the cable is worked as a 2×2 ribbing. The Knotted Cable Stitch pattern works in multiples of 6 over a 10 row repeat.
Disclosure: Please note that this post contains links for companies that I’m a proud affiliate for. That means that if you choose to purchase from that link, you allow the company to pay me a small commission without costing you a penny more. Thank you so much for your support!
To see a video tutorial of the Knotted Cable stitch, click on the box below.
Stitches and abbreviations used:
Written using US terms
K: Knit
P: Purl
RS: Right side
WS: Wrong side
Here’s a pin for your Pinterest board ??
Special Stitches:
C6: Cross 6 –Slip 4 onto cable needle and hold in front of work, k2, sl2 from cable needle back to left needle, pass cable needle with 2 remaining knit sts to back of work, p2 from left needle, k2 from cable needle
Instructions are for cable panel only; this stitch is worked on a background of reverse stockinette
Note: If you prefer to have the first knot higher up the panel (instead of towards the bottom where you begin), simply work a few more rows of 1-2
Directions for the Knotted Cable Stitch:
1 (RS): K2, p2, k2
2 & every alt row: P2, k2, p2
3: C6
5, 7 & 9: As row 1
10: As row 2
Rep rows 1-10 until desired length is reached.
I hope you enjoyed learning this stitch as much as I did. When you make something with it, could you please tag me @handmadebystacyj or #handmadebystacyj – I’d love to see what you create!
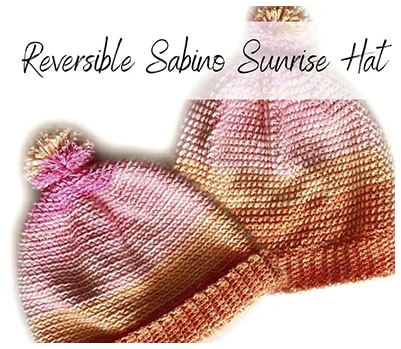
The Reversible Sabino Sunrise hat is named for the beautiful Sabino Canyon sunrises that we have here in Tucson, AZ. Sabino has been one of my favorite places to go since I was little, so it was fitting to make a hat that is inspired by it. When I was going to Flagstaff with my son, this hat was born because it was a chilly 7 degrees when we were scheduled to visit. Since I don’t really own hats, I decided to design one. And, here we have the Reversible Sabino Sunrise hat!
It’s a very simple hat that works a few increased rounds, 6.75” on the body and then the ribbing. However, when I made it, I realized that the wrong side is just as pretty as the right side. So, I secured the pom pom with a button so that it’s removable, making the hat reversible. This is great for learning how to crochet a hat and is customizable to whatever size you need. Simply measure as you go and then you’ll have the perfect hat!
In the video below, please note that I call the Herringbone Half Double Crochet the Herringbone Double Crochet (sorry about that!).
Disclosure: This post may contain affiliate links. As an affiliate, when you purchase through my links, you allow the company to pay me a small commission without costing you a penny more. This allows me to continue making free content. Thank you for your support!
Hbhdc: Herringbone half double crochet – this stitch is always worked in the back loop and third loop of the stitch starting on round 2: Yarn over, insert hook in back loop and third loop of stitch, draw up a loop and pull through stitch and first loop on hook, yarn over and then pull through remaining 2 loops on hook
Hk: Hook
Lp: Loop
Sc: Single crochet
Sl st: Slip stitch
Rep: Repeat
RS: Right side
Sk: Skip
St(s): Stitch (es)
WS: Wrong side
Yo: Yarn over
Here’s a pin for your Pinterest board 🙂
Notes:
Hat is worked in the round; until working the brim, do not turn work
Ch-2 at the beginning of each round does not count as a stitch
While working in the round, end each round with a slip stitch to the top of the first stitch
After round 1, you will always work the Herringbone Half Double Crochet stitch in the back and third loop. As a result of working in those loops the hat becomes reversible.
To customize the fit of the hat:
Measure the circumference of the head of the person that the hat is intended for. Subtract 2” / 5cm from that measurement (this gives a nice, snug fit). Then measure the circumference of the hat as you complete the increase rounds while you work them. Stop increasing when you get to the size needed; proceed to work the body of the hat. For example, my head is 22”, so I stopped increasing when the hat circumference measures 20”.
Directions for the Reversible Sabino Sunrise Hat:
Determine the circumference needed for your hat and then measure throughout the increase rounds. Stop when you get to your desired circumference and move on to the body of the hat.
Increase rounds
Using larger hook, Ch 3
In third ch from hk, work 10 Hbhdc, join with sl st to top of first st, do not turn. Gently pull yarn tail to close up st where 10 Hbhdc were worked.
Ch 2, work 2 Hbhdc (in back loop and third loop here and throughout the pattern) in ea st around, join with sl to top of first st; 20 Hbhdc
Ch 2, *2 Hbhdc in next st, 1 Hbhdc in next st; rep * around, join with sl st to top of first st; 30 Hbhdc
Ch 2, *2 Hbhdc in next st, 1 Hbhdc in ea of next 2 sts; rep * around, join with sl st to top of first st; 40 Hbhdc
Ch 2, *2 Hbhdc in next st, 1 Hbhdc in ea of next 3 sts; rep * around, join with sl st to top of first st; 50 Hbhdc
Ch 2, *2 Hbhdc in next st, 1 Hbhdc in ea of next 4 sts; rep * around, join with sl st to top of first st; 60 Hbhdc
Ch 2, *2 Hbhdc in next st, 1 Hbhdc in ea of next 5 sts; rep * around, join with sl st to top of first st; 70 Hbhdc
Ch 2, *2 Hbhdc in next st, 1 Hbhdc in ea of next 6 sts; rep * around, join with sl st to top of first st; 80 Hbhdc
If you need to continue increasing your stitch count to make your hat larger, use the following increase directions:
Ch 2, *2 Hbhdc in next st, 1 Hbhdc in ea of next 7 sts; rep * around, join with sl st to top of first st; 90 Hbhdc
Ch 2, *2 Hbhdc in next st, 1 Hbhdc in ea of next 8 sts; rep * around, join with sl st to top of first st; 100 Hbhdc
Body of hat
Ch 2, 1 Hbhdc in each st around, join with sl st to top of first st
Repeat body round until hat reaches 6.75” / 17.1 cm or your desired length from beginning of body; do not cut yarn.
Ribbing
This makes a 2.5” / 6.4 cm ribbing – if you would like smaller or larger ribbing, simply add or subtract chain amounts.
Use smaller hook with RS facing and continue as if working in the round
Ch 10, in second ch from hook work 1 sc in the back loop and 1 sc in back loop in ea of remaining 8 chs (9 sc total), 1 sl st in back loop and third loop in ea of the next 2 sts, turn
Sk 2 sl sts, work 1 sc in back loop in ea st across, turn (9 sc)
Ch 1, work 1 sc in back loop in next st and remaining 8 sts, 1 sl st in back loop and third loop of next 2 sts, turn (9 sc total)
Repeat rows 2-3 around the hat.
Sl st in last 2 sts (or 1 st if that’s all you have left), then repeat row 2
Seam together using your preferred method.
Make pom pom and sew it on to the hat using a button to secure the pom pom ends.
Have fun with this and please tag me on social media @handmadebystacyj and #handmadebystacyj – I’d love to see your hat!
This pattern is copyright 2022 Handmade by Stacy J. Please do not duplicate or copy any portion of this pattern, as well as photographs. You are encouraged to share images of your final product and are allowed to sell final products. I ask that if you sell your final product, please purchase the ad-free pdf, provide your own photographs and credit Handmade by Stacy J as the designer. Thank you for your support!
The written pattern for the Eyelet Lace Washcloth can be used with the video tutorial on the “Handmade by Stacy J” YouTube channel. It‘s a beginner friendly knit pattern that only uses Knit, Purl and simple increases and decreases. There is also a checklist & chart attached to this pattern to help keep track of rows. Enjoy!
Disclosure: This post contains affiliate links. As an affiliate, when you purchase through my links, you allow the company to pay me a small commission without costing you a penny more, which allows me to continue making free content. Thank you for your support!
Tutorial available on YouTube at: https://youtu.be/c1ojVmZZEHM At the bottom of this post, you will find a chart and a checklist, as well.
Here’s a pin for your Pinterest board 🙂
Difficulty level:
Easy
Measures:
9” x 9” / Gauge not important
Stitches used:
Knit (k)
Purl (p)
Yarn Over (yo)
Slip Slip Knit (ssk)
Materials Needed:
Solid Color yarn (100% Cotton, Medium 4 weight) 60 yards in Color “Sky” Size 6 (4.00 mm) Knitting Needles 2 stitch markers (optional), Tapestry needle and scissors
Note:
Pattern length can be adjusted by continuing to do more repeats. End with either row 5 or 13 in Pattern Repeat, then finish with “Final Row” section when you come to desired length. To adjust width, calculate the number of stitches in increments of 2.
Directions for Eyelet Lace Washcloth:
Set up Rows
Cast on 40 K across for 4 rows
Pattern
Knit across
(All all WS Rows) K3, p34, k3
K3, *yo, ssk; rep from * until 3 sts remain, k3
As row2
Knit across
As row2
Knit across
As row2
Knit across
As row 2
K4, *yo, ssk; rep from * until 4 sts remain, k4 12. As row 2
Knit across
As row 2
Knit across
As row 2 Rep rows 1-16 once more, then rep rows 1-13 once more
Final Rows
K across for 4 rows Bind off knit wise and weave in ends.
Below is the chart and a pdf with a checklist to help you along with your Eyelet Lace washcloth. 🙂
When you choose to make your Eyelet Lace dishcloth, please tag me on your makes @handmadebystacyj and #handmadebystacyj – I’d love to see them!
If you prefer a printable pdf with the checklist, please feel free to download this pattern.
This pattern is not to be sold or copied in any way. The images, pattern and charts are copyrighted by Handmade by Stacy J and may not be duplicated. You are welcome to sell your makes, however I ask that you credit me as the designer. You are also responsible for providing your own photographs. Thank you!