The Little Shell Pattern is an easy stitch pattern to learn. It’s worked in multiples of 7 stitches + 2 over a 4-row repeat, which also makes it easy to memorize. This stitch uses only a variation of knits and purls, which creates a beautiful pattern of little shells separated by columns of eyelets and stockinette stitch. This would be a wonderful stitch to use for a hat, trim on a sweater or a scarf!
A video tutorial is included to demonstrate how to create this stitch. You’ll also find a chart and a downloadable PDF (look for the blue “PDF Download button) of this stitch at the bottom of this post.
Disclosure: This post contains affiliate links. That means that I may receive compensation when you purchase through my links at no additional cost to you. Thank you for your support!
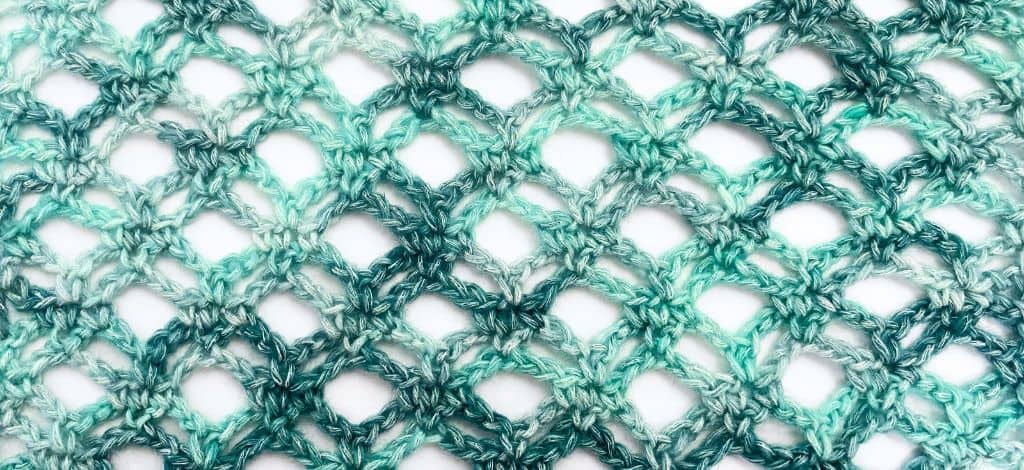
Welcome to the Double Diamond Mesh crochet stitch! If you’re looking to add a touch of elegance and intricacy to your projects, you’re in the right place. This lacy and beautiful stitch does require a bit of concentration, but trust me, the effort is absolutely worth it. Imagine the stunning scarves or the eye-catching accents on sweaters you can create with this stitch!
In addition to the written directions below, there’s also a step-by-step video tutorial to help you along the way. The Double Diamond Mesh stitch is worked in multiples of six over a four-row repeat.
For a free, downloadable and printable pdf, scroll down to the bottom of this post and click on the blue “Pdf Download” box.
Disclosure: This post contains affiliate links. That means that I may receive compensation when you purchase through my links at no additional cost to you. Thank you for your support!
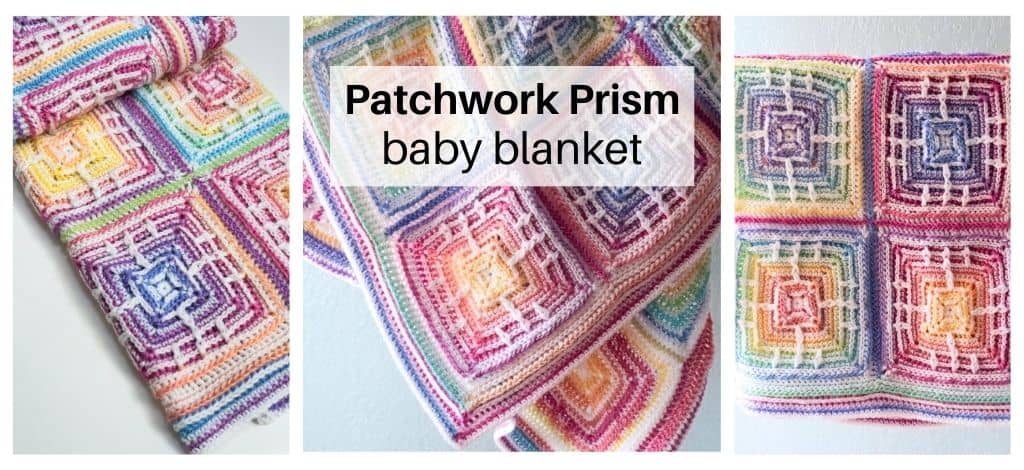
Today I am so excited to share with you the FREE crochet pattern for the Patchwork Prism Baby Blanket!
Disclosure: This post contains affiliate links. As an affiliate, when you purchase through my links, you allow the company to pay me a small commission without costing you a penny more, which allows me to continue making free content.
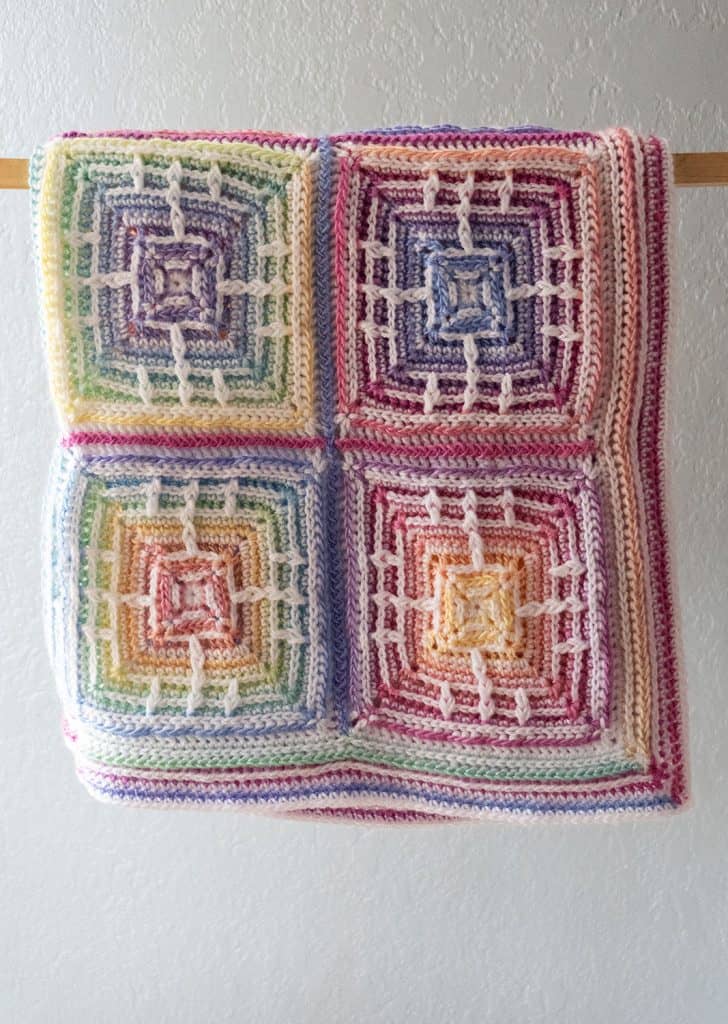
About the Patchwork Prism Baby Blanket
The Patchwork Prism Baby Blanket was inspired by Mary Maxim’s “Prism” yarn – it’s wonderfully colorful and so much fun to work with. I had used the “Prism” yarn for the Mary Maxim kit of the Birthday Sorbet Baby Blanket. The idea of using that particular yarn with a solid color and lots of texture really called out to me. So, after some fiddling with the stitches, the placement and some ideas, the Patchwork Prism Baby Blanket was born!
My testers rated this pattern as “Intermediate”, so it does require some concentration for the first square or two. But, don’t let that scare you. The squares use basic stitches with the occasional front post stitch placed in there and some back posts for texture. Also, there’s only 4 ends to weave in with each square! Instead of cutting the yarn with each round, I recommend simply carrying it up with your work. There are also videos to help you along with the square, the join and the border.
On a side note, I want to extend a big “Thank You!” to all of my testers that helped with this design and a huge “Thank You” to Mary Maxim for supporting my idea!
Here’s a pin for you Pinterest board
About the yarn
The yarn used was provided to me from Mary Maxim. The solid color (white) is Mary Maxim “Mellowspun DK”. This is a DK / #3 light weight yarn that is 100% acrylic. It works up beautifully, is machine washable and there are LOTS of colors to choose from.
The colorful yarn is the wonderful, self striping yarn named Mary Maxim “Prism”. It’s also a DK / #3 light weight yarn that is 100% acrylic. It works beautifully with the Mellowspun DK and comes in gorgeous colors to choose from. For this particular blanket, I used the color “Rainbow”.
To purchase a kit directly through Mary Maxim, please use my affiliate link HERE
If you prefer a printable pdf that includes a chart for the square, is written using US terminology, 14 point font for easier reading and a printable gift tag for gifting, you can purchase through Ravelry (or add to your favorites or que) or you can purchase through my Etsy store. To purchase a kit directly through Mary Maxim, please use my affiliate link HERE
Due to this being a digital download, no refunds will be given. Thank you!
To purchase a kit that contains the printed pattern and the yarn needed directly through Mary Maxim, please use my affiliate link HERE
Measures:
Blanket: 34.5” x 34.5” / 88 cm x 88 cm
Each square: 7.25” x 7.25” / 18.4 cm x 18.4 cm
Difficulty Level:
Intermediate
Gauge:
After completing round 4 of the square, piece should measure 2.5” / 6.35 cm – Gauge isn’t critical, but will affect size and yarn usage
Stitches & Abbreviations Used
(Pattern is written in US terms):
Beg: Beginning
BpDc: Back post double crochet
BpHdc: Back post half double crochet
BpSc: Back post single crochet
CC: Contrast color
Ch (s): Chain (s)
Dc: Double crochet
FpDc: Front post double crochet
Hdc: Half double crochet
MC: Main color
Rep: Repeat
Rep *: Repeat the stitches that follow the * symbol as many times as indicated
Sl st: Slip stitch
Sp (s): Space (s)
St (s): Stitch (es)
X: Times (ex: 2x = 2 times)
If you prefer a printable pdf that includes a chart for the square, is written using US terminology, 14 point font for easier reading and a printable gift tag for gifting, you can purchase through Ravelry (or add to your favorites or que) or you can purchase through my Etsy store. To purchase a kit directly through Mary Maxim, please use my affiliate link HERE
Due to this being a digital download, no refunds will be given. Thank you!
Directions for Patchwork Prism Baby Blanket:
Notes:
Square is worked in the round; do not turn work.
Do not cut yarn for each round, instead carry it up with your work
Each square uses approximately 12 – 14g of each color
When working the Dc 2 rows below and the FpDc stitches, extend the height of the Dc or FpDc to be consistent with the height of the surrounding stitches
Stitch counts at the end of each round do not include ch-2 spaces
For ease of joining, please block each square prior to doing the join
To view the tutorial on how to crochet the square for the Patchwork Prism Baby Blanket Free Crochet Pattern, please click on the video link directly above or visit my YouTube channel at: https://youtu.be/A0WCKSc6YZ8
Directions for Square – Make 16
Make Magic Ring
Round 1 – MC: Ch 4 (counts as 1 hdc and ch-2), *3 hdc, ch 2; rep * 2 more times, 2 hdc, join CC with sl st to third ch of beg ch-4 (Each side: 3 hdc, 1 ch-2 sp)
Round 2 – CC: Ch 3 (counts as sc, ch-2), work 1 more sc in corner ch-2 sp, *1 BpHdc around ea of next 3 sts, in ch-2 sp work (1 sc, ch 2, 1 sc); rep * 2 more times, 1 BpHdc around ea of next 3 sts, join MC with sl st to second ch of beg ch-3(Each side: 2 sc, 3 BpHdc)
Round 3 – MC: Ch 3 (counts as sc, ch-2), work 1 more sc in corner ch-2 sp, *1 BpHdc around ea of next 5 sts, in ch-2 sp work (1 sc, ch 2, 1 sc); rep * 2 more times, 1 BpHdc around ea of next 5 sts, join CC with sl st to second ch of beg ch-3 (Each side: 2 sc, 5 BpHdc)
Round 4 – CC: Ch 4 (counts as hdc & ch-2), work one more hdc in corner ch-sp, *1 BpDc around ea of next 7 sts, in ch-2 sp work (1 hdc, ch 2, 1 hdc); rep * 2 more times, 1 BpDc around ea of last 7 sts, join MC with sl st to third ch of beg ch-4 (Each side: 2 hdc, 7 BpDc)
Round 5 – MC: Ch 3 (counts as sc, ch-2), work 1 more sc in corner ch-2 sp, *1 sc in ea of next 4 sts, 1 dc in st 2 rows below, 1 sc in ea of next 4 sts, in ch-2 sp work (1 sc, ch 2, 1 sc); rep * 2 more times, 1 sc in ea of next 4 sts, 1 dc in st 2 rows below, 1 sc in ea of next 4 sts, join CC with sl st to second ch of beg ch-3 (Each side: 10 sc, 1 dc)
Round 6 – CC: Ch 3 (counts as sc, ch-2), work 1 more sc in corner ch-2 sp, *1 sc in ea of the next 11 sts, in corner sp work (1 sc, ch 2, 1 sc); rep * 2 more times, 1 sc in ea of the last 11 sts, join MC with sl st to second ch of beg ch-3 (Each side: 13 sc)
Round 7 – MC: Ch 3 (counts as sc, ch-2), work 1 more sc in corner ch-2 sp, *1 sc in ea of next 6 sts, 1 FpDc around dc made 2 rows below, 1 sc in ea of next 6 sts, in ch-2 sp work (1 sc, ch 2, 1 sc); rep * 2 more times, 1 sc in ea of next 6 sts, 1 FpDc around dc made 2 rows below, 1 sc in ea of next 6 sts, join CC with sl st to second ch of beg ch-3 (Each side: 14 sc, 1 FpDc)
Round 8 – CC: Ch 3 (counts as sc, ch-2), work 1 more sc in corner ch-2 sp, *1 BpHdc around ea of next 15 sts, in ch-2 sp work (1 sc, ch 2, 1 sc); rep * 2 more times, 1 BpHdc around ea of next 15 sts, join MC with sl st to second ch of beg ch-3 (Each side: 15 BpHdc, 2 sc)
Round 9 – MC: Ch 3 (counts as sc, ch-2), work 1 more sc in corner ch-2 sp, *1 sc in ea of next 4 sts, 1 dc in MC stitch 2 rows below, 1 sc in ea of next 3 sts, 1 FpDc around FpDc made 2 rows below, 1 sc in ea of next 3 sts, 1 dc in MC stitch 2 rows below, 1 sc in ea of next 4 sts, in ch-2 sp work (1 sc, ch 2, 1 sc); rep * 2 more times, 1 sc in ea of next 3 sts, 1 dc in MC stitch 2 rows below, 1 sc in ea of next 3 sts, 1 FpDc around FpDc made 2 rows below, 1 sc in ea of next 3 sts, 1 dc in MC stitch 2 rows below, 1 sc in ea of next 4 sts, join CC with sl st to second ch of beg ch-3 (Each side: 16 sc, 1 FpDc, 2 dc)
Round 10 – CC: Ch 3 (counts as sc, ch-2), work 1 more sc in corner ch-2 sp, *1 BpHdc around ea of next 19 sts, in ch-2 sp work (1 sc, ch 2, 1 sc); rep * 2 more times, 1 BpHdc around ea of next 19 sts, join MC with sl st to second ch of beg ch-3 (Each side: 19 BpHdc, 2 sc)
Round 11 – MC: Ch 3 (counts as sc, ch-2), work 1 more sc in corner ch-2 sp, *1 sc in ea of next 6 sts, 1 FpDc around post of dc 2 rows below, 1 sc in ea of next 3 sts, 1 FpDc around FpDc made 2 rows below, 1 sc in ea of next 3 sts, 1 FpDc around post of dc 2 rows below, 1 sc in ea of next 6 sts, in ch-2 sp work (1 sc, ch 2, 1 sc); rep * 2 more times, 1 sc in ea of next 6 sts, 1 FpDc around post of dc 2 rows below, 1 sc in ea of next 3 sts, 1 FpDc around FpDc made 2 rows below, 1 sc in ea of next 3 sts, 1 FpDc around post of dc 2 rows below, 1 sc in ea of next 6 sts, join CC with sl st to second ch of beg ch-3 (Each side: 20 sc, 3 FpDc)
Round 12 – CC: Ch 3 (counts as sc, ch-2), work 1 more sc in corner ch-2 sp, *1 BpHdc around ea of next 23 sts, in ch-2 sp work (1 sc, ch 2, 1 sc); rep * 2 more times, 1 BpHdc around ea of next 23 sts, join MC with sl st to second ch of beg ch-3 (Each side: 23 BpHdc, 2 sc)
Round 13 – MC: Ch 4 (counts as hdc & ch-2), work one more hdc in corner ch-sp, *1 BpDc around ea of next 25 sts across, work (1 hdc, ch 2, 1 hdc) in corner sp; rep * around ending with sl st in third ch of beg ch-4, fasten off (Each side: 25 BpDc, 2 hdc)
Joining the squares using the “Zigzag Slip Stitch Join” method
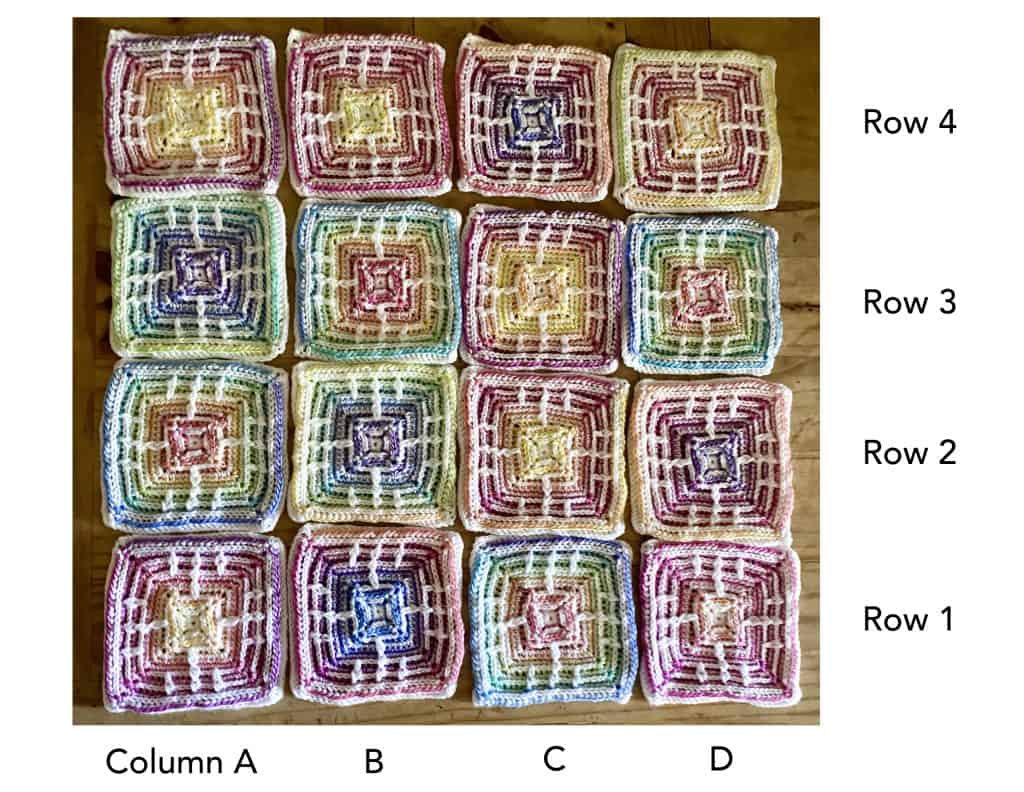
Before beginning the join, lay all squares out to determine placement of squares and take a picture to reference.
Lay out bottom row and next row (See picture below for visual reference).
1. Using removable stitch markers, mark the stitch that is after the first ch-2 sp and the stitch that is before the next ch-2 sp on each of the two squares sides that will be joined together (the ch-2 sp is easy to find, but the next st can be more difficult)
2. Using CC, make slip knot
3. Insert hook in bottom (closest to you) chain space in the right side square from front to back, then insert hook into the slip knot. Pull the hook through the ch-2 sp with slip knot
4. Insert hook in bottom (closest to you) chain space in the left side square from front to back
5. Work slip stitch
6. Insert hook in next st of right side square, work slip stitch
7. Insert hook in next st of left side square, work slip stitch
Continue repeating steps 6 – 7 until you come to the end of the row ending with the final slip stitches in the chain-2 spaces.
Joining the columns
Work the join for the columns the same as the rows, but when you come up to where the columns and rows intersect, work over the row join when slip stitching into the next block’s chain-2 space.
Border
Notes:
The border works with any stitch increment, so being off by a stitch or two isn’t critical
RS is always facing; do not turn your work
Directions for Patchwork Prism Border
Round 1 – MC: In any corner ch-2 sp, join with a sl st and ch 1 (ch 1 does not count as a stitch), in same ch-2 sp work (1 sc, ch 2, 1 sc), *work 116 sc across (29 sc for each block), then work (1 sc, ch 2, 1 sc) in corner ch-2 sp; rep * around ending with a sl st in top of first sc, fasten off (Each side: 118 sc)
Round 2 – CC: In any corner ch-2 sp, join with sl st and ch 4 (counts as hdc and ch-2), 1 more hdc in ch-2 sp, *1 BpDc around ea sc across, work (1 hdc, ch 2, 1 hdc) in corner ch-2 sp; rep * around ending with sl st in third ch of beg ch-4, fasten off (Each side: 118 BpDc, 2 hdc)
Round 3 – MC: In any corner ch-2 sp, join with sl st and ch 1 (does not count as a stitch), in same ch-2 sp work (1 sc, ch 2, 1 sc), *1 BpHdc around ea st across, work (1 sc, ch 2, 1 sc) in corner ch-2 sp; rep * around ending with sl st in beginning sc, fasten off (Each side: 120 BpHdc, 2 sc)
This free crochet pattern is copyright 2024 Handmade by Stacy J. Please do not duplicate or copy any portion of this pattern, as well as photographs. You are encouraged to share images of your final product and are allowed to sell final products; If you sell your final product, I just ask that you please purchase the ad-free pdf and credit Handmade by Stacy J as the designer. Thank you!
The Baby Steps Baby Blanket is quick, easy and fun to knit. The border frame is worked with the blanket as you make it. The frame around the body consists of a larger garter edge, then a smaller stockinette frame, then a small 2 stitch reverse stockinette frame that frames the body.
The stitches used are a combination of knit, purl, purl 3 together and yarn overs that create an interesting fabric. The needles are a little larger than the yarn band recommends, therefore giving the blanket a lovely drape. This blanket uses just under 4 skeins of yarn and works up fairly quickly, making it the perfect gift for the little one in your life.
It’s easy to adjust the size of the blanket, as the body is worked in stitch multiples of 14 over an 8 row repeat.
Disclosure: This post contains affiliate links. That means that I may receive compensation when you purchase through my links at no additional cost to you. Thank you for your support!
The Tiled Infinity Scarf is a beautiful, squishy knit infinity scarf pattern that has a great texture with an i-cord edge. With only knits and purls over an 8 – row repeat, this is an easy project to take with you or for social knitting. The Tiled Infinity Scarf is worked flat, then seamed when you finish the pattern, so you can adjust the length to your liking. To make the scarf wider or thinner, add or subtract the cast on stitches in increments of 6.
This pattern is an Easy project and has been tested – thank you to all my lovely testers!
Disclosure: The yarn for this project was provided to me by King Cole. I am a King Cole Brand Ambassador and this post is part of our ongoing collaboration. Thank you for your support!
The “No Purls About It” is the perfect project to take with you as you travel. It’s worked over a 4-row repeat and only uses knits (no purls!) and is reversible. The extra wraps of yarn during the knits on one of the rows offer a beautiful and simple lace design.
“No purls about it” uses only one hank of yarn and you can choose to work until you’re almost out of yarn or until you reach your desired length. This pattern is easily adaptable to be wider or more narrow simply by adding or subtracting in increments of six.
The yarn that I chose to use is Knit Picks “Muse” fingering weight yarn. You can use any fingering weight yarn that you like. However, I chose this specific yarn because it’s soft, not slippery and has a tiny bit of “stickiness” to it. The yarn rarely split and the color is tonal.
The “Muse” yarn offers pretty generous yardage, therefore allowing a nice, long scarf using only one hank of yarn.
This pattern is an Easy project and has been tested – thank you to all my lovely testers!
The Daddy O scarf was originally inspired by my stepfather. I was trying to think up a design as a holiday gift for him and this idea came to me. It’s a simple design with a little bit of flair – kind of like him!
Although I don’t call my stepfather “Dad”, his name, or “stepdad”, I do call him “Daddy O”. I have no idea where that name came from, it just seemed to fit him. So, here we have the Daddy O Scarf!
When I was getting pictures for this scarf, he had no idea that I had made it for him. He thought it was just one of my regular designs. But, boy, did he go crazy for it. I’ve never seen him so enthrawled with one of my designs! He kept saying how much he loved the design…the color…how it fit, etc… So, I know that this is the right gift for him.
This pattern is an intermediate project, but some of my testers also labeled it as easy.
This crochet pattern has been tested – thank you to all my lovely testers!
Disclosure: This pattern contains affiliate links. That means that I may receive compensation when you purchase through my links at no additional cost to you. Thank you for your support!
In this tutorial, I’m going to show you how to knit extended openwork stitches. These stitches are absolutely gorgeous with the lace a cabling effect. This stitch contains knitting (no purls here!) only and works over a four row repeat. This stitch is also reversible! Extended openwork stitches would be a great to use for a cowl, a scarf or as a fun accent to a sweater or cardigan
Disclosure: This post contains affiliate links. That means that I may receive compensation when you purchase through my links at no additional cost to you. I am a King Cole Brand Ambassador and this post is part of our ongoing collaboration. Thank you for your support!
The Boxed shell stitch is a very simple crochet stitch to learn. It has a blend of delicate lace, yet also has the added structure with a 5 double crochet cluster. The Boxed shell stitch works over a two-row repeat and only uses double crochet and chains, making it a very easy pattern to memorize. This would be a beautiful stitch to use for a scarf or as an accent for a pull over or wrap.
Disclosure: This post contains affiliate links. That means that I may receive compensation when you purchase through my links at no additional cost to you. I am a King Cole Brand Ambassador and this post is part of our ongoing collaboration. Thank you for your support!
The Diamond pattern is a beautiful knit stitch pattern. The stitch pattern creates an interesting texture of a diamonds using only knits and purls. The Diamond pattern provides a lovely fabric that would be beautiful for a dishcloth, scarf or a shawl! This stitch is worked in stitch multiples of 8 + 1 over a 10 row repeat.
Disclosure: This post contains affiliate links. That means that I may receive compensation when you purchase through my links at no additional cost to you. I am a King Cole Brand Ambassador and this post is part of our ongoing collaboration. Thank you for your support!